So, either I have to pivot to writing music without D above middle C, or I have to repair my Roland A-80 again. The D4 key stopped responding. After a miserable couple of days procrastinating, I opened her up and took a look.
I’ve written about disassembling the A-80 keybed before, and of course the first thing I did was open that post and refresh my memory. Quick recap for first-time readers:
The A-80 is HEAVY and most of that is in the keybed itself;
It uses a rubber dome with two contact switches to trigger a velocity-weighted note event from each key press.
One thing I was sure about: After last time, I wasn’t going to try and lift the entire keyboard off the table, and also I was going to need to have it in a state where I could monitor MIDI output whilst testing key presses.
I pulled the keyboard out and unplugged it, then tilted it onto its back edge (on a soft towel) and removed the necessary 15 screws from the underside.
Fig.1 – Those 15 screws (marked I) need to come out.
Right-side up, carefully lifted the lid. At this point I deviated from the previous process – I needed this to be in a playable state whilst examining the inner workings of the keybed. I unscrewed the 12 screws holding the keybed in position in the chassis (shown as II and III in the diagram above – III from inside the chassis, and II from underside. Then I lifted the keybed away from the lip of the chassis and raised it up on two metal blocks (about an inch high) on either side. This was sufficient to be able to remove the white keys whilst leaving all the connectors in place.
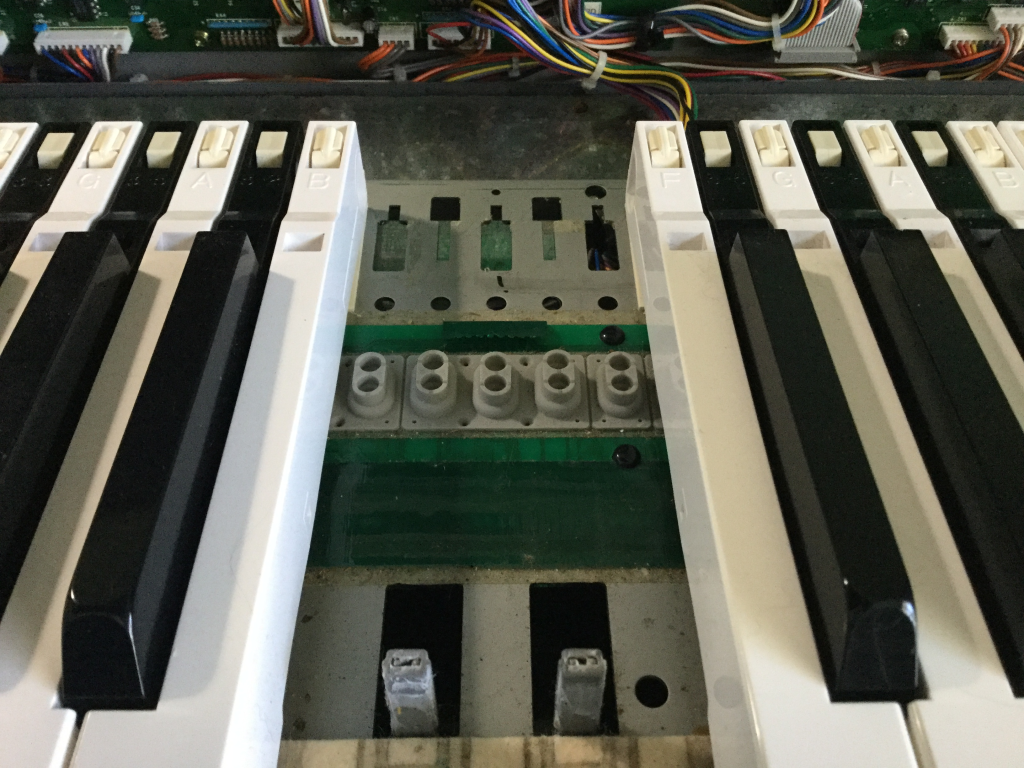
The key removal tool made quick work of removing the keys around the problematic “D”:
Fig.2 – C4 -> E4 removed, revealing the strip of rubber domes and a “!” mark
Not the sharpest knife in the draw, am I. When I saw that “!” in black sharpie on the base plate, I remembered from last time: D4 was the key in which I accidently damaged the rubber dome. I left it unrepaired last time, because it sat correctly, the invisible slit in the side of the dome didn’t appear to affect the key response. (And, indeed, it worked fine for 6 months.) Yet, here we are.
This was a great relief, to know that there was an actual root cause to the failure of D4, and not just something random breaking.
So, what to do? First, I tried repairing the slit (which was substantially larger than I remember) with superglue.
THIS WAS A BAD IDEA.
A) it doesn’t seem to bond the rubber dome together, and B) very great danger of getting glue on the conductive contacts under the dome or on the PCB. NEVER TRY THIS.
At this point, if I had no other recourse, I was prepared to re-purpose the rubber dome from the lowest or highest note, sacrificing it and yielding a functional 87-note keybed.
I had one more thing to try, however: Replacement rubber domes from www.bustedgear.com. I haven’t found any genuine article for the Roland A-80 in stock anywhere, but these replacement parts KCS10 are apparently good for the A-50 and they sure looked near-as-dammit identical. I’d ordered a couple of sets several months ago, on a hunch that I might need them in the future. THE FUTURE IS NOW
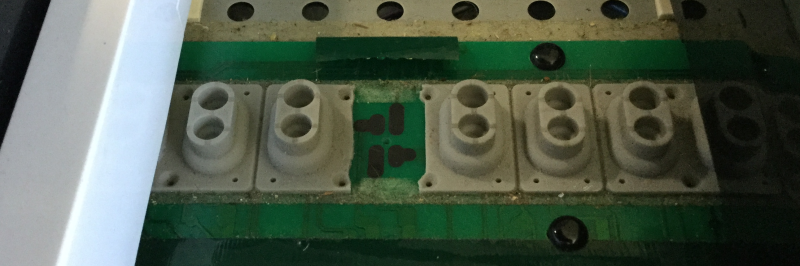
Using an exacto blade, I carefully removed the damaged D4 dome. The domes are installed as a strip, held in place by double-sided tape (true!) and the white key domes are subtly different from the black keys. Upon close examination of the replacement, I could see they weren’t an exact match with either black or white key dome, but I think they would be close enough. Anyway, the bad dome had to come out, even if I was to replace it with a dome from elsewhere in the keybed. It was worth trying these KCS10 domes, just to see.
Fig.3 – surgery complete
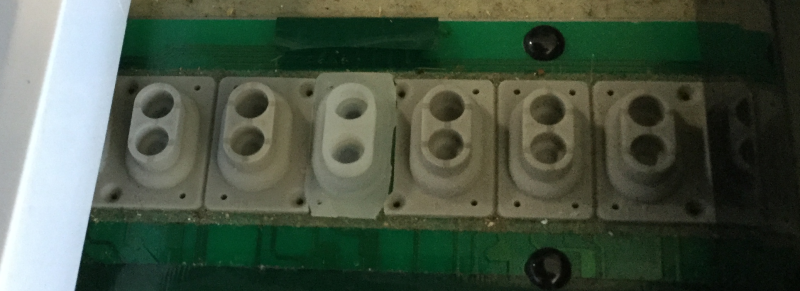
Trimming the replacement dome to fit was finicky but the exacto blade earned its name. The replacement dome is slightly lower (not easy to see from this angle):
Fig.4 – Transplant in place
I carefully installed the D4 making sure not to dislodge the new dome, just sitting in place with the slightly tacky and very dusty tape remaining on the PCB.
Connect mains power and MIDI out, open Cakewalk with an instance of Pianoteq responding to notes, and HOT DAMN if it didn’t JUST WORK. Perfect? Pretty close. It does seem to respond a little “hotter” in terms of velocity sensitivity, which makes sense if the new dome is slightly lower/closer to the PCB. But you know what? The velocity sensitivity across the whole keybed has some variation in it, and this is DEFINITELY playable. It’s not wrong; it’s just slightly different. Not really noticeable unless I listen carefully.
Let me be more clear: I can forsee a time when I a) experiment with replacing a Black key dome, and if that works okay, then b) replacing the whole 7+octaves. That would give the A-80 a usable and consistent velocity response.
Okay, um, let’s take the key out and try and attach that dome in place a little more firmly. I used two tiny pieces of fresh double-sided tape and I guess it made a slight difference. Probably not a great idea, if one of the strips comes loose, it could work its way up or down to cover the contacts under the dome, and then this key will stop responding again. At least I will know how to fix it.
Fig.5 – The Damaged Dome, with traces of the failed superglue fix
All keys back in place, keybed restored to original position, all screwed together, and hey we’re good for another take.
There’s more than one way to skin a cat, and other folks have talked about this before. The more, the merrier. Here’s how I constructed a project in Cakewalk to re-master a commercial CD.
The Problem
I have a commercial CD release from 1986 that sounds horrible for several reasons: it was the Age of Digital Reverb and there’s too much of it. Also: it was the Age of Digital Recording, and CDs were new, and when Treble wasn’t something you required analog psycho-trickery to extract from magnetic tape. It’s a very shrill mix. I am fond of the actual music, though.
It was “remastered” back in 2001 when the Loudness Wars were in full swing, and the results were… over-compressed and also shrill. What to do? I still have the original CD release from 1986, fortunately.
The Plan
Because this is a “re-master” and not a “master”, I’m going to treat all tracks the same way, using a common FX stack. I also want to be able easily to switch back and forth between “effected” and “un-effected” versions, for comparison purposes.
When evaluating quality changes of audio, it is important to match effective loudness between the two. This is because our ears think “louder” = “better”. And that’s a problem, because one of the things I will be doing is raising the overall level of the music. The original CD from 1986 is mastered at a fairly low average level.
So, the plan is to temporarily reduce the volume of the mastering effect chain during the tweaking so that the measured loudness is the same. This will require obtaining a loudness measurement from both signal paths.
The Process
I open a new empty project, and import the audio tracks from the CD. Cakewalk will create a separate audio track for each of the CD tracks.
Next, I create four stereo busses. The first is named SPLITTER, and I need to set all of the imported audio tracks to direct their output to this bus:
Press Ctrl-A to select all tracks. Then hold down the Ctrl key, and set the Output of one of the tracks to SPLITTER. All highlight tracks will set their Output the same way. (The Ctrl- key creates a “quick group” documented here.)
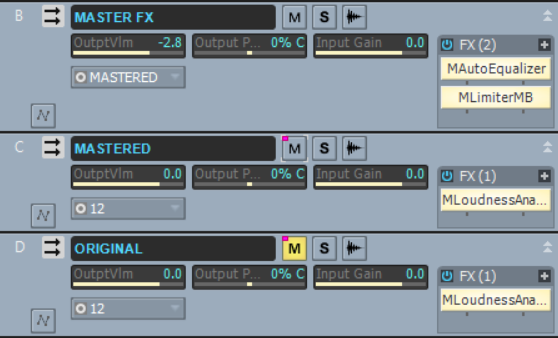
The other three buses are named MASTER FX, MASTERED, and ORIGINAL.
On the SPLITTER bus, I create two Sends: One to MASTER FX, and the other to ORIGINAL. (Both sends’ levels are left at the default of 0 db.) I set the Output of SPLITTER to “None”.
I set the Output of MASTER FX to the MASTERED bus.
Now I have two duplicate signal paths. Both MASTERED and ORIGINAL continue to direct their Output to the default, a hardware output (called “12” on my system).
The only drawback to this configuration is that Cakewalk will warn us upon opening the project, that SPLITTER is identified as a “Silent Bus”. I prefer the symmetry of the two Sends, rather than using SPLITTER’s own Output, so I pay the price of dismissing this warning dialog. (Feel free to adapt as necessary.)
The next step is obvious: we add some FX plug-ins to the MASTER FX FX Bin. My tools of choice are from MeldaProduction:
You probably have your own favorites. I’ll use these to apply a tilt to the frequency spectrum, taming the shrillness and up-ing the bass; and also some tasteful multi-band compression.
Speaking of LUFS… My Loudness Meter plugin of choice is – you guessed it – also from MeldaProduction: MLoudnessAnalyzer.
I put an instance of the Loudness meter in each of MASTERED and ORIGINAL, configured identically.
More detail: I configure the MASTERED instance for a “target” of -12 LUFS. I’ll use this as a reference as I mess around with the EQ and Multiband limiting, aiming to raise the overall level and apply a smidgeon of peak reduction (aiming for a still-conservative -12 LUFS). [0] I set the ORIGINAL instance identically so that I can match loudness-levels between the two, using the loudness metering.
Before we start playback, we need to set Exclusive Solo on (optional, but handy) so as to easily listen to one track at a time, switching between them with the Solo button:
And, just as important: Mute the ORIGINAL bus. Don’t forget to do this!
For convenience, I like to use a control group to link the Mute buttons of the MASTERED and ORIGINAL busses, letting me switch between them with one click:
Un-mute MASTERED
Mute ORIGINAL
Right-click on one of the Mute buttons and select Group > New…
Select a color for Group 1 (say)
Right-click on the other Mute button and select Group > Group 1
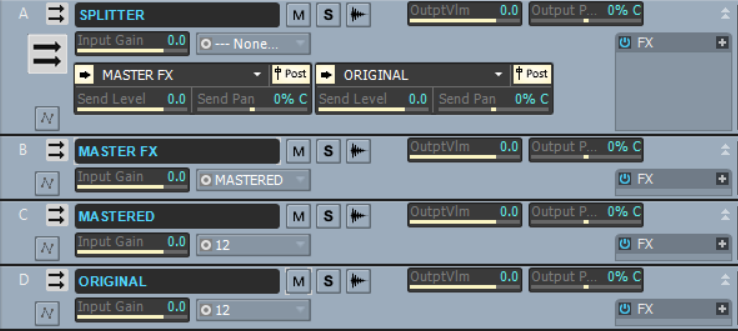
The final configuration looks like this:
You may notice the little colored dot on the Mute buttons, indicating they work together as a group.
Now I can take some time to fine-tune the mastering effect chain as described above. When I’m more-or-less happy with the results, I open both Loudness meters and watch the playback. I can see – as expected – that the MASTERED path is adding about +3 db of raw volume boost. Which is fine – but I also want to know if I’ve actually made the sound worse than the original. For that, I need to use my ears, and to remove the “louder-equals-better” bias, I need to reduce the level of the Mastered signal, so that the Loudness meters show the same values.
We do this using the OutptVlm control on the MASTER FX bus, reducing the volume to match. (See above, it’s temporarily set to -2.8 for the comparison review). [1]
Now I can start playback, and switch easily between the two signal paths by clicking on either of the two buses Mute buttons (they’ll swap in one click).
Yup – my version sounds better than the original.
Now, in order to export each track with the mastered fx in play, we need to ensure that we:
Switch to the MASTERED output;
Put the MASTER FX Output Volume control back to 0db;
Solo each track
Select the clip (to get the right timeline range) and Export to WAV or FLAC or whatever.
Happy Mastering!
[0] I’ve re-calibrated, I don’t think -12 is conservative. But it’s an okay choice in this case, I stand by that.
[1] Alternatively, we could instead increase the OutptVlm on the ORIGINAL bus to match the MASTERED level. This has some advantages in that we don’t need to make any changes before the final Export. On the other hand, it is usually a good rule of thumb to “cut, not boost” to avoid unexpected overloading, so I’ll let the instructions stand as-is.
It’s past time for an update on Studio activity for album#3, I think. I haven’t settled on a final name, yet, but the working title of the album is “Circles”.
As described in the last diary update, I had lyrics for five or so songs, and some melodic ideas. Lyric notebook in hand, I took a couple of long walks up the local hill to find some solitude away from the studio equipment and distractions, and tried singing the verses and choruses at various tempos and pitches, until I found something comfortable that “worked”. Then I recorded them into my iPhone voice memo recorder, for reference. In the process I re-wrote a lot of the lyrics to fit the “right” meter.
Back in the studio, I listened to the results and translated them into a simple piano arrangement with two or three tracks for chords, bass, and some melody. I find a Rhodes electric piano patch is best for this process.
(Okay, I realize as I review what I just wrote, that this is not particularly insightful. It’s not Rocket Science, and represents a typical songwriting process. I’m not special, I get that.)
For the last two months I’ve been working solely on one specific track, taking it from the linear “Idea Bucket” project and building it out to a full sixteen minute epic, with four or five movements. The piece is called “Annulus” and it is based on a 2017 trip we took with a friend to Oregon, to view the total solar eclipse.
At the risk of getting way too conceptual, the five movements map to the five phases of a total eclipse: First and Second contact; Totality; followed by Third and Fourth contact, as the Moon’s disc passes and overlaps the Sun.
The corresponding musical sections are: Departure I; Arrival; Aperture; Circles; and Departure II.
These sections were all sketched out and re-arranged in the form of pure MIDI tracks of bass, piano, and percussion. Using MIDI instead of trying to record audio allowed me to play around with tempo and arrangements, and even some transposition, as I prepared to record the vocals.
Happy with the arrangement, tempo, and pitch, I recorded all the vocals, lead and harmony. Done!
(This is so different to how I used to create. I would spend hours and hours on the music before ever getting near the microphone to record vocals, only to discover that much of what I’d done had to be removed, or replaced, or rearranged to make space for the vocal lines. I’m going to try and avoid that way of working, in the future.)
To be honest, prior to recording the vocals, I had spent a lot of time with various piano patches and a LOT of reverb, working on some of the instrumental sections.
With the vocals done, I practiced and recorded fretless bass and chapman stick. Then, having built up both a familiarity with the music and also some callouses on my fingers, I wiped what I’d recorded and re-recorded the bass parts, better.
Next, drums. I find that bass followed by drums is best, because I’m much more likely to develop an interesting rhythm part as the bass part is refined, and then if I’ve already invested time in the drum tracks, I have to go back and re-do. So, bass comes first.
And now we’re caught up, because I “finished” the drum tracks this weekend. I solo’d the Bass and Drum buses and it all sounds pretty locked up.
I have a tendency to overplay (really?!?!) and so I know there will still be some refinement required, mostly removing unnecessary rhythm parts. But it’s a good place to stop for now.
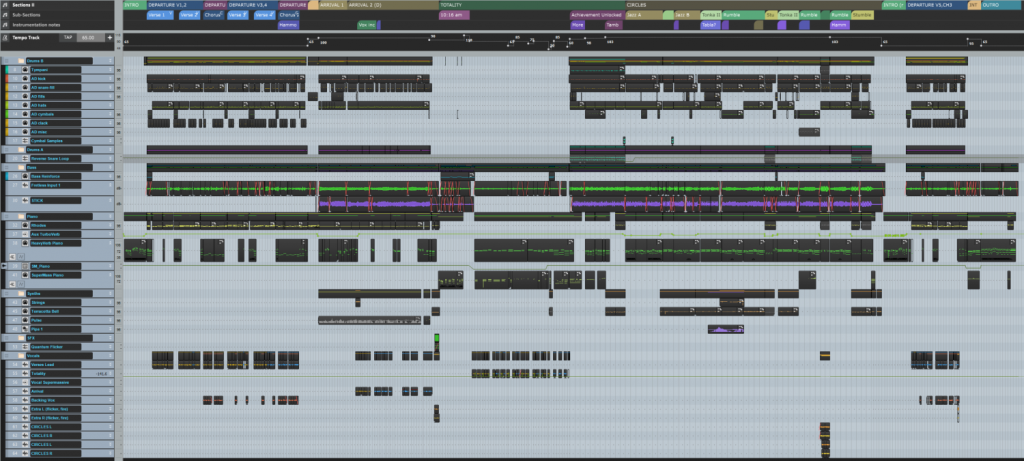
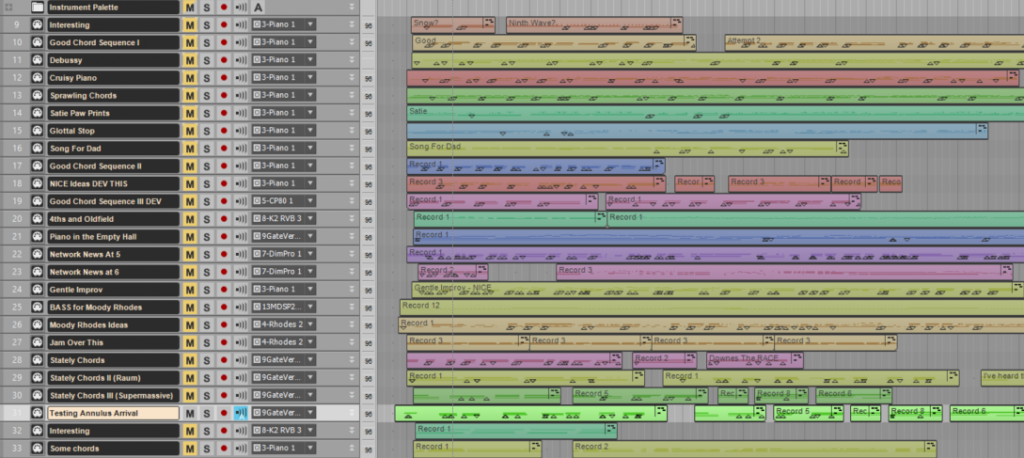
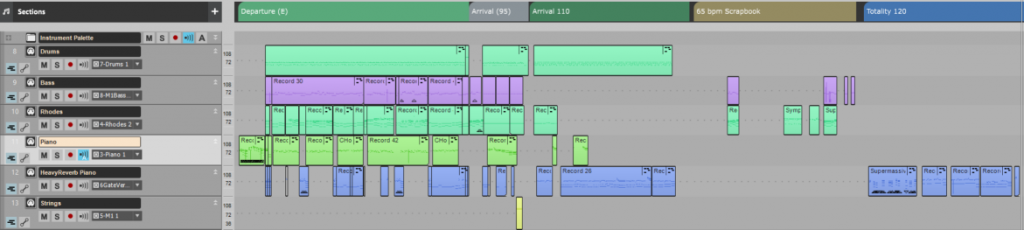
Just for fun I took the Cakewalk project and shrunk it down to show the full extent of the project in full-screen:
The 64-track project in Cakewalk, with non-content tracks hidden
There’s no guitars, and not much in the way of synths or other fairy-dust adornments. Just Vocals, Bass, Drums, and half-finished Piano tracks.
Next Steps:
I’m thinking seriously about breaking up that 16 minute monolith into separate projects, for safety and simplicity and speed. I’m not sure where the breaks go – there are short instrumental bridges between each of the major slabs of composition and so I’d have to allocate them appropriately. Some thought required.
I think I’ll move on to recording guitars. Some of music currently realized as piano notes will have to come out to make room. There are some parts I hear as “hammond organ” in my head, so that’s coming up at some point. And definitely some more synth-y fairy dust.
Drum Maps go back a long way. I’m certain that the feature was added to Cakewalk very early on back in the MIDI-only sequencer days before it became “Cakewalk Pro Audio”, back in 1995. This long-established feature hasn’t seen much attention from the developers in recent decades because it is stable and does the job. But what job is that, exactly? And why are new users often confused about them?
Where people get confused
At first glance, Drum Maps appear to be the way to set up Cakewalk’s Piano Roll View (PRV) so that, when you edit a MIDI track, you can see the names of each instrument or kit piece (“Tom1”, “Tom2”, “Snare”, “Wood Block”, etc.) in your drum instrument, whether it be a dedicated drum brain, SFZ sample library, or a “drum kit” patch in your rack synthesizer.
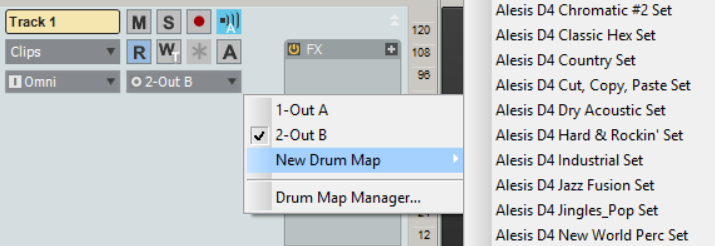
And to be fair, yes, that is true: Drum Maps are used to display kit piece names in the PRV (more on that later). Also, Cakewalk provides many pre-baked drum map presets for common percussion modules, which definitely reinforces this impression.
Fig.1 And many, many, more! Keep reading for more about “presets”
But drum mapping is much more powerful than just “show names for drum kit pieces in the PRV”, and Cakewalk doesn’t try to hide it. That’s probably where a lot of the confusion comes from. This tutorial/article aims at explaining Drum Maps, hopefully to reduce that confusion.
Thank you for subscribing to Map Facts!
A drum map is a virtual MIDI instrument that we define inside our Cakewalk project. It might help to think of them more generically as a “MIDI Map”. A map provides a way to translate incoming MIDI notes to alternative destinations. For any specific input note number, we can:
change the output MIDI note number;
change the output MIDI channel;
change the output port to any existing port in the project: Hardware or VSTi;
assign a name text;
apply a velocity offset (make it louder or softer by an amount);
apply velocity scaling (make it louder or softer by a percentage)
We don’t have to create a mapping for every one of the 128 possible notes – just the ones we are interested in. (Keep reading to learn about what happens to un-mapped notes.)
Once we have created our mapping, it becomes available as a possible MIDI output port for any MIDI track in our project.
Example use cases:
a 1:1 map that does nothing except reduce the velocity values by 50%;
a map that forces each note to the nearest note in the Pentatonic scale;
a map that assigns notes generated by your favorite drum controller (e.g. Roland SPD30, or Alesis kit, etc.) to trigger your favorite percussion VST instrument;
a map that splits the controller keyboard across two or more different instruments, e.g. Bass in the lower notes, Strings in the higher notes, samples on the top octave.
a map that combines several output ports into a single virtual instrument (e.g. Toms from AD2, snare from SI-Drums, etc.)
many others, I’m sure!
Key take-away: Because mapping takes note events from any single MIDI In portt and translates them to one or more MIDI Out Ports as defined in a project, the drum maps belong to the project and do not exist as separate files.
The Drum Map Manager
It’s an older code, sir, but it checks out.
Admiral Piett
The Drum Map Manager is located under Edit > Preferences > MIDI > Drum Map Manager, for historical reasons. It is only available with a current open project. This is definitely a source of confusion because you’d think the Preferences dialog is normally for general settings that apply across all projects. And yet, you can look under Edit > Preferences > MIDI with no project open, and you won’t find it.
The user interface is a little primitive – remember, this venerable code base dates back to the early ’90’s – but it is functional, given everything it has to do.
It shows all maps currently defined in the project (there can be more than one!), and allows you to edit the assignment settings for each note contained in each map. By default, a brand new empty project will have no drum maps, and the manager will be empty.
Please bear with me, as we work through creating a map from first principles.
Creating a new empty drum map, and editing it
As way of preparing for this tutorial, I’ve just created a new project, and added a couple of percussion VST instruments: Cakewalk’s SessionDrummer, and OrganicDrumLoop‘s OCK.
Now we bring up the Drum Map Manager. Clicking on the “New” button will create a map called “DM1-“, with no entries in it.
ASIDE: It would be nice to be able to give the map a more helpful name, wouldn’t it? Unfortunately, we can’t just simply assign one at this point. We’re stuck with “DM1-“. More on this later.
We start creating mappings for each MIDI note number by adding a new row to the map with the “New” button:
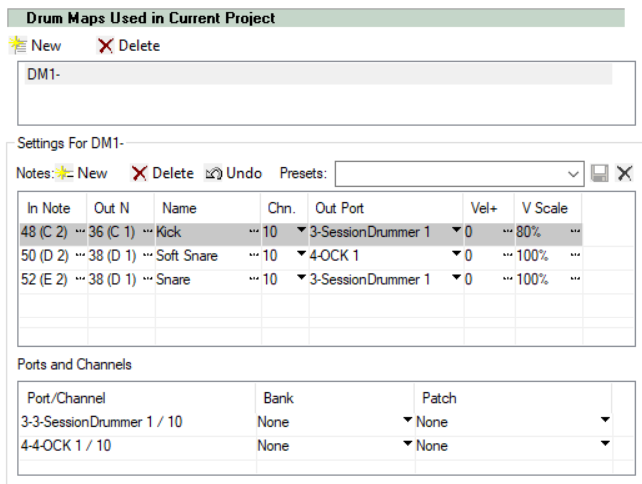
Fig 2. Creating a drum map from scratch
In this example, I want to build a virtual percussion instrument using sounds from both SessionDrummer and OCK. I’ve created three mappings, so that C2, D2, and E2 will trigger a kick and two snares respectively, with the “Soft Snare” coming from the OCK instead of SessionDrummer.
At this point the map exists as a definition in the project, and we can start using it.
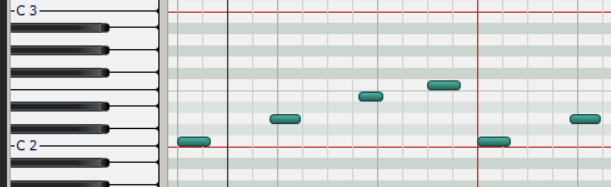
I’ve created a MIDI track (Track 3) containing a clip with note events for C2,D,E, and F2 and we can see them in the PRV:
Fig 3. Note events in the Note Pane: C2, D2, E2, etc…
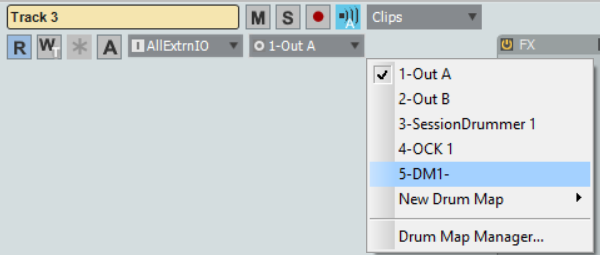
That’s with the Track 3 pointing at the default output port, which on my system is “1-Out A” – my USB MIDI interface (Midisport 2×2). Now let’s change this to be the new Drum Map, “DM1-“, which shows up in the list of available Out ports for the track, along with the two VSTi’s:
Fig 4. Assigning the track’s out port to the new Drum Map
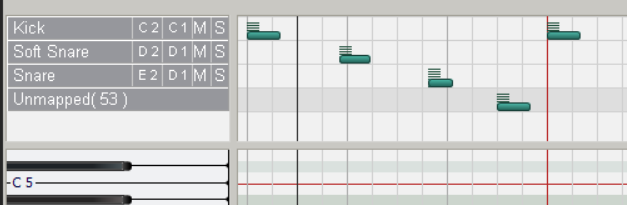
Now, having made that assignment, when we open or refresh the PRV, and select Track 3, we see the Drum Grid pane has become visible above the Note pane:
Fig 5. Mapped track shows in the Drum Grid
(Actually it was always there, just empty and minimized out of sight above the Note pane.)
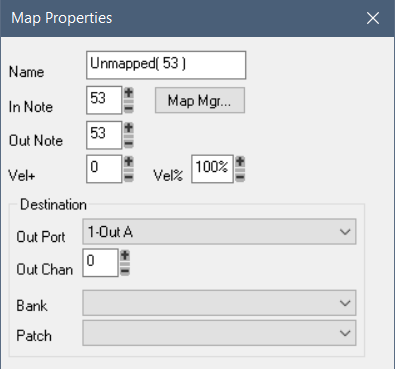
All the notes in Track 3 are now shown in the Drum Grid, and not the Note Pane. I deliberately included an un-mapped note (F2) so that we could see what would happen. Cakewalk includes the un-mapped notes at the bottom of the Grid Pane, clearly marked as “unmapped”. They won’t trigger any sounds because they haven’t been assigned to any Output. We are free to delete the notes; left them as inaudible visual cues; or add them to the map, as appropriate.
Double-clicking on the unmapped note row will bring up a property dialog that allows us to enter the necessary mapping information for that note:
Observations on PRV Editing with Drum Maps:
Notes in Tracks assigned to Drum Maps only display in the Drum Grid Pane.
Although multiple MIDI tracks can be edited at the same time in the PRV, Notes in Tracks using a Drum Map are only shown when the Track is the selected Track. (I’ve posted about this on the Cakewalk forum.)
Only one Track can be displayed in the Drum Grid Pane at any one time.
Correction: Only one Drum Map can be displayed in the Drum Grid Pane at any one time, but it will include note events from all Tracks assigned to that map.
Because of these side-effects, it can be frustrating working with multiple MIDI tracks where some are Mapped and other are not; or tracks directed to two or more drum maps.
Did someone mention presets?
Although setting up a drum map from scratch can be tedious, there are short-cuts.
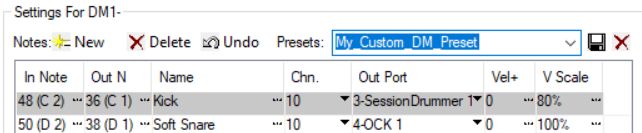
You can save an existing drum map in a project as a “preset” so that you can quickly restore it. Let’s do that now: open the Map Manager and type in a name for the preset, and then press the Save button:
Fig 6. Saving a map as a new preset
Two things happen:
the Drum Map in the project is renamed;
A .map preset file is created on disk.
The first thing is a bit of misdirection on Cakewalk’s part. There is no link between the drum map in the project and the preset file created on disk, yet now the drum map in the project has a name that is the same as the preset (in my case it is now “DM1-My_Custom_DM_Preset”).
If you later create a preset from a different drum map, with the same name, you will overwrite the existing preset file. However, the original drum map is not altered or changed in any way (nor would you want it to be!).
And it would seem that the only way to give the drum map in the project a meaningful name is to create a saved preset, with the desired name!
By default, these preset files (.map extension) are stored in the following directory, as per Edit > Preferences > File Locations:
%APPDATA%/Cakewalk/Cakewalk Core/Drum Maps
TIP: Out-of-the-box, Cakewalk provides a metric tonne of drum map presets available to use as a template when creating a new drum map. In order to retain your sanity, I recommend that you copy the specific files you actually use to a different directory, and change the folder location to match. Then you’ll see a much reduced list to choose from.
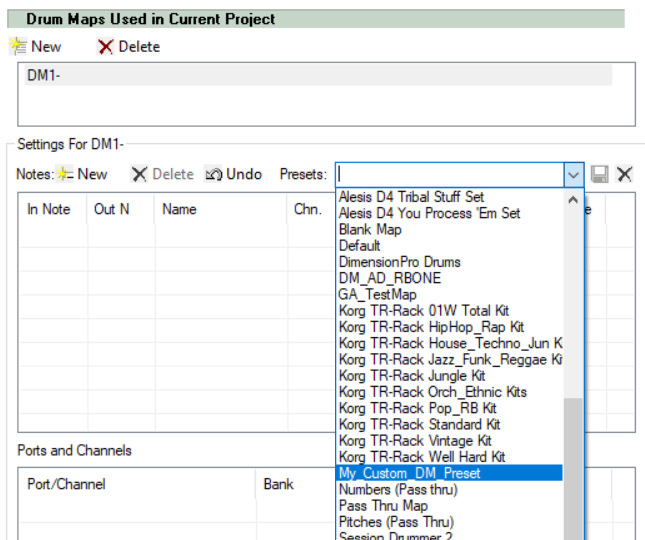
Okay, let’s create a new project and make use of this preset that we just created!
There’s two ways to do this. First, you can go into the Drum Map Manager, create a new empty drum map (“DM1-“), and then drop down the list of presets and select the entry:
Fig 7. Initializing a new drum map from a preset
Alternatively, use the Output selector on the Track (See Fig.4) and select “New Drum Map” and pick one from the list (which, according to my advice above, you have reduced to a manageable size, right?)
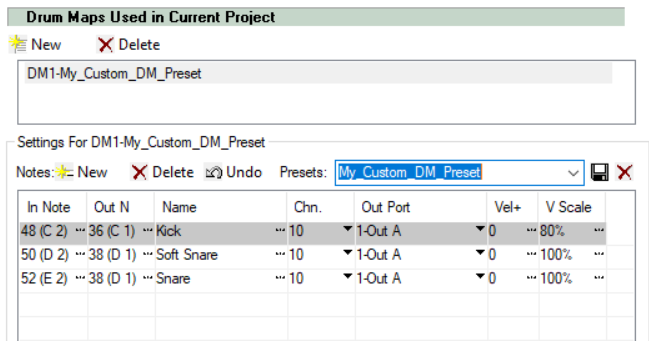
Having done this, you should notice something immediately:
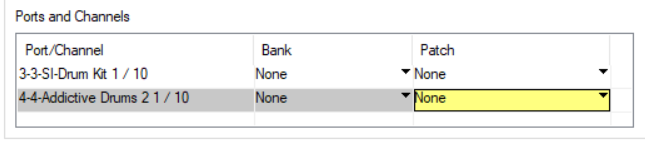
Fig 8. The out ports aren’t set as we expect
The mappings have been initialized from the preset, but the Out ports are not set. They’ve reverted to the default. Why? It’s a new empty project! We don’t have any VSTs loaded yet; and in fact, we might even have a different default MIDI i/o hardware configuration (i.e. I could have removed the USB MIDI interface and switched to the MIDI I/O on my Focusrite 6i6). So it makes sense that the Out Ports are not included in the preset. Right? Wrong:
Or maybe there’s something else going on
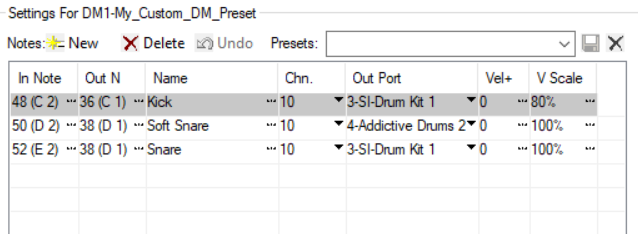
Let’s try something different: Once again, create a new empty project, and this time, add an instance of Cakewalk’s Studio Instruments “SI Drum Kit” and then an instance of Addictive Drums.
Now repeat the process: add a MIDI track; and assign the output to a New Drum Map, using the same preset we used above:
Fig 9. Ports are restored in enumerated order
Interesting! The Out Ports are being retained and retrieved from the preset, kinda, except they are assigned using an enumerated value (or index number), matching the order the VSTs were loaded into the project. (That’s the 3, 4.)
So now we have the Kick and Snare going to the SI Drum Kit, and the “soft snare” going to Addictive Drums. So clearly there’s some clean-up we’re going to need to do, in addition to loading the correct presets in each of the associated VSTs (or, indeed, external percussion synth modules if that is what you’re using).
Warning: This bears repeating: When you remove a VST from a project, its virtual MIDI IN port is also removed, and the index of any remaining VSTs in the project may be changed, depending on the order in which they were loaded in the project. Drum Maps assign their MIDI out port assignments by index rather than by name. This means that a drum map may end up with its out port assignments changing underneath it, after that VST is removed, even if the VST was unrelated to those used by the drum map.
How to quickly change the out port on all rows in a Drum Map:
Hold down Ctrl+Shift keys while changing one of the rows – you’ll see all rows assigned to the same Out Port change to the new value. Nice!
Exercise for the Student: Did you look further down the Drum Map Manager? Perhaps patches are also saved with the drum map preset, if we wanted them to? Might be worth exploring, if that is something you’re interested in:
Fig 10. Can a patch be restored with the preset? Experiment!
How to quickly create a Drum Map from an existing MIDI track
There is a handy way to create a new drum map for an existing track, such that it only contains mappings for the note events in the track:
Select the source track with MIDI note data in it
Assign the Output to New Drum Map > Blank Map
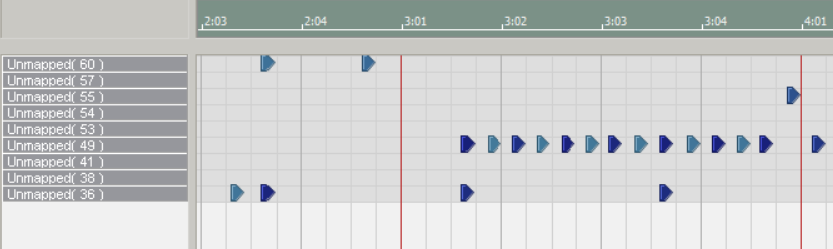
In the PRV/Grid pane, you’ll see:
Fig 11. An alternative way to create a drum map from scratch
You can now enter the mapping properties for each unmapped row.
A final tip
You may notice in Fig 5. above that each mapped row can be MUTE or SOLO independently. One interesting use case presents itself: Imagine a drum kit map, and now select a kit piece to use for a click track (say, “Sticks” or similar). Now map an additional MIDI note to trigger that sound. You can use this additional note as a click or reference beat, and then MUTE it when you don’t need it, leaving all the normal “performance” notes untouched.
Finally, for real
I hope that helps clear up some of the intricacies and subtleties about MIDI Maps – I mean, Drum Maps – in Cakewalk.
After completing the WestPac Bolero, I decided to produce a cover version of Simple Minds’ “New Gold Dream”, originally released in 1983. I’ve always wanted to do this, and the recent state of the world inspired me to update it for the ’20s. I temporarily uploaded my version to SoundCloud earlier this month – since removed – but now I’ve released it on BandCamp:
I could write a whole blog post about the trick needed to get the OBXa strings slap-back to sound right. (Shorter version: the 4th triplet delay on the synth is not synchronized to the BPM of the song – it’s slightly slower, 114 bpm instead of 123.)
I wasn’t originally planning to include it in Album #3, but it might end up as a bonus track or something, because I am quite proud of it. One thing I did was to make sure that I pitched the backing tracks to my voice before attempting to sing it, and somewhat to my amazement, I was able to lay down all the vocal tracks in two short sessions. Clearly there’s a “pro tip” in here somewhere.
But that’s enough about old music…
I’ve mentioned before about how this next album is going to be a blank slate, with nothing pulled out of the archives and re-worked, and as of now, this is still more-or-less true.
For the songs on Steel Tree and the Inevitable sequel, the music has typically always come first. A lot of work then went into refactoring the existing music to accommodate the lyrics, applied retroactively. Hopefully that effort paid off, and the results weren’t too awkward.
In the case of Album #3, however, almost the opposite is true: I have lyrics for five songs, and although I hear proto-melodies and harmonic changes in my head, I didn’t have any music committed to a project that directly corresponded to these five compositions. So where does the music come from?
Shortly after I acquired the Novation PEAK synthesizer, I started creating custom patch after patch. Pretty soon I realized I needed somewhere to store musical ideas that developed as I played around with each sound. So I created a Cakewalk project called PEAK_Patch_Demos, with a separate MIDI track for each patch slot, with musical phrases and text notes. Some of these ideas show promise.
In the past, when I’ve experimented with a new piece of software (VST instrument or effect) I’ve create a project to host the plug-in, and save any musical ideas that developed as I experimented. Some of these are pretty interesting.
For some time, I’ve also had a single project containing piano improvisations, where each track is its own little melodic idea, collated and built up over time. I expanded on this and started trawling through the other projects to bring all the ideas into one big “idea bucket” project.
Each idea has its own track, and a choice of instruments to play back on – either strings or a type of piano. Only one track is un-muted at any one time – the tracks are not related to each other.
The Idea_Bucket project made a great starting point for identifying similar ideas that might work together in a single composition.
The next step is to create a second type of “idea bucket”, this one for linear composition: I have instrument tracks set up, with drums, bass, piano, rhodes, and strings. My drum instrument is comprised of just a Cajon and Hi-Hat, in order to limit distractions: I can create a simple beat, but not get carried away with elaborate percussion fills before basic arrangement things like key and time signatures are decided on. This stage is all about finding the right vocal melody, pitch, and correct meter and tempo, using only just enough instrumentation to establish the feel.
At this point it’s a bit of a dance: The lyrics have to come together with rhythm and melody – there’s some give-and-take there. I have to practice singing the melody against the music – and now the tempo and pitch might have to be adjusted to suit my voice. Choices such as, do I sing that an octave higher? In which case I have to transpose that section down a fifth for comfort. Now I have a problem getting section B to follow section A… etc.
And at the back of my mind, I have this fear that I’m actually ripping off some other artist subconsciously, and if so, will it be too blatant? I’m pretty sure this is all normal creative angst. When it gets too intense, it’s time to go out on the bike with the mp3 player on shuffle and listen to some different artists.
I can not remember when I acquired the Roland A-880 MIDI Patch Bay. It certainly wasn’t the first piece of kit I ever bought – that honor goes to a second-hand Roland Jupiter 6 back in 1988. It had some DIN ports – In and Out – on the back for something called MIDI. It was soon followed by an Akai sampling keyboard and synthesizer rack module, which worked very well together when connected with MIDI cables. Also, you could send notes from the Jupiter to the Akai devices over MIDI, so long as you set the rack to listen on MIDI Channel 1 or 2. Shortly after that, we found a Roland MIDI Interface (MPU-401?) for our PC, and started recording MIDI sequences into a copy of Passport Software’s Master Tracks Pro.
Recap: MIDI in a nutshell
So far, so good. We had PC software that allowed us to perform patch librarian tasks using MIDI (called System Exclusive or SYSEX) on many of the devices but it requires bi-directional data transfer between the sound module and the computer, and signals in a single MIDI cable only go one way: You need two cables connecting the In and Out ports. From the computer OUT to the module IN; and also from the module OUT to the computer IN. The computer requests data; the module sends it; the computer sends more data.
MIDI messages are assigned a “channel” between 1 and 16. So if you connect a MIDI cable between two devices, a device listening on channel 1 won’t respond to any messages assigned to channels 2-16. More information here.
This allows more than one device in a MIDI chain. In fact, later keyboards and modules included a third port, a MIDI THRU that would re-transmit incoming MIDI signals to the next device in a chain, allowing layering and multi-timbral setups. Some manufacturers combined the THRU and OUT connectors.
I realize as I write this that it all sounds archaic these days, when we have digital bi-directional comms over a single USB connector, let alone Ethernet and WiFi. But back in the 1990’s, it was like magic, and no-one complained that they needed two cables for this type of two-way communication.
The problem is that the more devices you have, the more un-plugging and re-plugging of MIDI cables is required to manage all the equipment. Some sort of automated patch bay becomes almost required. Enter the Roland A-880 MIDI Patch Bay.
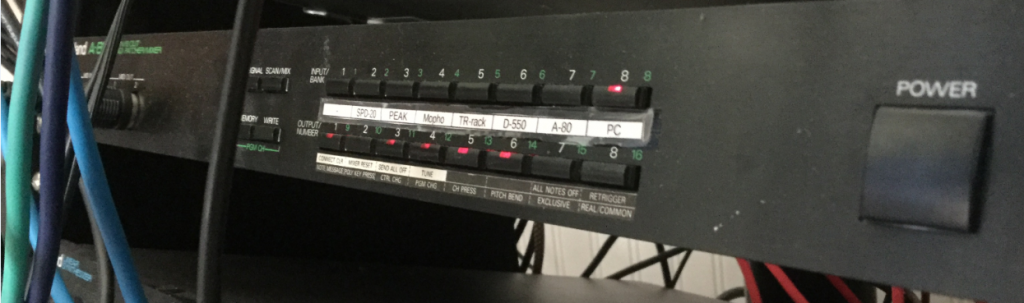
Fig 2. Front panel controls of the Roland A-880
The A-880 is basically a box with 8 inputs; 8 outputs; and it will connect these together any way you like. You can use it ad-hoc by selecting an input (from the top row of eight buttons) and then selecting which of the eight outputs (from the bottom row of buttons) the MIDI messages are echoed on. If you find yourself using the same set of connections over and over, you can save it in one of the 64 possible memory locations for easy recall.
The Studio Equipment
For the purposes of this article I’m using the following devices:
Windows 10 computer running the Cakewalk by Bandlab DAW
MIDISport 2×2 USB MIDI interface (ports A and B)
Roland A-80 Keyboard controller
Roland SPD-20 Drum Pad controller
Novation PEAK synthesizer desktop module
Korg M1 Synthesizer keyboard
Korg TR-Rack synthesizer rack module
Roland D-550 synthesizer rack module
All these devices have MIDI In and Out ports for sending and receiving MIDI messages such as notes, clock, and system-exclusive (data dumps and patch edits). I’ve already decided which MIDI channels each device is going to use.
Aside: Cakewalk and MIDI Echo
Cakewalk – and presumably other DAWs – has the ability to mimic the behavior of a THRU port, and echoing the incoming MIDI data from input to output. It records the performance into the active track, but also optionally echoes the notes through the computer’s MIDI output port. This lets me play the Roland A-80 whilst hearing the sound from, say, the Roland D-550.
Use Case 1 – Playback of a previously recorded MIDI project from the DAW
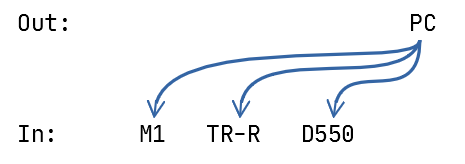
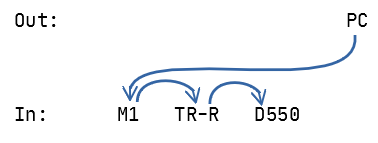
It’s an old project from back before we had the ability to record Audio tracks in our computer. It has three tracks and I need to send the MIDI out to the Korg M1; the Roland D-550; and the third track was drums and there’s a nice standard kit on the TR-Rack that will do nicely. So I need to connect the MIDI OUT from the computer to the MIDI In on those three modules:
Unfortunately, that arrangement can’t be done as-is because the MIDI cables are point-to-point: one Out port has to go to one In port. Instead, we have to daisy-chain them using the MIDI THRU ports on each unit:
That works – providing you have the THRU ports available.
One down-side of this is latency, in that if your chain has too many hops, then the instrument at the end of the chain can take a noticeable time to respond after you press a note. Also, there’s a potential for signal degradation. If you limit yourself to 2-3 devices in a chain, it’s not a problem, and it works.
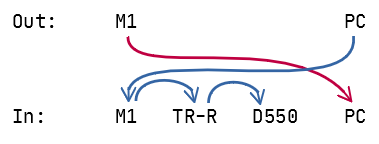
Use Case 2 – Recording a performance into a new MIDI track
Now I want to record a MIDI performance on the M1 keyboard into a new track in the project in the computer software. So I need to connect the M1 Out to the computer’s In:
Hang on, the M1 keyboard is great for some types of playing styles, but after some practice runs, I think I really want to use the weighted, 88-keys of my Roland A-80. Just a sec, I need to re-connect:
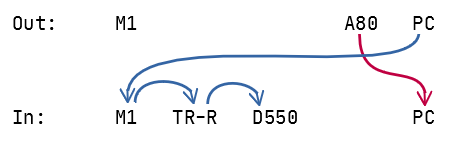
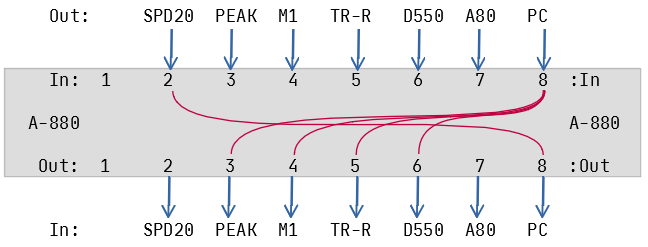
Okay, enough! I’m sure you get the idea. Let’s move all these connections into the Roland A-880. One advantage is that now, we can feed multiple In ports from a single Out port, reducing the latency and signal degradation (which in practice isn’t a problem, but hey, it’s all good):
Bank/Patch 1:7 with A-80 as controller
Making virtual connections between the ports is easy once you know how: Press a button on the top row, followed by one or more buttons on the bottom row. Then press Scan/Mix or Signal to complete the configuration. So to set it up as shown above:
Press In-8
Press Out-4, Out-5, Out-6
Press In-7
Press Out-8
Now I can send my performance on the A-80 to the Cakewalk DAW running on my computer; and in turn, Cakewalk sends the MIDI notes from the existing tracks out to my sound modules.
If I decide I’d like to record the next track on the Korg M1, I can merely switch from the A-80 by:
Press In-4
Press Out-8 (this “disconnects” the previous connection from In-7)
Now the M1 is the “controller”.
Connecting the rest of the gear
Now we go into the closet and pull out ALL the MIDI cables, and connect all the devices:
Ports 1 and 2 are accessible from the front panel of the A-880, so I tend to reserve these for “temporary” connections (although, my SPD-20 drum pad controller has been out of the closet and connected up for about a year now). Port 1 is handy when I want to integrate my iPad into the studio, or back up patches on the Line6 POD.
Now, it is so easy to lay down a new drum track using the SPD-20 as the controller:
Bank/Patch 1:2 with SPD-20 as controller
Other features
MIDI Clock is a “pulse” or timing reference transmitted along with other data that can be used to synchronize devices. The A-880 will respect the MIDI Clock on the port nominated as “Control In”. You can set which port (1-8) is the “control” by holding down the corresponding input button during power-on. I use Port 8 as the Control In because the PC/DAW is my timing master.
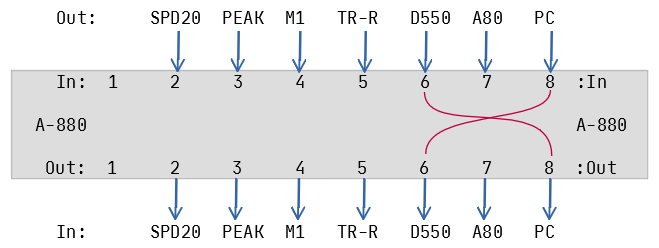
Use Case 3 – D-550 Editor/Librarian operation
I can use SoundQuest‘s MIDI Quest software to download, edit, and upload patches to the Roland D-550, and this requires that we connect both In and Out to the computer:
Bank/Patch 8:6 for SyEx/Dump from the D-550
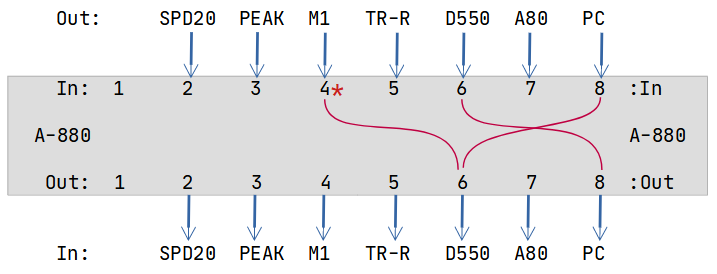
This works well – I can request a dump from inside MIDI Quest, and edit the patches, but what if I want to try out a few riffs from my handy keyboard controller? I want to be able to both edit the D-550 patches from the Computer (PC on Port 8) and also play notes on, say, the Korg M1 keyboard (Port 4), and have the D-550 respond.
Normally, MIDI does not allow multiple IN ports to direct to a common OUT port.
This is where the A-880’s Mixing function comes in: Any additional input port can be mixed with the control port. By design, Port 8 is my control port and also used by the DAW/PC. So we can add the M1 keyboard into the configuration using these steps:
Hold down the Scan/Mix button;
Press In-4 (the Korg M1);
Press Out-6 (the Roland D-550);
Release the Scan/Mix button.
That might seem odd but when you see the configuration graphically, hopefully it will make sense:
Mixing in signals from the M1 to audition sounds on the D-550
You can tell that Port 4 is “mixed” because the LED will flash during the scan cycle.
Memory Management
We have 64 memory locations available in 8 banks of 8 patches. I can’t imagine needing all of them. I divide mine into two categories: Bank 1 is “Controller select”, and Bank 8 is “SysEx Operation”. To make it easy to remember, I use the patch number to indicate the “subject” of the configuration:
1:2 SPD-20 is controller (on port 2)
1:4 Korg M1 is controller (on port 4)
1:7 Roland A-80 is controller (on port 7)
8:2 SysEx/Dump for SPD-20 (on port 2)
8:4 SysEx/Dump for Korg M1 (on port 4)
etc
You can change programs on the A-880 by sending it patch change messages on the Control In port, using the Control MIDI Channel. You set this channel by pressing Memory + Write , then one of the 16 input/output buttons. For example, to set a control channel of 12:
Press MEMORY + WRITE (don’t hold)
Press OUTPUT 4
Press SCAN/MIX or SIGNAL to complete.
Final thoughts
The A-880 has remained the heart of my studio since arriving back in the early 1990’s. Keyboards come and go (a moment of silence for the Jupiter 6, alas) but the A-880 remains at the hub, probably the most reliable piece of gear I’ve ever owned.
Melodic progressive rock songs and instrumental interludes, a touch of 70’s influence but a product of the dystopian Now.
“Very smooth, hi-tech sounding delivery…” – Chris Jemmett, alt.music.yes
“This guy is awesome.” – Dazed, on the Carvin Forum.
“..on a rare occasion you just have to conclude that the prog world should be feasting upon the birth of a new and promising act. That’s exactly the case with this [first] album.”
– Theo Verstrael, DPRP.net
“I find this new album attractive, [..] slightly less appealing than the 2014 debut. But as that is often the case with great artists, let it not distract you from trying this fine album. Especially those that are interested in bands that play varied, cleverly made, well played and sung [..], this might just be your cup of tea.”
– Theo Verstrael, DPRP.net


Recent Comments