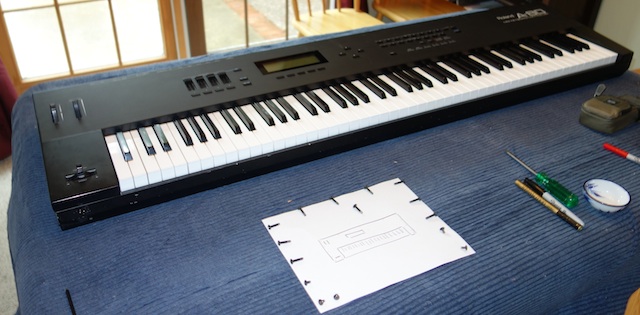
The Roland A-80 keyboard controller is one of the few keyboards that supports polyphonic aftertouch. This makes it quite desirable for those who care about such things, and indeed, is one of the reasons I tracked down a unit on ebay.
Out of the box it is a fine 88-key ‘board with a respected weighted action (it’s not “hammer action” but it has a very nice response all the same), with sophisticated zone and tweakable response curves for things like velocity and the afore-mentioned key pressure.
On the down-side, it weighs a ton, and the aftertouch requires the keyboard technique of the Incredible Hulk. Seriously. In order to register any aftertouch messages emitting from the MIDI out socket, I needed to use force unattainable from mere human fingers.
What Good Luck: Fortunately, this is a known problem. See… there’s this resistor on one of the circuit boards called “R43”. Originally, it came from the factory with a value of 5.6k ohms, but when customers started complaining to Roland, the tech folks recommended changing it to 10k ohms. Later releases of the A-80 came from the factory with a 10k ohm resistor installed.
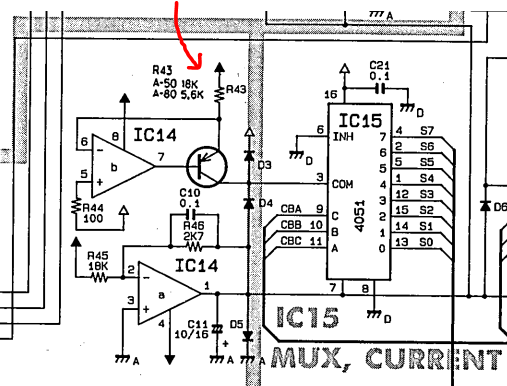
What Bad Luck: It seems that 10k is not enough. Other enterprising keyboard techs have Done The Research and found that higher-values give better results. Like, say, 51k ohms.
I knew about this issue when I sought for and purchased the A-80, fully intending to apply some DIY-love to the unit and make the mod. Two years later, I finally got around to it.
The first issue is figuring out how to open it up. I knew from some pictures on the web that the sides and panel opened up on a hinge (I could see the two hinges just by looking at the back panel of the keyboard) but knowing which screws to take out is a challenge. Future generations can save time by knowing that the screws you need to remove are all on the bottom of the keyboard. From the A-80 service notes:
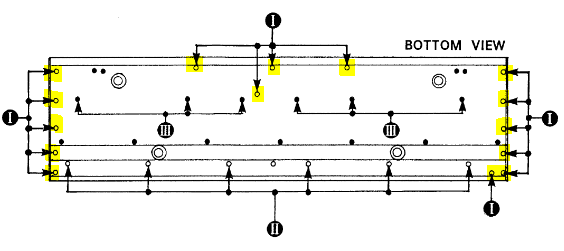
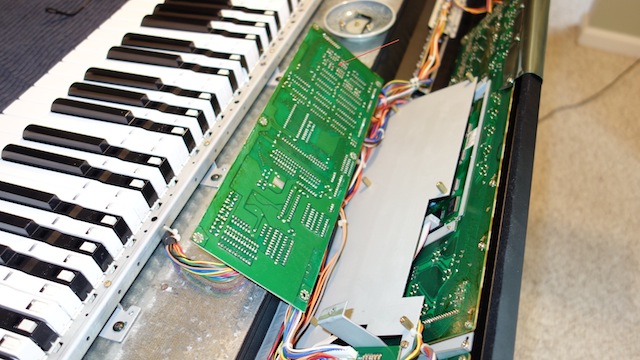
The screw locations (I) are shown above high-lighted in yellow. Once you’ve removed those 15 screws (5 short, 10 long), the top panel will be loose, so carefully re-position the unit and lift the panel. It will hinge up on the back edge:
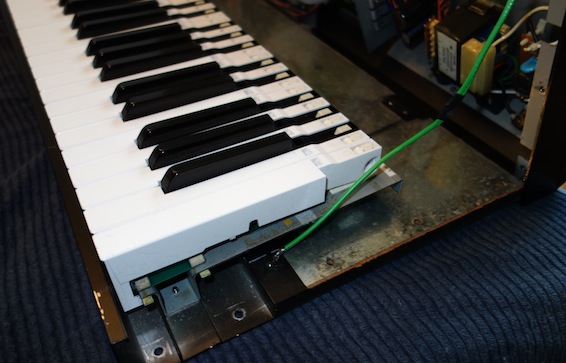
On my unit, there was a ground wire preventing the case from opening completely, but be warned! There are other connections to the circuit boards that may take up the tension if you unscrew the ground wire and haven’t braced the top panel to prevent it from swinging open. (This is unlikely to happen because on a flat surface, the back panel rests on the table top.)
I had the unit mounted on supports that meant that the table top was actually lower than the underside of the unit – so the panel could free-swing further back from the unit. You’re actually going to need to do something similar in order to get enough room to work on the unit.
There’s a wide copper sheet linking the circuit board to the main chassis that will take up tension as the panel opens. The way I handled this was to unscrew the three screws attaching it to the chassis, then folding it back over the top panel and taping it down out of the way.
We can now see the circuit board that interests us:
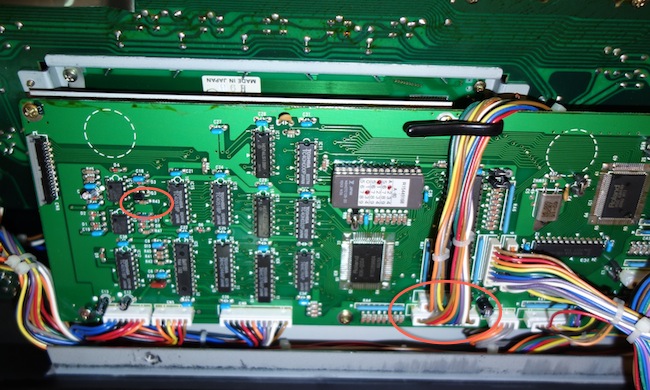
Our resistor, R43, is on the left side. I’ve highlighted it with a red ellipse.
There’s really no escaping it: in order to replace the resistor, we need to detach this circuit board from the chassis. There are three connections you’ll need to remove:
1. The ribbon cable on the top left (see the grey and black connector). This requires some care. It is basically just a slot that clamps down on the end of the ribbon cable. I actually detached it by accident and had a moment’s panic when i thought I’d made a mistake. The picture above shows the cable already disconnected (sorry) but it is a simple operation to “open” the clamp by pulling the grey part of the connector away from the black part. MAKE SURE YOU NOTE WHICH WAY THE RIBBON CABLE IS ORIENTED. Then the ribbon cable just falls out. (It’s trickier to reconnect it but if you’re careful, there isn’t much risk of getting it wrong. Just make sure the cable is fully into the slot on both sides before re-clamping.)
2. The other two connectors are highlighted by another red ellipse in the picture above. Much safer to remove but require more force than the ribbon cable. The plugs are grooved in a way that makes it impossible to reconnect them wrong.
There are six screws around the perimeter of the board that attach it to the chassis via separator posts. Two of the screws are holding cable retainers – make sure you remember where they are located before removing them.
Now the board folds back easily, allowing us access to the components from the reverse side:
There’s a red arrow in the picture above (somewhat hard to see) that points out the location of R43. Make sure you know which it is! It is not labeled on the back side.
I don’t have pictures of the solder removal process or the replacement resistor. If you don’t know how to handle that part of the process comfortably, you should not be doing this operation yourself. I’m not going to write a tutorial on circuit repair techniques here.
The actually resistor replacement operation took about 15 minutes, after which I re-assembled the unit and screwed the panel back in place.
Bottom line: The mod works. Replacing R43 with a 51k resistor makes the aftertouch feature work as expected. Mission accomplished!
Special thanks to Plink Floyd (http://computermusicguide.com/forum/viewtopic.php?f=11&t=340) for the excellent pics and entertaining rant.
Great post! I'm eager to do this mod, but the images aren't working. Any chance you could fix them?
Any chance you could restore the missing photos to this post?
Can I use my Roland A-80 with a USB input on my computer?
I've bought the Midi to USB adapter and noting. I ran Midi to my older Midi mixer with USB out and… Nothing.
Please help, I love the action of the A 80.
Thank you,
Bob
Hi Bob, the A-80 should work with any PC MIDI IO hardware. What kind of MIDI-to-USB did you purchase? Obviously there is more involved than just a cable; there should be both In and Out 6-pin DIN ports plus some circuitry before the USB connection to the computer. Personally I recommend MIDISport devices.
Max, the images should display correctly, especially if coming in from the http://www.prodigalsounds.com domain root. I did have to make a change some time back to fix the image display when I changed the root domain.
Your means of telling everything in this article is really good, all be capable of effortlessly understand
it, Thanks a lot.
I do like the roland controllers
I have three A-50s and one A-80
because of how similar the 50 is to the 80 and before I try this mod on my A-50s
do you think its the same for the 50 as the 80.
a polyphonic aftertouch keyboard used is hard to come by today. the A-50 for me is perfect. but if the touch could be lightened up all the better!
Hi Edd. I have never taken a look inside an A-50, but the Service Manual for the Roland A-50 suggests that the aftertouch PCB boards are similar, if not identical. I think the velostat would probably work there also. Comparing the circuit diagrams shows that the same aftertouch circuitry is used in both units, but the A-50 uses a 18k resister for R43 instead of the original 5k6 in the A-80. Of course, we had to experiment with alternative values for R43 in the A-80, and with the Velostat, it seems that ~10k might be a good value for R43. In the A-50, I can’t say with certainty that the same value would work, so I recommend using a variable resistor and experimenting. Or, you could just try with the existing 18k and you might get lucky. Try a few keys at first and see how you go.
EDIT: I mistakenly assumed this comment was for my latest post. Hence the comments about Velostat. I recommend checking out that post as well.
Thanks for the post! I have a Roland A500 pro. Aftertouch is also too hard. Do you think it has the same problem?
Hi Jorge. Probably not the same underlying mechanical problem. I’m not familiar with the A500 mechanics, sorry.
Can this same mod be done to D50?
Sorry, Jj, I don’t know. I’ve never opened a D-50 but I am sure the keybed is a completely different design, so this technique I describe would almost certainly not apply. The D-50 only supported “Channel Aftertouch” for a start.
Hi Bob
don’t know if you still answer this blog. If you do I have a question. Can I use a 51, 1 k resistor instead of the 51 k that you suggest.
Best regards
Peter
Hi Peter. The value of the resistor is not crucial. Most likely I used a 51k1 and I just simplified it in my description. Some folks have changed to to a variable resistor and adjusted to taste.