Drum Maps go back a long way. I’m certain that the feature was added to Cakewalk very early on back in the MIDI-only sequencer days before it became “Cakewalk Pro Audio”, back in 1995. This long-established feature hasn’t seen much attention from the developers in recent decades because it is stable and does the job. But what job is that, exactly? And why are new users often confused about them?
Where people get confused
At first glance, Drum Maps appear to be the way to set up Cakewalk’s Piano Roll View (PRV) so that, when you edit a MIDI track, you can see the names of each instrument or kit piece (“Tom1”, “Tom2”, “Snare”, “Wood Block”, etc.) in your drum instrument, whether it be a dedicated drum brain, SFZ sample library, or a “drum kit” patch in your rack synthesizer.
And to be fair, yes, that is true: Drum Maps are used to display kit piece names in the PRV (more on that later). Also, Cakewalk provides many pre-baked drum map presets for common percussion modules, which definitely reinforces this impression.
But drum mapping is much more powerful than just “show names for drum kit pieces in the PRV”, and Cakewalk doesn’t try to hide it. That’s probably where a lot of the confusion comes from. This tutorial/article aims at explaining Drum Maps, hopefully to reduce that confusion.
Thank you for subscribing to Map Facts!
A drum map is a virtual MIDI instrument that we define inside our Cakewalk project. It might help to think of them more generically as a “MIDI Map”. A map provides a way to translate incoming MIDI notes to alternative destinations. For any specific input note number, we can:
- change the output MIDI note number;
- change the output MIDI channel;
- change the output port to any existing port in the project: Hardware or VSTi;
- assign a name text;
- apply a velocity offset (make it louder or softer by an amount);
- apply velocity scaling (make it louder or softer by a percentage)
We don’t have to create a mapping for every one of the 128 possible notes – just the ones we are interested in. (Keep reading to learn about what happens to un-mapped notes.)
Once we have created our mapping, it becomes available as a possible MIDI output port for any MIDI track in our project.
Example use cases:
- a 1:1 map that does nothing except reduce the velocity values by 50%;
- a map that forces each note to the nearest note in the Pentatonic scale;
- a map that assigns notes generated by your favorite drum controller (e.g. Roland SPD30, or Alesis kit, etc.) to trigger your favorite percussion VST instrument;
- a map that splits the controller keyboard across two or more different instruments, e.g. Bass in the lower notes, Strings in the higher notes, samples on the top octave.
- a map that combines several output ports into a single virtual instrument (e.g. Toms from AD2, snare from SI-Drums, etc.)
- many others, I’m sure!
Key take-away: Because mapping takes note events from any single MIDI In portt and translates them to one or more MIDI Out Ports as defined in a project, the drum maps belong to the project and do not exist as separate files.
The Drum Map Manager
It’s an older code, sir, but it checks out.
Admiral Piett
The Drum Map Manager is located under Edit > Preferences > MIDI > Drum Map Manager, for historical reasons. It is only available with a current open project. This is definitely a source of confusion because you’d think the Preferences dialog is normally for general settings that apply across all projects. And yet, you can look under Edit > Preferences > MIDI with no project open, and you won’t find it.
The user interface is a little primitive – remember, this venerable code base dates back to the early ’90’s – but it is functional, given everything it has to do.
(You can read the official documentation here.)
It shows all maps currently defined in the project (there can be more than one!), and allows you to edit the assignment settings for each note contained in each map. By default, a brand new empty project will have no drum maps, and the manager will be empty.
Please bear with me, as we work through creating a map from first principles.
Creating a new empty drum map, and editing it
As way of preparing for this tutorial, I’ve just created a new project, and added a couple of percussion VST instruments: Cakewalk’s SessionDrummer, and OrganicDrumLoop‘s OCK.
Now we bring up the Drum Map Manager. Clicking on the “New” button will create a map called “DM1-“, with no entries in it.
ASIDE: It would be nice to be able to give the map a more helpful name, wouldn’t it? Unfortunately, we can’t just simply assign one at this point. We’re stuck with “DM1-“. More on this later.
We start creating mappings for each MIDI note number by adding a new row to the map with the “New” button:
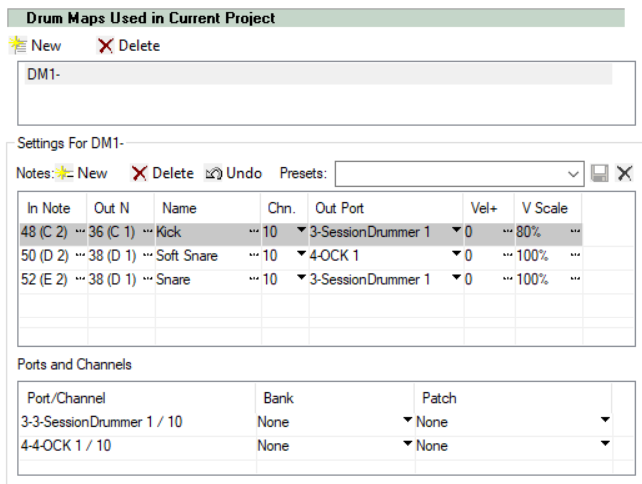
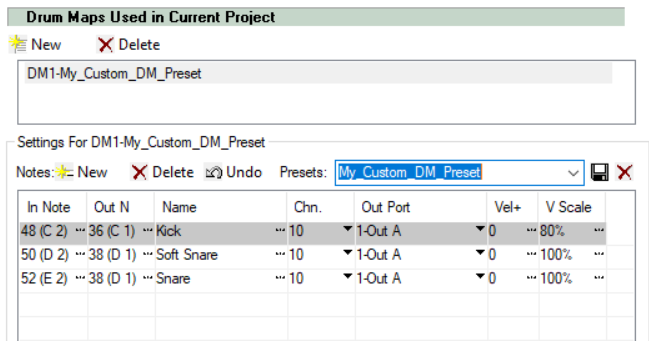
In this example, I want to build a virtual percussion instrument using sounds from both SessionDrummer and OCK. I’ve created three mappings, so that C2, D2, and E2 will trigger a kick and two snares respectively, with the “Soft Snare” coming from the OCK instead of SessionDrummer.
At this point the map exists as a definition in the project, and we can start using it.
I’ve created a MIDI track (Track 3) containing a clip with note events for C2,D,E, and F2 and we can see them in the PRV:
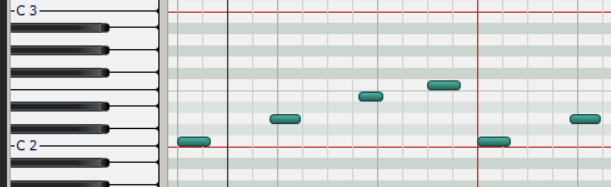
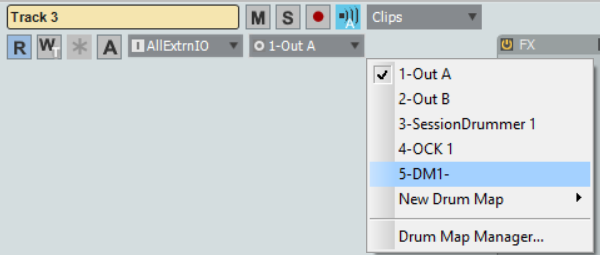
That’s with the Track 3 pointing at the default output port, which on my system is “1-Out A” – my USB MIDI interface (Midisport 2×2). Now let’s change this to be the new Drum Map, “DM1-“, which shows up in the list of available Out ports for the track, along with the two VSTi’s:
Now, having made that assignment, when we open or refresh the PRV, and select Track 3, we see the Drum Grid pane has become visible above the Note pane:
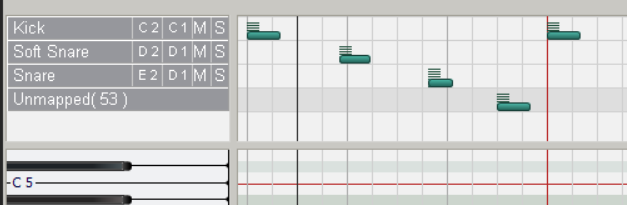
(Actually it was always there, just empty and minimized out of sight above the Note pane.)
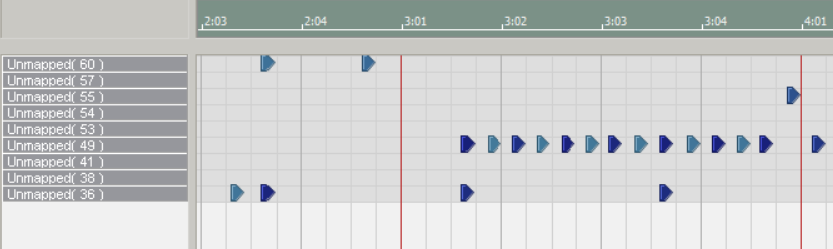
All the notes in Track 3 are now shown in the Drum Grid, and not the Note Pane. I deliberately included an un-mapped note (F2) so that we could see what would happen. Cakewalk includes the un-mapped notes at the bottom of the Grid Pane, clearly marked as “unmapped”. They won’t trigger any sounds because they haven’t been assigned to any Output. We are free to delete the notes; left them as inaudible visual cues; or add them to the map, as appropriate.
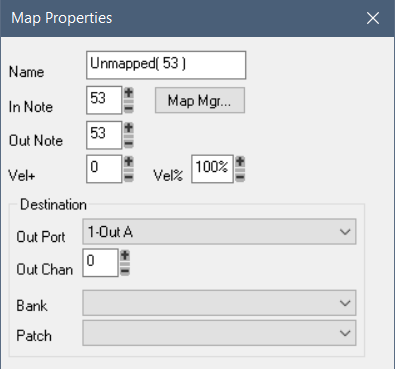
Double-clicking on the unmapped note row will bring up a property dialog that allows us to enter the necessary mapping information for that note:
Observations on PRV Editing with Drum Maps:
- Notes in Tracks assigned to Drum Maps only display in the Drum Grid Pane.
- Although multiple MIDI tracks can be edited at the same time in the PRV, Notes in Tracks using a Drum Map are only shown when the Track is the selected Track. (I’ve posted about this on the Cakewalk forum.)
Only one Track can be displayed in the Drum Grid Pane at any one time.- Correction: Only one Drum Map can be displayed in the Drum Grid Pane at any one time, but it will include note events from all Tracks assigned to that map.
Because of these side-effects, it can be frustrating working with multiple MIDI tracks where some are Mapped and other are not; or tracks directed to two or more drum maps.
Did someone mention presets?
Although setting up a drum map from scratch can be tedious, there are short-cuts.
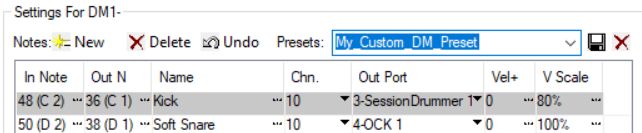
You can save an existing drum map in a project as a “preset” so that you can quickly restore it. Let’s do that now: open the Map Manager and type in a name for the preset, and then press the Save button:
Two things happen:
- the Drum Map in the project is renamed;
- A .map preset file is created on disk.
The first thing is a bit of misdirection on Cakewalk’s part. There is no link between the drum map in the project and the preset file created on disk, yet now the drum map in the project has a name that is the same as the preset (in my case it is now “DM1-My_Custom_DM_Preset”).
If you later create a preset from a different drum map, with the same name, you will overwrite the existing preset file. However, the original drum map is not altered or changed in any way (nor would you want it to be!).
And it would seem that the only way to give the drum map in the project a meaningful name is to create a saved preset, with the desired name!
By default, these preset files (.map extension) are stored in the following directory, as per Edit > Preferences > File Locations:
%APPDATA%/Cakewalk/Cakewalk Core/Drum Maps
TIP: Out-of-the-box, Cakewalk provides a metric tonne of drum map presets available to use as a template when creating a new drum map. In order to retain your sanity, I recommend that you copy the specific files you actually use to a different directory, and change the folder location to match. Then you’ll see a much reduced list to choose from.
Okay, let’s create a new project and make use of this preset that we just created!
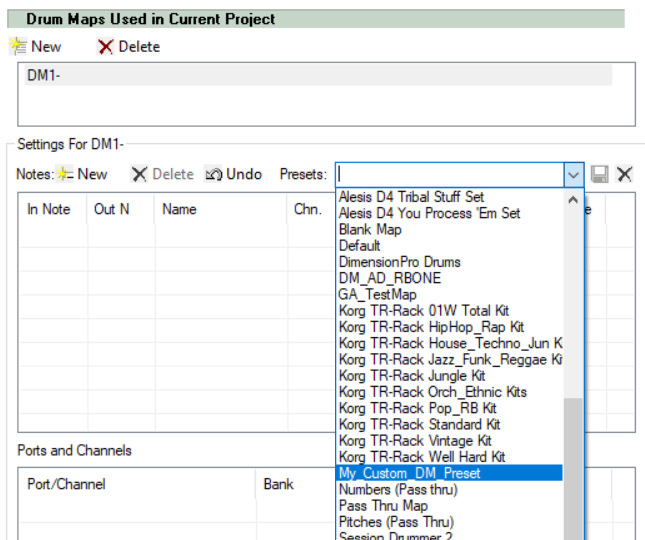
There’s two ways to do this. First, you can go into the Drum Map Manager, create a new empty drum map (“DM1-“), and then drop down the list of presets and select the entry:
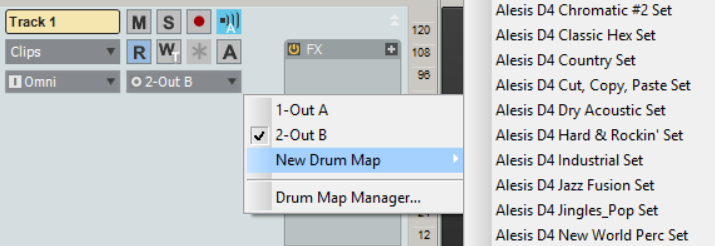
Alternatively, use the Output selector on the Track (See Fig.4) and select “New Drum Map” and pick one from the list (which, according to my advice above, you have reduced to a manageable size, right?)
Having done this, you should notice something immediately:
The mappings have been initialized from the preset, but the Out ports are not set. They’ve reverted to the default. Why? It’s a new empty project! We don’t have any VSTs loaded yet; and in fact, we might even have a different default MIDI i/o hardware configuration (i.e. I could have removed the USB MIDI interface and switched to the MIDI I/O on my Focusrite 6i6). So it makes sense that the Out Ports are not included in the preset. Right? Wrong:
Or maybe there’s something else going on
Let’s try something different: Once again, create a new empty project, and this time, add an instance of Cakewalk’s Studio Instruments “SI Drum Kit” and then an instance of Addictive Drums.
Now repeat the process: add a MIDI track; and assign the output to a New Drum Map, using the same preset we used above:
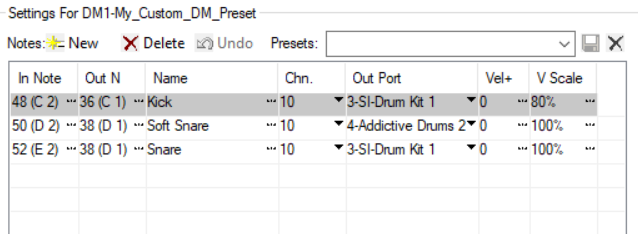
Interesting! The Out Ports are being retained and retrieved from the preset, kinda, except they are assigned using an enumerated value (or index number), matching the order the VSTs were loaded into the project. (That’s the 3, 4.)
So now we have the Kick and Snare going to the SI Drum Kit, and the “soft snare” going to Addictive Drums. So clearly there’s some clean-up we’re going to need to do, in addition to loading the correct presets in each of the associated VSTs (or, indeed, external percussion synth modules if that is what you’re using).
Warning: This bears repeating: When you remove a VST from a project, its virtual MIDI IN port is also removed, and the index of any remaining VSTs in the project may be changed, depending on the order in which they were loaded in the project.
Drum Maps assign their MIDI out port assignments by index rather than by name.
This means that a drum map may end up with its out port assignments changing underneath it, after that VST is removed, even if the VST was unrelated to those used by the drum map.
How to quickly change the out port on all rows in a Drum Map:
Hold down Ctrl+Shift keys while changing one of the rows – you’ll see all rows assigned to the same Out Port change to the new value. Nice!
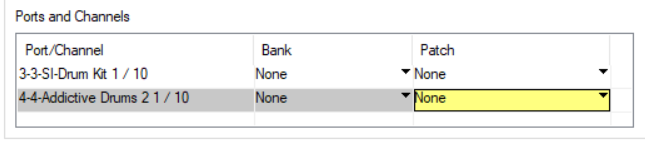
Exercise for the Student: Did you look further down the Drum Map Manager? Perhaps patches are also saved with the drum map preset, if we wanted them to? Might be worth exploring, if that is something you’re interested in:
How to quickly create a Drum Map from an existing MIDI track
There is a handy way to create a new drum map for an existing track, such that it only contains mappings for the note events in the track:
- Select the source track with MIDI note data in it
- Assign the Output to New Drum Map > Blank Map
- In the PRV/Grid pane, you’ll see:
You can now enter the mapping properties for each unmapped row.
A final tip
You may notice in Fig 5. above that each mapped row can be MUTE or SOLO independently. One interesting use case presents itself: Imagine a drum kit map, and now select a kit piece to use for a click track (say, “Sticks” or similar). Now map an additional MIDI note to trigger that sound. You can use this additional note as a click or reference beat, and then MUTE it when you don’t need it, leaving all the normal “performance” notes untouched.
Finally, for real
I hope that helps clear up some of the intricacies and subtleties about MIDI Maps – I mean, Drum Maps – in Cakewalk.
Wow Colin !
You did a really nice job explaining this. I am just starting to get a handle on Cakewalk and as it is my first DAW there is much to learn. I purchased an Arteria MiniLab Mk2 and for starters would like to learn how to map the pads to SI-Drum Kit. I have been watching quite a few Creative Sauce Tutorials, and I’m sure you would agree it is and excellent series My problem is that I am all over the “Map” (pun intended) have limited understand of inputs, outputs, and in general how much can you know when you just get started and the Reference Manual is 1802 pages. I have been scrambling to copy/clip and write text to compile documentation such as yours. I feel as though I am getting closer and appreciate your help. Nice Work !
Thanks,
Hank
Hi Colin,
You have done an excellent job to explain the Cakewalk Drum Map. It is so revealing and only by reading your write-up that I can understand the under the hood operation. Cakewalk should include your stuff in the official documentation. A job well done.
Now I am trying to create a mapping using my Yamaha DTX450 drum kit as midi-trigger to generate sound on the Cakewalk bundled vst SI-Drum Kit. As I found out that the DTX uses different midi notes for each pad that does not correspond to the SI-Drum vst. I think I should be able to use Cakewalk Drum Map to map the DTX trigger midi-note to the right drum such as the snare. Am I on the right track? Is there a published reference to show me that midi note number the SI-Drum snare, as an example, is expecting in order to generate sound? Would be nice if someone have already create a definition file for this. Feel free to give me some suggestion to make the task simpler. Once again thank you for the excellent write-up.
Peter
Peter, thank you for the kind words. Yes, you should totally be able to trigger the sounds from the SI-DrumKit using the Yamaha controller using a Drum Map to, um, map the incoming MIDI notes to the appropriate alternate value. This is almost exactly what Drum Maps are for.
There is already a drum map in Cakewalk that documents the MIDI notes – it is called “Studio Instruments-Drums”. You would need to make a copy of that – or edit it after loading it into your project – and set the appropriate input note being send from the controller.
Thanks for the tutorial, Colin. The link to this article was provided by someone in the Cakewalk forums. Following your directions, I am still not having success using a drum map in Cakewalk that I’m trying to connect to a Kontakt instrument I created in Kontakt 7.
It’s a drum kit created using samples which plays just fine in the stand alone instance of Kontakt 7.
I created a drum map for the drum kit and did everything according to this article. When I select the drum map in the MIDI Source track output, the drum map shows up in the PRV but the sounds don’t make it to the Synth Audio Output. If I reset the MIDI track output to the instance of Kontakt, I can generate sound (and notes) in PRV using the piano keys – which don’t contain the drum map names. I can add notes to the MIDI track and they sound when I hit play, but not if I select the drum map. I’ve rechecked the Out Port in Drum Map Manager to confirm the map is routed to Kontakt, but I cannot get the MIDI to route to the Synth Audio Output with drum map selected.
This is so frustrating. Any thoughts?
Al G
Wow Alan that does sound frustrating. Is it possible the MIDI channel is not correct? I’m not super-familiar with Kontact but it is a multi-instrument so it is possible that the drum map is flipping the midi channel. I can only suggest trying a very simple drum map example with a different instrument – Try SI Drums – and verify you can get that working.
If you ask your question on the cakewalk forum I might be able to provide more details than in a blog comment 🙂
Just saw this today. One thing you need to check is to see if the MIDI channel is set to the channel that your instrument is on. Kontakt doesn’t set Drum Instruments to channel 10 it usually just uses the next available channel.