Consider an audio track, in which we want to change the volume of the audio for a short period of time during playback. Instead of moving the Track Fader manually with our mouse, we can set up an automation envelope on our track to do this for us.
Creating an automation envelope
Click on the Edit Filter menu and select Automation > Volume from the drop-down list:
Fig 1. Creating an automation envelope for Track Volume
Now we can add nodes to the envelope and arrange them so that the volume is adjusted the way we want. In this example, we’re going to lower the second half of the clip by 6 db:
Fig 2. Click-drag to select a region in the lower part of the clip, then drag down from above
You’ll notice that the Track Volume control changes to show an envelope symbol, indicating that the value is controlled by an envelope, and will change its value over the timeline:
Fig 3. The Track Volume envelope controls the value depending on timeline position
So far, so good. You may notice that if you try to change the Volume value during playback, it will snap back to the value dictated by the envelope. This is expected behavior.
Fig 4. Meter value shows -6 to -12 during playback, controlled by the envelope’s -6 db change.
The default volume of the track is -6 db (as shown by the meter) but as the envelope curve takes effect, it applies a change from 0 to -6 and the output is now -12 db.
By default, this is how Cakewalk displays Track parameters controlled by automation envelopes. This is “Envelope Mode”.
Introducing Offset Mode
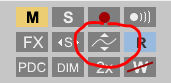
Alternatively, we can switch to “Offset Mode” by using the switch in the Control Bar Mix Module:
The Envelope/Offset mode switch
In Envelope Mode, volume and pan faders follow the project’s automation and do not respond to changes you make in real-time.
In Offset Mode, you “offset” the current automation in a track using a parameter’s controls.
Switching to Offset Mode changes the Volume control “envelope” symbol to a plus sign, but other than that, there is no change:
Fig 5. Playback in Offset Mode
Now, say we want to adjust the overall level of the track, but retain the envelope shape. We can just make the change. For example, in Fig 6. we have looped playback over the clip, and I change the volume “offset” from 0 to -6, which lowers the envelope values by -6 over the whole timeline.
Fig 6. Lowering the overall volume by 6 db in Offset Mode (during a looped section)
After we apply the manual adjustment, you can see from the audio meter that the output volume at the start of the clip is now at -12db. During playback, the envelope then applies the -6 reduction and the output has been lowered and is now -18 db during that segment of the timeline.
Tip: Switch back to Envelope Mode to avoid accidental changes
Because it is less easy to make accidental adjustments in Envelope Mode, it is a good idea to switch back to it, and only use Offset Mode when we need it. Back in Envelope Mode, the track now looks like this during playback:
Fig 7. Back in Envelope mode, after making a -6db offset adjustment
Of course, using our ears and looking at the Track Meters, we can tell that the track audio is now playing back -6db quieter, which is what we intended.
Warning: Be aware of the invisible offset value
On the down-side, both the level of the envelope and the Volume control value are indicating that the level is being adjusted from 0 to -6db. But that isn’t strictly correct: there is an invisible additional offset of -6db, that we applied in Offset Mode, but now isn’t visually displayed (except in the audio meter).
So you should be aware of this possible source of confusion, and, when in doubt, you can temporarily switch from Envelope to Offset mode to check for any manually-applied offsets.
Bonus Tip: easy gradual envelope changes
A quick way to get a gradual change in the envelope instead of the instant change shown above, try this: Place two nodes by clicking on the envelope; then select a wider region and Ctrl-Click-Drag down from above:
Ctrl-Drag a selection around existing nodes for a gradual slope
Finally, you may wish to return the Track display to the view shown in Fig 1., in which case, just set the Edit Filter back to “Clips” (see Fig.1).
Although I’ve used Volume as an example in this post, everything I’ve said also applies to Pan and other values controlled by automation. Have fun with automating parameters with envelopes in Cakewalk By Bandlab.
This post is mostly for my own reference, and also to replace and supplement information that used to be hosted at http://soundofmusic.se/ but is no longer available.
According to Gearslutz, the A-80 features a Matsushita SK-688 keybed – it’s an older keybed (but it checks out) – and Syntaur have some replacement parts available, including a felt strip suitable for the keybed “lowers”, where the keys rest when they are not being played. I ordered two units, on a hunch (turns out I was right).
When they arrived, it was time to begin the service operation.
Before you begin
I highly recommend getting a copy of the service manual. I’ve saved you the bother of finding it: here it is. That’s the PDF I use, hosted on our site. (It’s not perfect but it is the best resolution and clearest copy I could find online.) I kept the PDF open on my desktop, and flipped between pages as I worked.
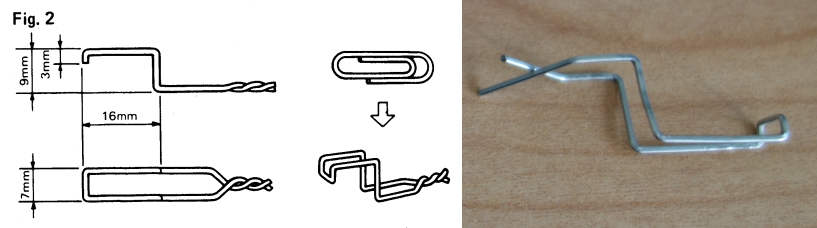
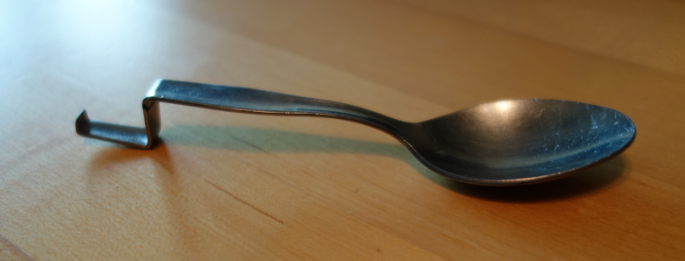
Secondly, you will need a key removal tool. There are instructions in the manual on Page 5 on how to make one using a paper clip, and providing you are able to match the dimensions specified, it actually works.
However, it is awkward to use, and not too robust for intensive use. (I went the extra mile and sacrificed a teaspoon for the cause. More on that later. If you don’t have access to a basic workshop, be assured that the paper clip tool does work.)
Before moving it to the work table, make a note of any connections
Wherever you move the unit to, make sure it is at a comfortable working height. I initially placed it on a “standing desk” but this was really too high. I should have just used a regular-height table. The A-80 weighs a ton. (30 kg?). Most of that weight is concentrated at the front edge (each key is weighted at the tip and that is where most of the weight comes from).
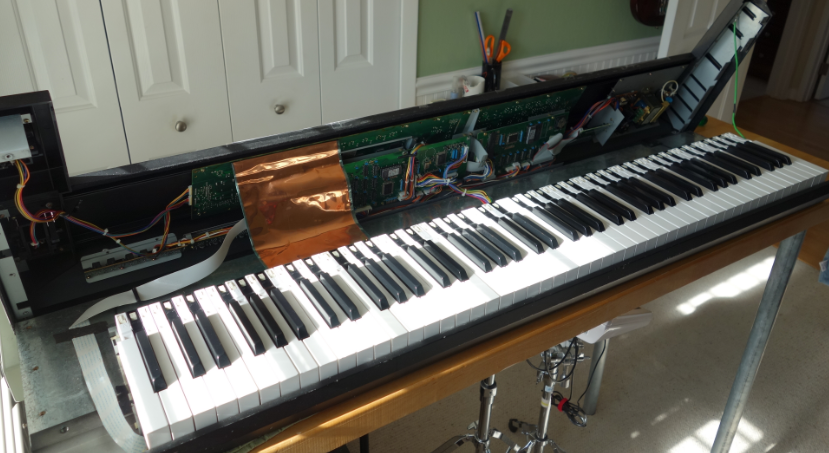
Opening the Lid
The top is hinged at the back edge and flips up like a car bonnet, once you have removed some screws from the bottom of the unit. Page two in the Service Manual has the details but I’ve got a diagram from another post about the A-80 which I’ll re-use here:
Fig. 1 – 15 screws to remove, highlighted in yellow
You either need to flip the unit on its back, balance it upright on the back edge as you remove the screws. Either way, it’s awkward and risky. (It was at this point I realized the standing desk was probably a bad idea.) Restoring it to the normal position, the lid then swings up for easy access.
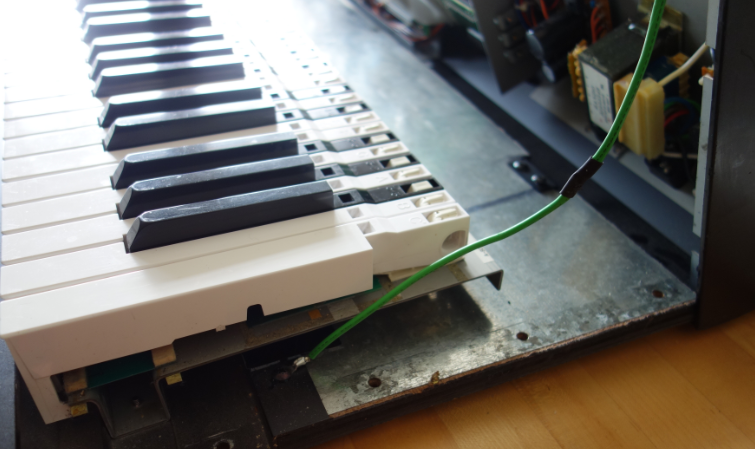
If I recall correctly, there’s an earthing wire that will possibly prevent the lid opening to a useful working angle. In my unit, I’ve lengthened the wire so that I don’t have to unscrew one of the lugs, but your unit may be different. Use caution.
Now we’re ready for the next step.
Removing the keybed
If you’re only interested in removing the black keys, you don’t need to remove the keybed from the chassis: Black keys slide out towards the back; White keys towards the front (where there is no room in the assembled unit.
Removing the keybed requires:
Disconnecting the cables;
Unscrewing the keybed from the base.
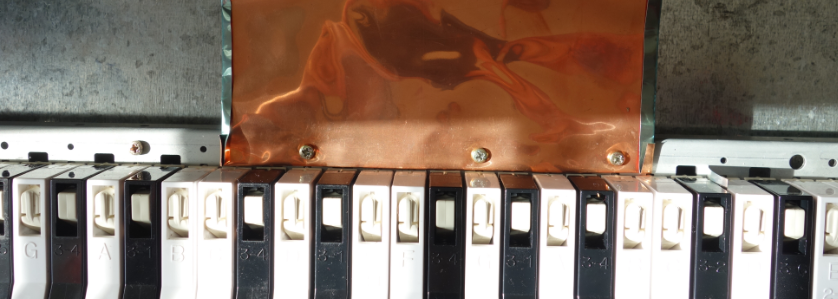
Disconnect the copper shield
It’s attached to the keybed by three screws:
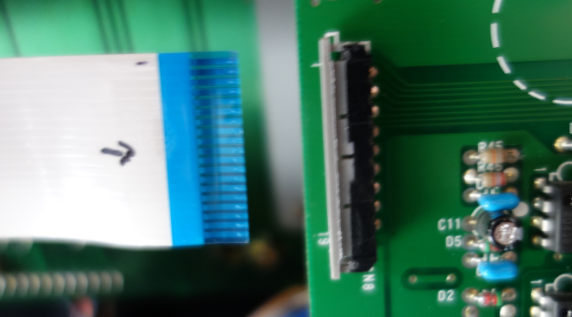
Unplug the “key pressure” ribbon cable
It is easy to unplug the cable from the CN8 connector on the MAIN-A board: Mark the ribbon with a sharpie so you can re-connect it correctly later (optional). The receptacle clamps down on the ribbon edge and easily releases the cable if you tug gently on the grey section of the connector to open it:
Once open, the cable slides free
The ribbon cable is retained by a flexible clamp, and in my unit, a strip of tape holding it to the base plate.
Cable retainers also need to be released
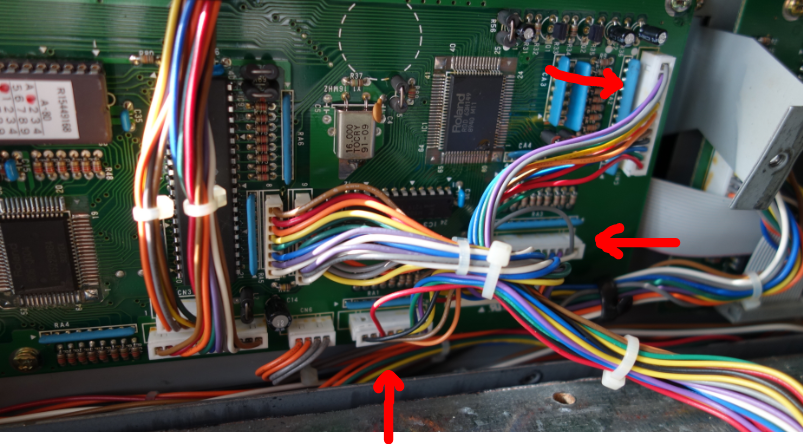
Unplug the PCB connectors RA1, RA2, RA3
In my unit I had to snip a cable tie that was grouping all the wires together. Now that I write this, I realize that I forgot to replace it. Oh well, no big deal. RA1, RA2, and RA3 are marked on the PCB.
Connectors RA1, RA2, and RA3
If necessary, you can use a small screwdriver to loosen the connectors. They are keyed, you can only insert them one way.
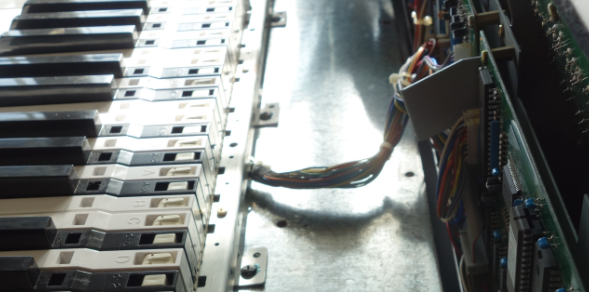
Unscrewing the keybed from the chassis
There are 12 screws to remove: 6 from the inside back edge, and 6 from the underside at the front of the chassis. These are indicated as “II” and “III” in Fig.1 above.
Three of six to remove from inside
Now we can lift the keybed out of the chassis and place it on a clean padded work surface. Take care to protect the ribbon cable – it is still attached, and is fragile.
Now would be a good time to take a vacuum cleaner to the interior of the chassis. I don’t know about you, but my unit was pretty filthy inside under the keys.
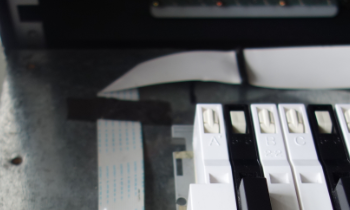
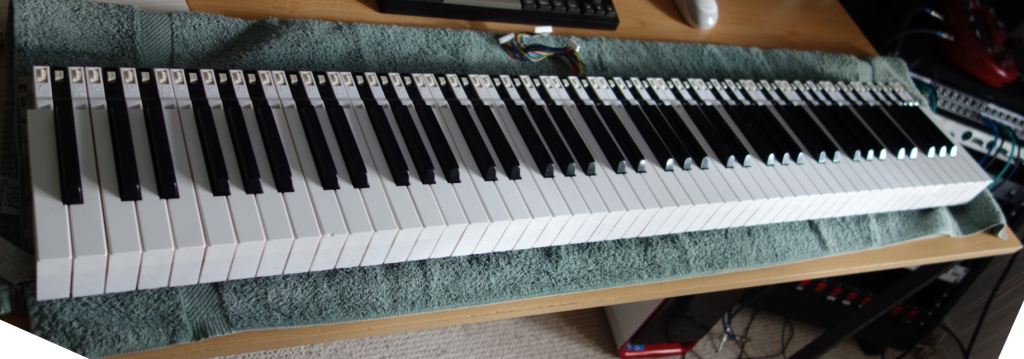
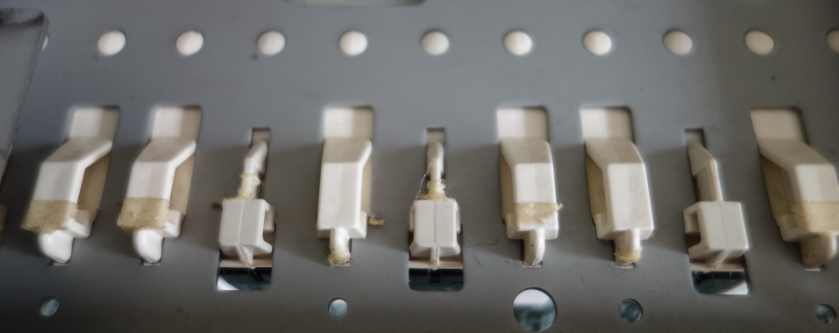
Reviewing the keybed
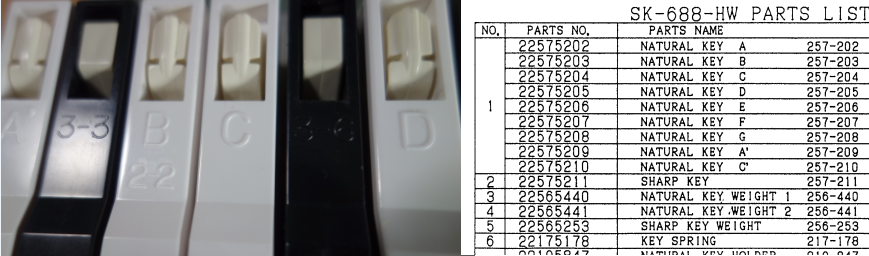
Replacing the felt “lowers” means that I’m going to have to remove all the keys. I took some time to review the keys. Each key has an identifier embossed near the hinge. For White keys, its the Scale note (except for one B key which also says “2-2”, and the first and last keys which are A’ and C’ respectively). The Black keys seem to be a random 3-1, 3-2, 3-3, etc, up to 3-6. I can’t see a correspondence between scale position and number.
The parts list on page 4 of the service manual does not give any hints about these codes. I don’t think it is significant, apart from the obvious non-standard keys at the top and bottom ends of the keybed. However, as I put the removed keys aside, I made sure to line them up in order so that I could replace them exactly the same way. I recommend that you do the same.
Removing the keys
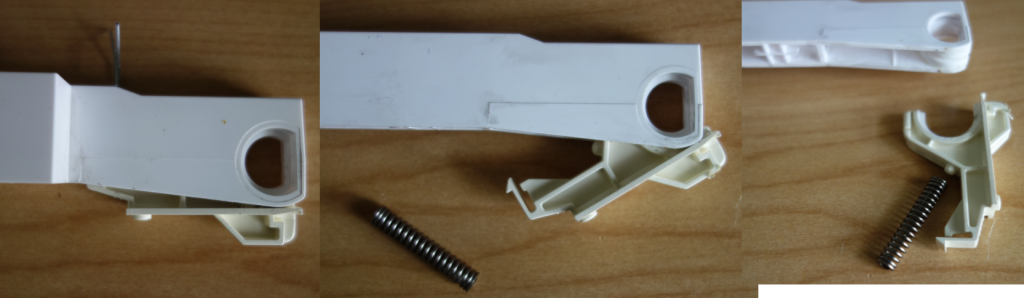
Each key consists of a key Holder that is attached to the base, and the Key itself which hinges on the holder, and depresses when you play a note. Removing a key from the base involves reaching through a hole in the Key and lifting a catch on the Holder to allow the holder to be slid out of the base. White keys slide towards the front, whilst Black keys slide out towards the back.
Page 6 of the Service Manual attempts to describe the process clearly, but in all copies I’ve found on the Internet, there appears to be some text missing.
Essentially, the process is:
Depress the Key
Insert the key removal lever and rock it towards you so that the tooth engages the Key Holder latch (it is exposed while the Key is depressed)
Lift the key removal lever slightly to ensure the lock button at the base of the Key Holder is raised out of the hole in the base
For White keys, push at the back to slide the Key Holder towards the front.
For Black keys, push on the front of the key to slide the Key Holder towards the back of the base.
The Key + Key Holder should then lift away from the base.
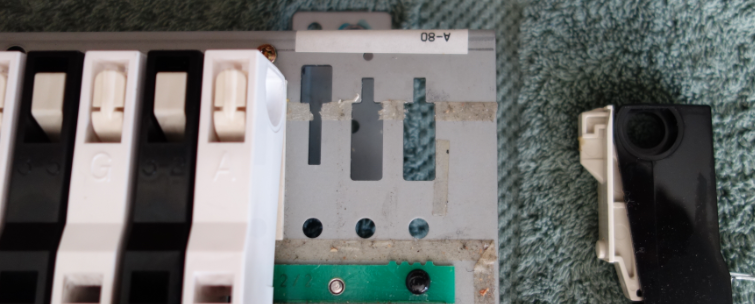
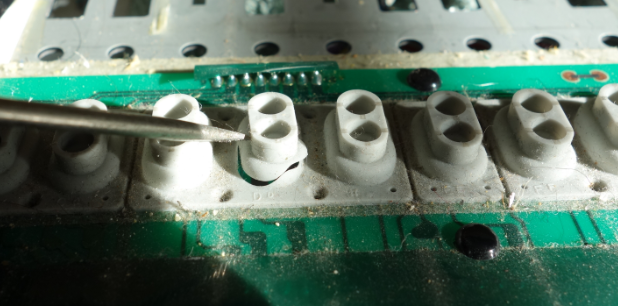
Having a look at base with keys removed make this more understandable:
The Key Holders fit into the notches in the base plate. Black keys lock in from the back; White keys lock in from the front. You can see the round hole that the lock button fits into… here’s a view from the back:
Another view, from below
The key removal tool is for lifting that button out of the hole, via the tooth latch on the key holder.
There’s nothing like trying it out in practice.
One thing you may encounter is that there is a whole lot of double-sided sticky tape all over the base plate, and the key holders are very firmly held in place. It took some force to dislodge them. Sliding them out while holding the key removal lever in place was tricky.
When I started removing the keys, the holder and key would separate and the spring would fall out. Not a big deal to re-assemble, but it’s best to avoid it if possible. Knowing the mechanics ahead of time might help with this.
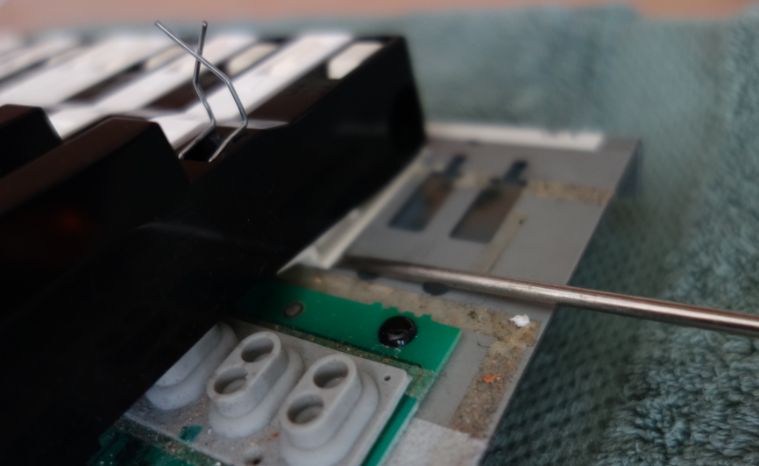
With the paper-clip version of the Key Removal Tool, I had difficulty lifting the Key Holder lock. Seeing as I was starting from one end and removing all keys, I could use a small screwdriver from the open side to assist in the release:
You can see how ineffectual the paper-clip is in obtaining leverage
However, using a screwdriver has risks. After two decades or so, those rubber domes are fragile. USE CAUTION! DO NOT LET THIS HAPPEN:
Cue Hitchcock Psycho strings in D
That’s the D4 key. So long as I don’t poke it, I can’t see the break in the rubber, and I had to hope that the switch was still functional. If not, I’d find out later.
Things were much easier when I gave up on the paperclip and manufactured my own key removal tool.
Some well-spent time with a vice, hammer, and flat bastard file later…
The thickness of the “blade” at the business end isn’t specified, but the thinner and more polished it is, the easier it will be able to latch on to the plastic catch inside the key.
Imagine you needed a knife for something, couldn’t find one cause all you found was 10 000 spoons…. it could happen!!! And therefore you couldn’t do whatever it was you needed the knife for, and then the next day it turned out that a spoon would have done.
Ed Byrne
With all the keys removed I debated trying to remove all the old excess double-sided tape, and decided that, maybe it was there for a reason, and left it.
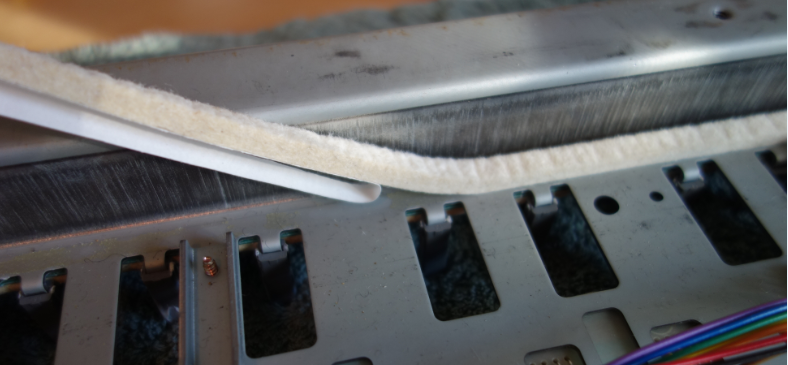
Replacing the key felt
This part was easy. It’s also the part where I realized that it was a good thing I ordered two units of key felt, because it took one unit just for the White keys alone.
This new felt feels a little thicker than the old strip.
With the felt replaced, we can re-insert the keys. No special tool is required for this.
Be warned that the thicker layer of felt on the underside means that there is slightly less room available when maneuvering the key into place. I took my time and tried to protect the rubber domes as much as possible from accidental shear forces as the key holder slid into the slot and locked in place.
Problem #1
A side goal of this whole adventure was to take a close look at C#5 which has always been a little “sticky”. It never quite bounced back as quickly as it should, and very occasionally stuck in the depressed state. Sure enough, when I re-inserted it into the base, the same behavior – actually worse – was observed.
Process of diagnosis:
I tried swapping the grey plastic guide with one from a known “good” black key position, and observed the same problem.
I swapped the key itself with a “good” one and, again, observed the sticky bounce-back.
I removed the guide completely, and the key bounced back freely – nice – but with a lot of unacceptable “slop” from side to side.
I decided that either the guide post itself must be bent (not visually apparent), or the key holder slot slightly out of alignment (I find that hard to believe).
The solution I settled on involved removing the grey plastic guide and shaving the sides down a fraction, then re-lubing with a slight amount of grease. Fortunately this was sufficient and the re-installed C#5 key now returned to the upright position snappily. Success!
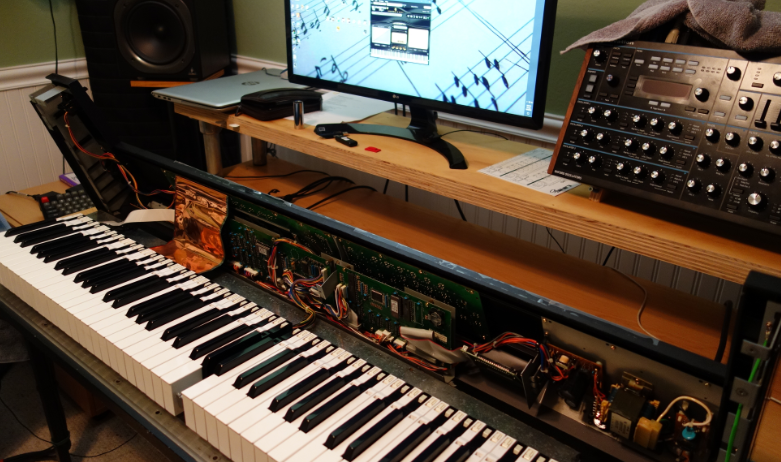
Reconnecting and Testing
With the keys restored to position, I lifted the keybed back into the chassis and screwed it in place; Reconnected the plugs and ribbon cable, and copper shield.
Anticipate the worst
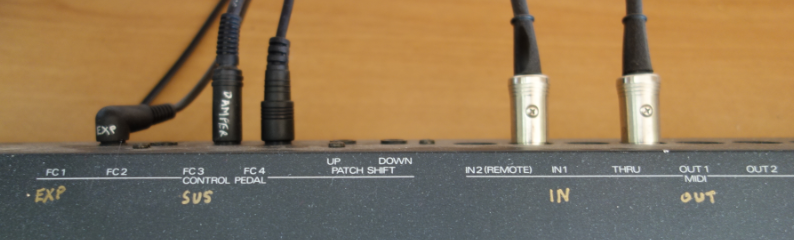
You’re going to need to connect the mains power and a MIDI out cable;
You’re going to need to test every key on the board, with a sound source that is responsive to velocity;
You’re going to find out that something isn’t working;
You’re going to have to go back in to the keybed and try to fix it.
Alternatively, just screw the lid back on and heft the A-80 back into your normal position in the studio, and hope for the best. I chose this second option. I recommend that you suppress your optimism, and assume the worst. Get the A-80 into a place where you can test the MIDI output and still investigate keybed issues.
First good news: I found that the D4 functioned normally. That damaged rubber dome switch isn’t affecting the key response. Phew!
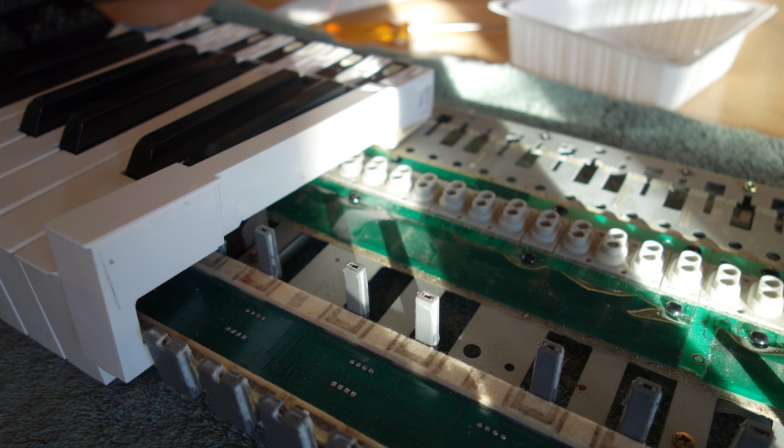
Problem # 2
However, G#4 seemed WAY too sensitive, belting out a velocity close to 127 no matter how gently I pressed the key. Ugh.
There’s nothing for it, but to open the lid and remove that key and examine the rubber dome switch.
Pro Tip: If you are diagnosing a Black key, then you do not need to unscrew and move the keybed from the chassis.
I unscrewed those 12 screws, and moved the keybed back towards the rear of the chassis to get clearance at the front; then raised it up an inch or so on wooden blocks so as to give all keys a clear travel path when depressed.
Then I realized that I didn’t need to do any of that, because I was only interested in one Black key. And they pop out from the back of the keybed, not the front.
After removing the key, I pressed the rubber dome with my finger. It seems that it was possible to emit notes with a wide range of velocity values. The dome switch did not appear to be at fault, but it is hard to judge sensitivity with a finger.
I tried carefully re-installing the key, to see if it was just debris or dust, but it didn’t make a difference. I also tried swapping over to a different Black key to see if it helped. It made a slight difference but still not acceptable – it was just too hard to get softer notes and compromising playing technique for that one key is not really feasible.
Testing in place with Pianoteq 7
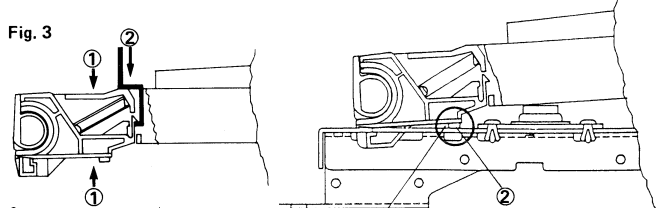
I examined the black plastic key at the point where it pushes down on the rubber dome switch. You can see from the schematic further back in this post (Fig.3) how the key, when depressed, impacts the dome switch at an angle. This causes the switch to close two sets of contacts in quick succession, and the time difference between the two circuits closing is translated to “key velocity”. It’s pretty accurate, when working correctly.
For whatever reason, this specific rubber dome was closing the two switches almost instantly, regardless of actual key depression rate.
In desperation, I took a file to the key and very carefully induced an angle in the flat underside of the key, such as to accentuate the timing difference in how the key impacted the two parts of the rubber dome. I don’t have a photo of this unfortunately (I wish I did, but I’m not opening up the A-80 again to get one).
Installing the key and re-testing demonstrated that my hack had made a difference. The velocity response on G#4 was now closer to that of the other keys. It’s not perfect but it’s very usable. It is still a “sensitive” key. I can live with it.
Conclusions
On the whole, the operation was a success. I think I dodged a bullet with the torn rubber dome on D4, and taking a flat bastard file to a key component to fix the problem on G#4 isn’t ideal by any means, but it seems to have worked. C#5 is no longer sticky.
The keybed is about 50% quieter and feels smoother. I did not replaced the “down” felt because it is aligned with the polyphonic after pressure sensors and I wanted to avoid messing with those. But much of the noise was due to “bounce-back”, and that has been reduced a lot.
The Black keys seem unaffected by the new felt with respect to key travel, but the White keys have a reduced “throw”, and feel…. tighter. This must be because their resting position is slightly closer from where it used to be, due to the new felt strip. I expect the new felt will compress a little further as time goes by, but the difference isn’t bad. It feels like an improvement. So, yay.
I hope you’ve enjoyed this tale from the workshop, and maybe even found some information that helps you out in your projects. Drop me a line if you have questions.
If you’re just here for the free SFZ files, the link to download them is at the end of the post. But if you are interested in the journey I took to get there, keep reading.
Introduction
I’m thinking of including sounds from a Javanese Gamelan in my next project. After some Internet searching, I found a pretty complete set of samples available from Casa da Música released under a generous license. The sample files are available in a single download:
DigitopiaCdM_Virtual_Gamelan.zip 360 MB
Unpacking the ZIP reveals a substantial directory structure:
DigitopiaCdM_Virtual_Gamelan\
    CASA DA MÚSICA's VIRTUAL GAMELAN.pdf
    Gamelao_CdM\*.nkm
    Gamelao_CdM\
        WAV\
            Gamelão da Casa Da Música - Porto, Portugal\
                BONANG\
                DRUMS\
                GAMBANG\
                GENDER\
                GONG\
                KEMPYANG\
                KENONG\
                KETHUK\
                SARON\
The sample files for each instrument are distributed within the subdirectories, along with a set of instrument definitions for NI’s Kontakt Sampler.
Unfortunately I can’t use the .nkm Kontakt instrument definitions because I don’t have the full version of Kontakt. However I do know how to create my own instruments using the SFZ format, which is a standard text file format used by many Cakewalk virtual instruments and other third party sample players like the venerable but lightweight rgcaudio SFZ Player, or Plogue Sforzando.
Reviewing the Library
The library contains samples from three families of instruments: Drums; Gongs; and Keys. The samples are in stereo WAV format, grouped into subdirectories and with a file name prefix to identify the instrument:
Family
Prefix
Instrument
Description
Drums
Kendhang Ageng
Drum, Large
Ciblon
Drum, Medium
Ketipung
Drum, Small
Gongs
BB_ _
Bonang Barung
Laid Gong, Medium
BP_ _
Bonang Penerus
Laid Gong, Small
K_ _
Kenong
Laid Gong
Kt_ _
Kethuk
Laid Gong
Kp_ _
Kempyang
Laid Gong
GA_
Ageng
Hanging Gong, Large
GS_
Suwukan
Hanging Gong
GK_ _
Kempul
Hanging Gong
Keys
GS_ _
Gender Slenthem
Metal Bars, Large
GB_ _
Gender Barung
Metal Bars, Medium
GP_ _
Gender Penerus
Metal Bars, Small
SD_ _
Saron Demung
Thick Metal Bars, Large
SB_ _
Saron Barung
Thick Metal Bars, Medium
SP_ _
Saron Peking
Thick Metal Bars, Small
G_ _
Gambang
Wooden Bars
Table 1 – Instrument Families in the Sample Library
These samples do vary in quality: most are very good, but many have odd resonances; are too quiet; are excessively long; or have tonal differences that are distracting. I can also hear from recording compression artifacts as the sounds decay into silence. Some even have negative phase correlation.
I could actually modify the sample .WAV files themselves for my own use but my reading of the license tells me that I then would not be able to distribute them. (I could be wrong about that.) However there is still a lot that can be done with the raw samples just by controlling how they are used in an SFZ instrument definition.
An SFZ instrument definition is just a text file, using simple HTML-like tags to define how samples are allocated to a MIDI keyboard; and played in response to a key press. (More information on SFZ available here.)
The Scales
Gamelan instruments are either SLENDRO (5-note scale) or PELOG (7-note scale). The scale intervals and root notes are not standardized between orchestras like Western 12-tone temperaments, but within any given orchestra, there should be consistency among its instruments.
The Pelog scale roughly approximates that of the phrygian mode of the Western major scale (E-E on the white keys of the piano), with the notes EFGBC corresponding to the note positions 12356 in the slendro scale used by most gamelan.
Catherine Schmidt-Jones, Musical Travels for Children
Musically, the 5-note Slendro scale is similar to the Western pentatonic scale, with scale intervals of large, small, small, large, small.
The (pelog) scale “selisir” is the most common; this scale leaves out the fourth and seventh notes.
Pieter Duimelaar
Back to the Library
For pitched instruments, a file name suffix indicates the scale of the instrument, and a number or letter indicates the scale note and octave:
The Slendro scale samples in the CDM library would appear to use a root note of C, whilst the Pelog samples start on D.
Approximately mapping sample note to apparent pitch:
                   Slendo Scale           Pelog Scale
  Instrument       1   2   3   5   6      1   2   3   4   5   6   7
  -----------      -------------------    --------------------------
  Bonang           C   D#- F   G+  A+     D-  D#  F-  G   G#  A+  B
  Kenong           C   D+  F-  G+  A+     D-  D#  F-  *   A-  A+  B
  Kempul           C   D#- F   G   A      D-  D#  F-  *   A-  A+  B
  Gender Slenthem  C   D+  F   G   A+     D   D#  F-  G   G#  A#+ B
  Gender Barung    C   D#- F-  G+  A+     D-  D#+ E+  *   G#+ A+  B
  Gender Penerus   C   D+  F-  G+  A+     D   E-  F+  *   G#+ A#  B+
  Saron            C   D+  F-  G+  A+     D-  D#  F-  G+  G#+ A+  B
  Gambang          C   D+  F   G+  A+     D   D#  F-  *   G#+ A#- *
* = No sample provided (see “Selisir” scale variant described above).
This assumes that the scale note number in the sample file name is accurate – which seems to be the case.
Assigning Samples to the Keyboard
When mapping the Slendro samples to the conventional piano keyboard, we could start at C. However, musically, the 5-note Slendro scale is similar to the Western Minor Pentatonic scale, and therefore maps quite well to the black notes on the piano keyboard. If we did that, we could then map the Pelog scale notes to the White keys.
In reviewing the samples of each instrument, I found that the Slendro scales aren’t consistent in their interval sizes:
If we assign the Slendro scale note that corresponds to the Minor Pentatonic root to the Eb key; and assign the Pelog scale notes to the corresponding adjacent White keys, we get:
                     Slendro Scale        Pelog Scale
   Instrument        1  2  3  5  6        1  2  3  4  5  6  7
   ---------------   ----------------     --------------------
   Bonang            Eb Gb Ab Bb Db       E  F  G  A  B  C  D
   Kenong            Gb Ab Bb Db Eb       G  A  B  -  D  E  F
   Kempul            Eb Gb Ab Bb Db       E  F  G  -  B  C  D

   Gender Slenthem   Bb Db Eb Gb Ab       C  D  E  F  G  A  B
   Gender Barung     Bb Db Eb Gb Ab       C  D  E  -  G  A  B
   Gender Penerus    Bb Db Eb Gb Ab       C  D  E  -  G  A  B
   Saron             Bb Db Eb Gb Ab       C  D  E  F  G  A  B
   Gambang           Bb Db Eb Gb Ab       C  D  E  -  G  A  -
I admit, I’m probably way over-thinking this.
Pros:
The “Keys” instruments will share a common scale note : key note mapping (same pitch = same key)
The Slendro scale notes will be intuitively produced from the Black keys on the keyboard;
The 12 notes in each octave will uniformly increase in pitch from low to high, making some interesting performance possibilities (trills, note substitutions, cross-scale melodies)
Cons:
Note 60 (“middle” C) isn’t going to produce a tone pitched at 262 Hz for any instrument, although this is hardly a new concept in orchestral assemblies;
It’s a shame that Kenong doesn’t map elegantly to Eb, matching the other Gong family instruments.
The SFZ Instrument Definitions
I developed the SFZ instrument definition files using Plogue Sforzando and the SFZ v2 format. However it would be easy enough to convert these back to SFZ v1 if necessary; I didn’t use any features unique to v2 other than the default sample path.
Each definition file uses a <control>default_path= operator to set the base directory to allow the sample files to be located. If it weren’t for those accented characters in the directory name, I’d have located the .SFZ files in the same directory as the .nkm files, the Gamelao_CdM\ folder.
But even just cutting and pasting the subdirectory name can cause problems, as you can see: “Gamela╠âo da Casa Da Mu╠üsica – Porto, Portugal”.
So instead, I’ve assumed the following relative directories:
This means that you’ll have to re-arrange the subdirectories to match, or edit the .sfz files to relatively or explicitly locate the samples where-ever you decide to put them.
I’ve prepared three categories of instrument definitions, indicated by a file name prefix:
RAW_ uses all available samples assigned to MIDI notes as per the table above. Slendro on the Black keys, Pelog on the White. I used Key Switches to separate the different kinds of sample (scale, mute/unmute, piano/forte) where available, for easy comparison. Feel free to use these instrument definitions in musical projects but really this was just intended for reference and review. I’ve made comments against each sample, where appropriate.
FIX_ are based on RAW_ but refined. Some sample substitution to omit noisy or tonally distracting samples, but retaining the original charm of the instrument. Hopefully still “organic” sounding. Ideally, this is what I’d use in projects that required the traditional Javanese tuning.
TET_ are 12-tone Equal Temperament versions, with A4=440 tuning, using cross fades, multi-samples, and other techniques to create instruments that would be used for Western tuning projects.
RAW_drums
In general these are well-recorded samples, L-R balanced, low noise. A collection of “door slams”, “bongo hits”, and “face slaps”. I’ve assigned them to C2 > C3.
RAW_bonang
C1 and D1 are used to switch between the Barung and Penerus voices respectively.
RAW_gongs
Kenong, Kethuk, and Kempyang are arrayed with C1 and D1 switching between Muted and Un-muted (sustained) tones.
Kempul, Ageng and Suwukan are arrayed together with E1 and F1 switching between Piano and Forte voices.
RAW_gender
Slenthem, Barung, and Penerus instruments are available using Key Switches on C1, D1, and E1.
RAW_saron
Demung, Barung, and Peking size instruments are available using the C1, D1, and E1 key switches.
RAW_gambang
No voice variations, just Slendro and Pelog mapped across the Black and White keys, from A2 > G6.
The “FIX” instrument definitions
FIX_bonang
I’ve combined Barung and Penerus into one SFZ instrument, using round-robin alternating for over-lapping tone ranges.
FIX_kenong
Seeing as we have both muted and un-muted (sustaining) tones for Kenong, Kethuk, and Kempyang instruments, it seems sensible to combine these into one instrument definition. We could use key velocity to switch between them, but I don’t think it “works” from a performance point-of-view. I’ve used key switching, with C2 and D2 controlling Muted and Un-muted respectively.
Alternatively, we could replace the Key Switch with the following opcodes in order to play the sustained notes when the Damper Pedal is depressed:
<group>
hicc64=100          // play group when cc64=0   (sustain pedal up)

<group>
locc64=100          // play group when cc64=127 (sustain pedal down)
In practice, I didn’t like how the sustain pedal affected the natural decay of the sustained tones when the key was released, so I’ve left it as key switching. Feel free to experiment.
FIX_kempul
We have loud (forte) and soft (piano) tones for Ageng, Suwukan, and Kempul gong voices, so I combined these into one SFZ instrument, using velocity switching to change to the Forte tones. Some volume matching between samples was used.
I realize that the point in the velocity curve where the switch happens is dependent on the controller’s velocity curve; personal preference; etc, so tweak to taste.
FIX_gender
Tonal differences between the Slenthem, Barung, and Penerus sizes mean that I’ve left them as separate key-switched ranges in this SFZ instrument. C2, D2, and E2 respectively.
I’ve used sample offsets and volume matching to try to even out some of the harsher samples, and used sample substitution in the worst cases. The result is a more uniform instrument, but still with character.
FIX_saron
Because of a similarity of tone between the three sizes, I’ve combined these into a single SFZ instrument, using velocity switching for loud and soft tones; and round-robin for duplicates. I’ve adjusted for volume differences and also substituted some samples in cases where noise was distracting (vibration or rattle).
FIX_gambang
Generally clean samples. The Slendro notes have some rattle but it is a musical sound. Outliers in the Pelog scale have been substituted for. Clicks and initial “dead space” in the samples have been removed by limiting the sample playback regions.
The “TET” instrument definitions
The CDM library samples are used to construct a good-sounding 12-tone Equal Temperament instrument with A4=440 using the Gamelan Instruments’ samples as a source. This could be used in musical projects that would work best with Western tuning.
I’ve allowed more creative leeway in assembling the instruments. In the case of Gender and Saron, I liked the effect of playing all layers at once so I’ve provide a couple of alternative SFZ files that do that.
Definition
Description
TET_bonang.sfz
Laid Gong, Range B3 > F7
TET_kenong.sfz
C2: Laid Gong (muted), Range C4 > E5 D2: Laid Gong (sustain), Range C4 > E5
TET_kempul.sfz
Hanging Gong, Range E2 > C4 (piano/forte on velocity switch)
TET_gender.sfz
C2: Large Metal Bars, Range C3 > C4 C#2: Medium Metal Bars (Slendro), Range C3 > G5 D2: Medium Metal Bars (Pelog), Range G2 > G5 D#2: Small Metal Bars (Slendro), Range G3 > G6 E2: Small Metal Bars (Pelog), Range G3 > G6
TET_gender_ALL.sfz
All layers enabled. Thick! Range C3 > C7
TET_saron.sfz
C2: Thick Metal Bars (Pelog), Range G3 > C7 D2: Thick Metal Bars (Slendro), Range G3 > C7
Following on from a previous post, I wasn’t happy with the touch response on the Korg M1 since upgrading the keybed felt. The Yamaha FS keybed supports “aftertouch” or “channel pressure” which means that you can alter a sound by pressing down after the initial depression of the key. Nice for, say, opening the filter or adding vibrato, or some other musical change in the sound.
After the felt upgrade, the “feel” was great, but the response to additional pressure on the keys didn’t seem smooth or playable.
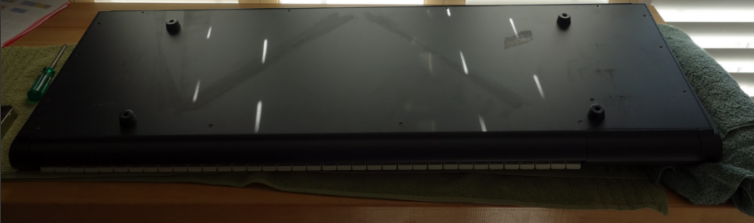
Fortunately, the Korg M1 has two tiny variable resistors you can tweak to fine-tune the pressure response. The down side? They are inside the chassis and you can’t get at them without turning the unit upside down, and removing the bottom panel. At which point, playing the instrument to check the results of the adjustment is problematic.
Remove all the screws except the ones holding the rubber feet
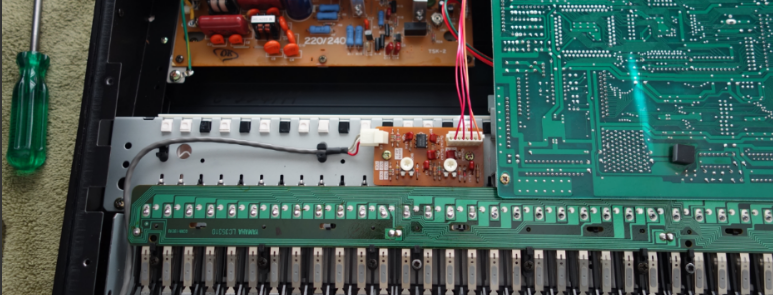
After removing the bottom plate and taking a look, the pressure adjustment controls are very easy to spot:
Right in the middle of the photo
Each control sets a different aspect of pressure sensitivity:
The one on the right sets the level required to start sending “channel pressure” signals.
The one of the left sets the level required to reach “maximum”.
Obviously these levels are very subjective and need to be tuned to match your playing expectations, along with how firm the newly installed felt is. And over time, these may change – the felt will break down and become softer; and your technique as a performer may also change.
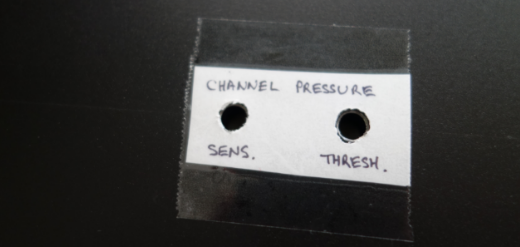
I decided I’d quite like to make it easier to access these adjustment controls with the keyboard assembled and set up for performance, so I measured the location and drilled a couple of holes in the under plate.
The location of the centers of the holes are 176 mm down from the top edge of the back plate, and 198mm and 226mm in from the left edge, respectively.
6mm holes
With the back plate screwed back into position, and the keyboard restored in the upright position in the stand, I plugged it in and temporarily edited the default I08 “Pan Flute” patch so that the AFTERTOUCH Pitch=+12, for calibration purposes. This means that “maximum pressure” should raise the tone by one octave.
I then used a Philips head screwdriver to reach under the chassis and adjust the levels to their mid-point. Pressing a key and listening to the onset of the change in pitch, and how heavy I needed to push in order to raise the pitch, allowed me to adjust each of the two levels to optimize the response of the keyboard to pressure.
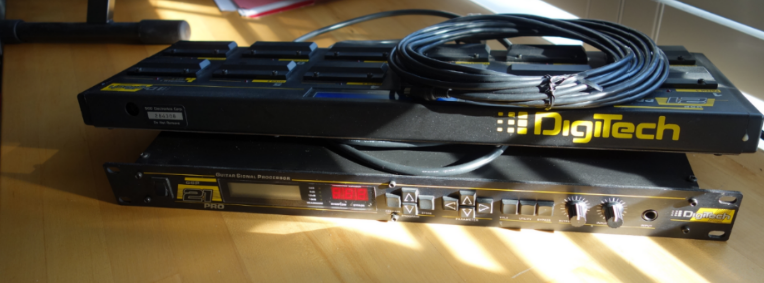
I’m not a hoarder – at least, I try not to be – but there are some items of equipment I’m not using and probably don’t need to keep. They are either in storage, or mounted in a rack, taking up space but providing passive heat sinking.
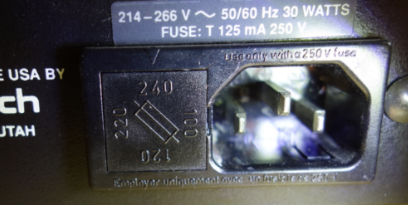
One of these items is my venerable Digitech GSP21-Pro. This is a very capable guitar effect processor and I think it could go to someone who would actually use it rather than just leave it sitting around. I brought this over from New Zealand, so it required a 240V mains supply. About 50% of my gear has been running on a grunty 120-240 mains transformer, so I’ve never bothered to take a close look at the power supply on this unit. However, if I am to pass this on to someone else, it will really need to run on a 120V supply.
Given my recent success with my Korg EX-8000 , I figured I’d open it up and see what was needed to convert the power supply. It turns out that it couldn’t be simpler:
The internal transformer supports 100-240 volts via a simple fuse plug
The easily switched voltage plus the standard appliance socket means that it was trivial to switch it over to 120V. Embarrassing! I could have done this years ago and not needed to run it on the big transformer.
However, I did have a problem: The GSP21 had forgotten all of the custom programs I’d set up over the years, and when turned on, goes to patch 01 instead of the last used setting. Typically this behavior is due to the internal memory backup battery being dead. If I was to sell or gift the unit to someone else, I wanted to be confident that their own patches would be retained in memory while the unit was switched off.
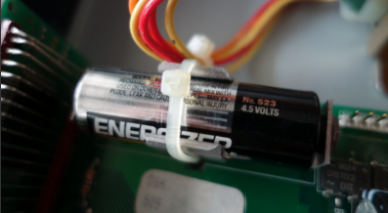
The internals are easily accessed by removing a series of screws from the chassis. The backup battery is identified quickly, tucked away neatly at one side of the PCB. I expected a coin-style CR-2032 but it’s quite different:
Energizer No. 523 4.5 Volts
That battery lasted at least 20 years before giving up. Impressive.
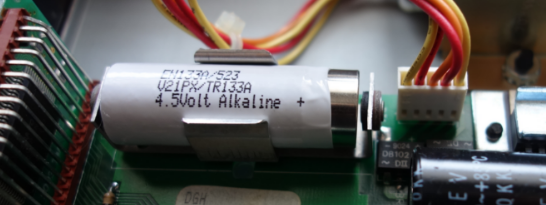
After some research I found that it is actually very difficult to find a No.523 battery of this type. One possible replacement is A21/A133 4.5 Volt Alkaline Battery which can be found at BatteryMart.com under the item code BAT-A21PX.
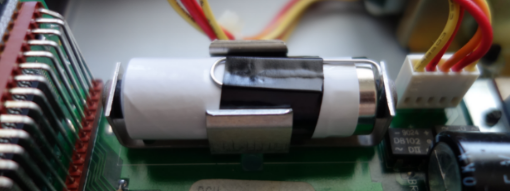
Mind the gap…
It is almost a perfect drop-in replacement except for a 1mm gap. I tried bending the battery socket arms inward to eliminate the gap but it wasn’t really possible without potentially stressing the PCB. It’s not really designed to be bent – it’s quite strong spring-steel.
My solution was to use a paper clip. Really low-tech but seems to work well:
Simple but effective
It closed the circuit and the battery is firmly held in place. Turning on the unit for the first time showed “restoring factory patches….” for a second, before making patch 01 available. The second time I powered it up, the patches were available immediately, and it remembered which patch I had selected prior to turning the unit off. Success!
I cleaned the exterior of the unit, and offered it on NextDoor.com along with cables, the footpedal unit, and a ragged photocopy of the user manual (which is all I had). And now it is in someone else’s hands, hopefully to give many more years of effective use. I highly recommend the UltraVerb reverb algorithm; it’s very good.
How does your synth know what note to play, when you press a key? If it has a built-in keyboard, then the glib answer is, “whatever key I’m pressing!”. If your synth is a module in a rack, or your keyboard is responding to signals sent to it over the MIDI cable from your sequencer, it gets a little more interesting.
MIDI Note Numbers
MIDI signals are digital, so everything is represented by numbers. For example, if I want an instrument to play a sound, I need to send it a specific type of message: a “Note On” message. In addition to a number identifying the message as a “Note On”, it will include two additional numbers representing:
which note to play
how strongly the note was played (known as note “velocity“)
Because the numbers are 7-bit digital, there are 128 possible values. For example, the note number will be between 0 and 127, representing the lowest and highest possible notes respectively. The velocity will also be between 0 and 127, where 0 is the lightest possible touch, and 127 represents the most force you could use.
Your synthesizer uses these numbers to decide how to respond: which note (pitch) to play, and how to set the volume or tone for the requested velocity. For your typical instrument using a standard Western 12-tone scale, note number 60 will result in a tone of 261.63 Hz, or “Middle C”. The synth module will continue to play that note until it receives a follow-up “Note Off” message for the same note number.
A message here, a message there, and pretty soon you’re playing yourself a tune. MIDI messages get complicated quickly, and there are better places to go if you are curious about the details.
Introducing Note Names
Secure in the knowledge that our instruments – both physical and virtual – will respond with middle C if we sent them a MIDI Note Number 60, we can move on to note names.
If you’re used to conventional Western musical notation, it makes sense to refer to notes using the alphabet notation of the scale, .e.g. C, D, E, F, G, etc, instead of those confusing and non-obvious numbers. With ten and a half octaves covered by our 128 possible note numbers, back in 1982 Roland documentation writers chose “C4” to represent Note 60, middle C, and to enumerate octaves from C to B (.e.g. ascending notes would be A4, B4, C5, D5, etc.)
And everything was cool… until Yamaha used “C3” to represent note 60 in their own MIDI documentation.
Since then, instrument and music software manufacturers tended to pick one of the two conventions and ignore any subsequent confusion on the part of the users.
For example, XLN’s Addictive Drums follows Yamaha’s convention, and in their documentation and note maps, they use “C3” to refer to note 60.
Voxengo SPAN, however, displays ~262 Hz as “C4”, following the Roland standard.
Three notes walk into a bar
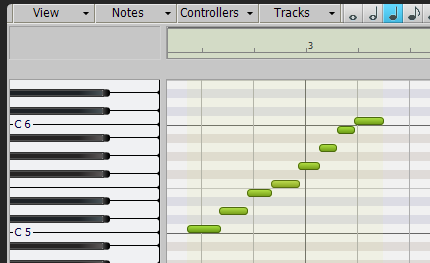
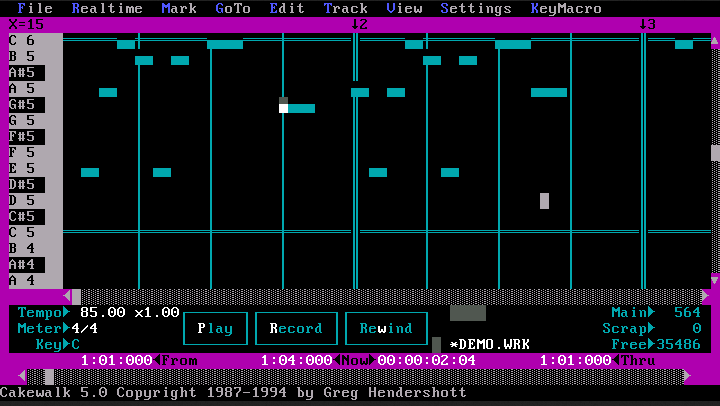
Just to be different, Cakewalk eschews both conventions, and shows note number 60 (middle C) as “C5” in their Piano Roll View.
“There is no industry standard for numbering octaves. By default, Cakewalk calls MIDI note 0 (the lowest possible note) C0.
Cakewalk Documentation
Here’s a scale from note 60 to 72:
Personally I think I know the reason for this: One side effect of middle C as C5 is that the lowest possible MIDI note 0 is then “C0”. Cakewalk started life as a character-based DOS sequencer, and if they’d used “C4” or “C3” for note 60, they’d have needed additional real-estate space for notating the lower octaves, e.g. “C-2”.
I don’t know for sure that this was the reasoning behind it, but it seems possible. Those were the days! I personally never used the DOS version of Cakewalk, but I used to develop character-mode applications in MS-DOS, and I feel their pain.
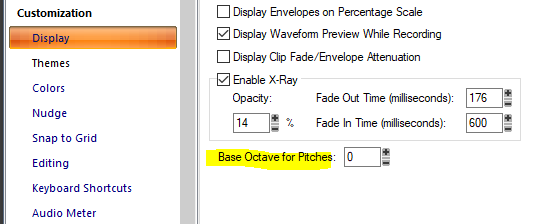
Fortunately, we’re not limited to Cakewalk’s default notation:
In the Preferences dialog, we can control the “base octave for pitches” offset to our needs.
The Yamaha FB-01, for example, shows MIDI note 0 as C-2 (C negative 2). To match Cakewalk to that standard, set Base Octave to –2.”
Cakewalk Documentation
Because I’m an avid user of XLN’s Addictive Drums virtual drum instrument, I set my Base Octave for Pitches” to -2.
And all was good, until the other day I was developing some SFZ patch definitions and I noticed that the samples were being played back 12 notes below where I was defining them:
That worked as expected, responding when I pressed “Middle C” on my keyboard (i.e. sending MIDI Note 60 to the SFZ Player instance in my Cakewalk project.).
Bottom line: I could use the note numbers in my SFZ file definitions, but if I feel the need to use Note Names, I should remember that SFZ Player uses the Roland standard of C4=60.
Melodic progressive rock songs and instrumental interludes, a touch of 70’s influence but a product of the dystopian Now.
“Very smooth, hi-tech sounding delivery…” – Chris Jemmett, alt.music.yes
“This guy is awesome.” – Dazed, on the Carvin Forum.
“..on a rare occasion you just have to conclude that the prog world should be feasting upon the birth of a new and promising act. That’s exactly the case with this [first] album.”
– Theo Verstrael, DPRP.net
“I find this new album attractive, [..] slightly less appealing than the 2014 debut. But as that is often the case with great artists, let it not distract you from trying this fine album. Especially those that are interested in bands that play varied, cleverly made, well played and sung [..], this might just be your cup of tea.”
– Theo Verstrael, DPRP.net


Recent Comments