The Novation PEAK is like having my Jupiter-6 back. Very yummy. I’m looking forward to working through the complete Synth Secrets book with this one.
Progressive Rock Artist seeks Audience
The Novation PEAK is like having my Jupiter-6 back. Very yummy. I’m looking forward to working through the complete Synth Secrets book with this one.
Quite a nifty little mono-synth. I like the extended keyboard (for this class of instrument) and it has a quite sensitive pressure response.
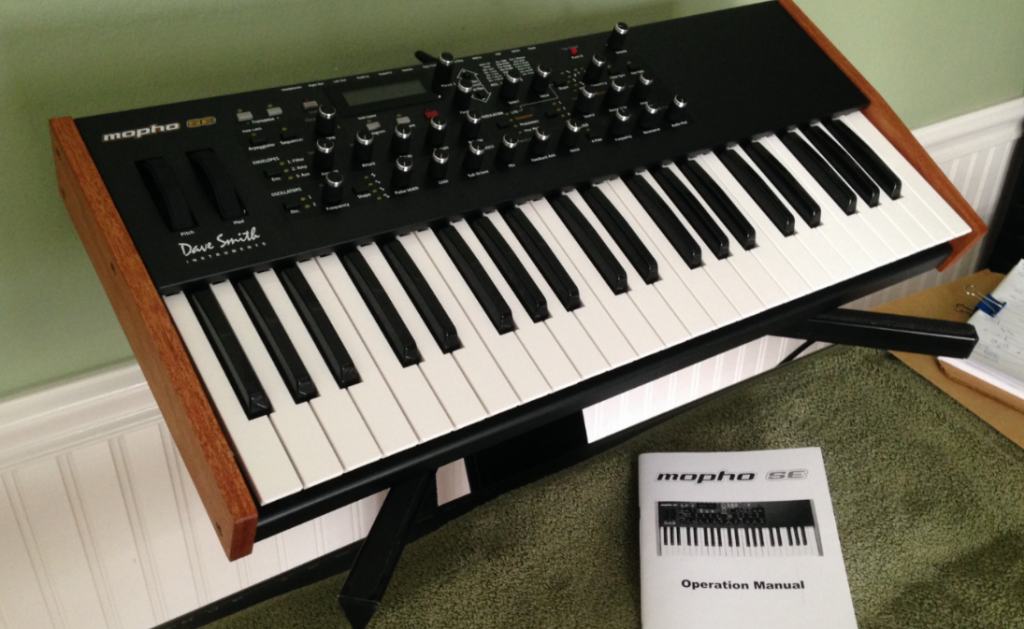
The Roland A-80 keyboard controller is one of the few keyboards that supports polyphonic aftertouch. This makes it quite desirable for those who care about such things, and indeed, is one of the reasons I tracked down a unit on ebay.
Out of the box it is a fine 88-key ‘board with a respected weighted action (it’s not “hammer action” but it has a very nice response all the same), with sophisticated zone and tweakable response curves for things like velocity and the afore-mentioned key pressure.
On the down-side, it weighs a ton, and the aftertouch requires the keyboard technique of the Incredible Hulk. Seriously. In order to register any aftertouch messages emitting from the MIDI out socket, I needed to use force unattainable from mere human fingers.
What Good Luck: Fortunately, this is a known problem. See… there’s this resistor on one of the circuit boards called “R43”. Originally, it came from the factory with a value of 5.6k ohms, but when customers started complaining to Roland, the tech folks recommended changing it to 10k ohms. Later releases of the A-80 came from the factory with a 10k ohm resistor installed.
What Bad Luck: It seems that 10k is not enough. Other enterprising keyboard techs have Done The Research and found that higher-values give better results. Like, say, 51k ohms.
I knew about this issue when I sought for and purchased the A-80, fully intending to apply some DIY-love to the unit and make the mod. Two years later, I finally got around to it.
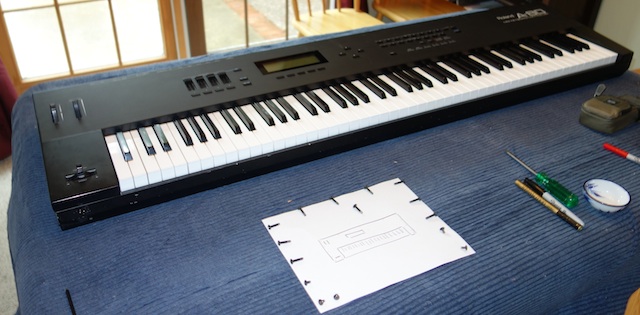
The first issue is figuring out how to open it up. I knew from some pictures on the web that the sides and panel opened up on a hinge (I could see the two hinges just by looking at the back panel of the keyboard) but knowing which screws to take out is a challenge. Future generations can save time by knowing that the screws you need to remove are all on the bottom of the keyboard. From the A-80 service notes:
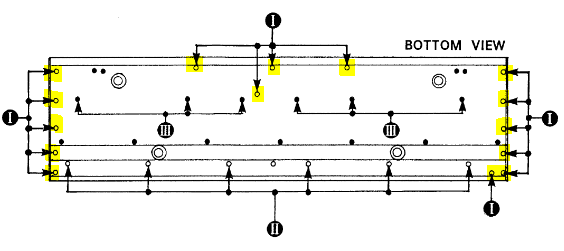
The screw locations (I) are shown above high-lighted in yellow. Once you’ve removed those 15 screws (5 short, 10 long), the top panel will be loose, so carefully re-position the unit and lift the panel. It will hinge up on the back edge:
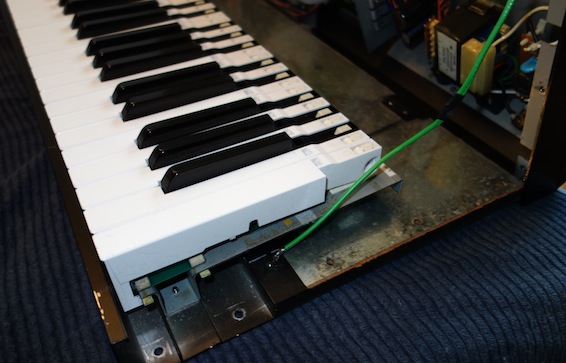
On my unit, there was a ground wire preventing the case from opening completely, but be warned! There are other connections to the circuit boards that may take up the tension if you unscrew the ground wire and haven’t braced the top panel to prevent it from swinging open. (This is unlikely to happen because on a flat surface, the back panel rests on the table top.)
I had the unit mounted on supports that meant that the table top was actually lower than the underside of the unit – so the panel could free-swing further back from the unit. You’re actually going to need to do something similar in order to get enough room to work on the unit.
There’s a wide copper sheet linking the circuit board to the main chassis that will take up tension as the panel opens. The way I handled this was to unscrew the three screws attaching it to the chassis, then folding it back over the top panel and taping it down out of the way.
We can now see the circuit board that interests us:
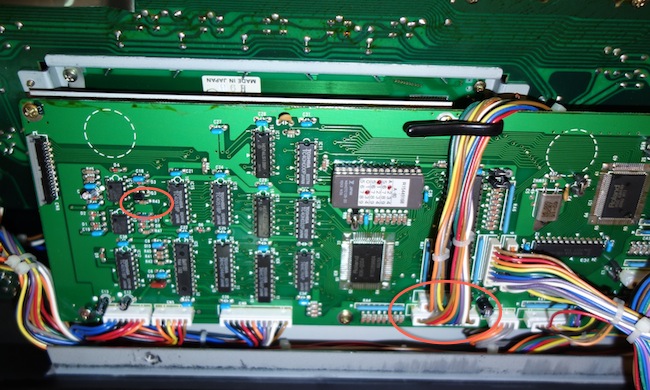
Our resistor, R43, is on the left side. I’ve highlighted it with a red ellipse.
There’s really no escaping it: in order to replace the resistor, we need to detach this circuit board from the chassis. There are three connections you’ll need to remove:
1. The ribbon cable on the top left (see the grey and black connector). This requires some care. It is basically just a slot that clamps down on the end of the ribbon cable. I actually detached it by accident and had a moment’s panic when i thought I’d made a mistake. The picture above shows the cable already disconnected (sorry) but it is a simple operation to “open” the clamp by pulling the grey part of the connector away from the black part. MAKE SURE YOU NOTE WHICH WAY THE RIBBON CABLE IS ORIENTED. Then the ribbon cable just falls out. (It’s trickier to reconnect it but if you’re careful, there isn’t much risk of getting it wrong. Just make sure the cable is fully into the slot on both sides before re-clamping.)
2. The other two connectors are highlighted by another red ellipse in the picture above. Much safer to remove but require more force than the ribbon cable. The plugs are grooved in a way that makes it impossible to reconnect them wrong.
There are six screws around the perimeter of the board that attach it to the chassis via separator posts. Two of the screws are holding cable retainers – make sure you remember where they are located before removing them.
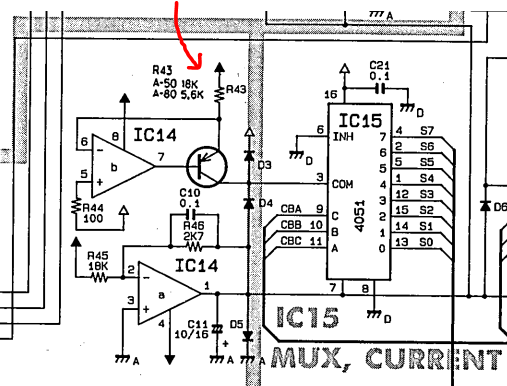
Now the board folds back easily, allowing us access to the components from the reverse side:
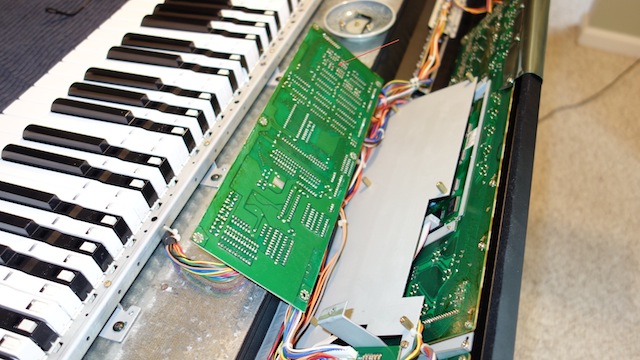
There’s a red arrow in the picture above (somewhat hard to see) that points out the location of R43. Make sure you know which it is! It is not labeled on the back side.
I don’t have pictures of the solder removal process or the replacement resistor. If you don’t know how to handle that part of the process comfortably, you should not be doing this operation yourself. I’m not going to write a tutorial on circuit repair techniques here.
The actually resistor replacement operation took about 15 minutes, after which I re-assembled the unit and screwed the panel back in place.
Bottom line: The mod works. Replacing R43 with a 51k resistor makes the aftertouch feature work as expected. Mission accomplished!
Special thanks to Plink Floyd (http://computermusicguide.com/forum/viewtopic.php?f=11&t=340) for the excellent pics and entertaining rant.
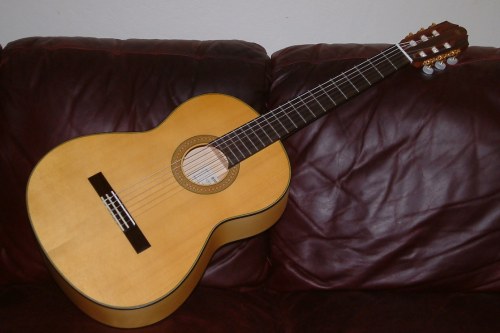
Satin finish, flamenco-style classical guitar. Sounds great, records well, very happy with this one. One day, if I get really excited about playing flamenco, I may find I need something higher quality, but for now, this satisfies.
The AudioSource AMP100 recently experienced a 50% price cut in my “save for later” shopping cart on Amazon, so I took advantage and purchased:
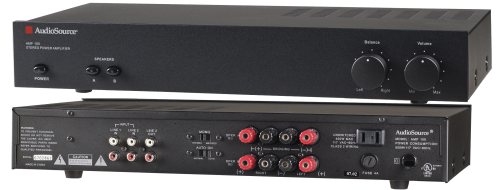
It replaces the old Dick Smith Electronics kitset amplifier that a) runs on 240 V and b) was starting to crackle. One nice thing about the AMP100 is that it has an A-B speaker switch on the front, which allows me to switch between my Behringer TRUTH 2031P monitors, and a pair of Boston Acoustic bookshelf speakers.
Next step: Obtaining an SPL meter and calibrating the room for K-System monitoring.
Serial# 968739
The annual Marin County Guitar Fair was held in January. This was the second year in a row that we’ve gone along to see what’s on offer. Not with any intention of buying or selling, of course, but just to admire the work of local luthiers and to maybe catch a glimpse of a genuine ’53 blackguard tele, or similar.
Last year I joked to Lisa that there were only two possible models of guitar that we might find that would put me in a “difficult position”, one of which is the Gibson ES-Artist, as played by Steve Howe on all Asia albums in which he contributes; and a Gibson L6-S Deluxe, as played by this guy shown on the right.
That model of guitar is all over Oldfield’s albums, from Incantations to QE2, and specifically the ’79 live concerts exemplified by the Exposed film and album.
Oldfield’s playing has a particular tone and quality on these albums that I covet, and it was always tempting to think that the guitar was partially responsible. I’ve kind of always wanted one.
Last year I remember seeing a related model, a black L6-S Custom but it didn’t pique my interest at all.
This year, the real thing showed up.
After a couple of seconds careful thought*, it came home with me.
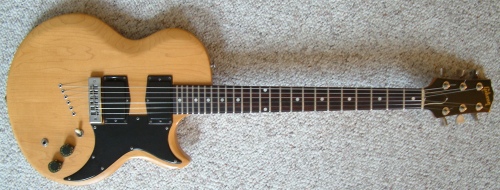
According to Wikipedia, Gibson only made 3500 of these models, from 1975 to 1980. They are not really considered collectable by guitar experts – at least, not currently – and so prices vary. I consider this particular purchase to be good value, while “true collectors” who wet themselves over $30,000 blackguard teles and 50’s Les Pauls probably haven’t even heard of the L6-S, and might think it too much to pay for an old, “unknown” Gibson.
The body shape is somewhat unique. It looks like a classic Les Paul that has been left out in the sun: Thinner and “spread out”. I like to think of it as a cross between a thin Gibson SG and the Les Paul profile. Also unusual is it has 24 frets, with a thin neck joint and body cut-away making runs up the fretboard a breeze.
I think the pickups are designed by Bill Lawrence – they were on the original L6-S but the Deluxe model could be using something different. Either way, I know they are factory-original**, along with the guitar case.
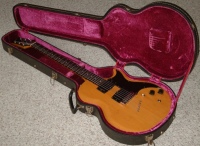
Both the guitar case and guitar smelled rather musty, but after I brought the guitar home, I have been airing the case out in the sun, and I stripped the guitar down and cleaned off all the accumulated gunk from the hardware and rubbed the body down with Murphy’s Oil Soap. Now it has a pleasant, vintage wood aroma.
To celebrate the addition of this first “vintage” instrument to my collection, I spent some time recording some excerpts of my favorite Oldfield tracks with the L6-S.
The first thing I noticed is that this guitar is BRIGHT. Very trebly, not at all Les Paulish at all, despite the humbuckers. Secondly, the guitar is seriously resonant. Play almost any note on the high E string above the 12th fret and you can hear various harmonics on the other open strings singing along. Also, the pickups are very microphonic, reproducing clicks, and pick noise, and even my cursing at duff notes. I think these factors contribute to the tone of the instrument and do explain some of what you can hear in the Exposed recordings. The “honk” of this guitar is definitely present on the Oldfield albums.
So here’s my attempts:
I don’t have an amplifier, so I couldn’t try and replicate that wonderful sustained feedback on the original version of First Excursion.
These were all recorded with the same settings on the L6-S: bridge pickup with the treble control rolled all the way off.
(*) Actually, I went back the following day and bought it.
(**) Often, owners will swap out the factory-original pickups and put in their favorite brand of humbucker. When considering a vintage guitar purchase, it’s always better to have the original components.
© 2024 The Prodigal Sounds
Theme by Anders Noren — Up ↑
Recent Comments