There’s more than one way to skin a cat, and other folks have talked about this before. The more, the merrier. Here’s how I constructed a project in Cakewalk to re-master a commercial CD.
The Problem
I have a commercial CD release from 1986 that sounds horrible for several reasons: it was the Age of Digital Reverb and there’s too much of it. Also: it was the Age of Digital Recording, and CDs were new, and when Treble wasn’t something you required analog psycho-trickery to extract from magnetic tape. It’s a very shrill mix. I am fond of the actual music, though.
It was “remastered” back in 2001 when the Loudness Wars were in full swing, and the results were… over-compressed and also shrill. What to do? I still have the original CD release from 1986, fortunately.
The Plan
Because this is a “re-master” and not a “master”, I’m going to treat all tracks the same way, using a common FX stack. I also want to be able easily to switch back and forth between “effected” and “un-effected” versions, for comparison purposes.
When evaluating quality changes of audio, it is important to match effective loudness between the two. This is because our ears think “louder” = “better”. And that’s a problem, because one of the things I will be doing is raising the overall level of the music. The original CD from 1986 is mastered at a fairly low average level.
So, the plan is to temporarily reduce the volume of the mastering effect chain during the tweaking so that the measured loudness is the same. This will require obtaining a loudness measurement from both signal paths.
The Process
I open a new empty project, and import the audio tracks from the CD. Cakewalk will create a separate audio track for each of the CD tracks.
Next, I create four stereo busses. The first is named SPLITTER, and I need to set all of the imported audio tracks to direct their output to this bus:
Press Ctrl-A to select all tracks. Then hold down the Ctrl key, and set the Output of one of the tracks to SPLITTER. All highlight tracks will set their Output the same way. (The Ctrl- key creates a “quick group” documented here.)
The other three buses are named MASTER FX, MASTERED, and ORIGINAL.
On the SPLITTER bus, I create two Sends: One to MASTER FX, and the other to ORIGINAL. (Both sends’ levels are left at the default of 0 db.)
I set the Output of SPLITTER to “None”.
I set the Output of MASTER FX to the MASTERED bus.
Now I have two duplicate signal paths. Both MASTERED and ORIGINAL continue to direct their Output to the default, a hardware output (called “12” on my system).
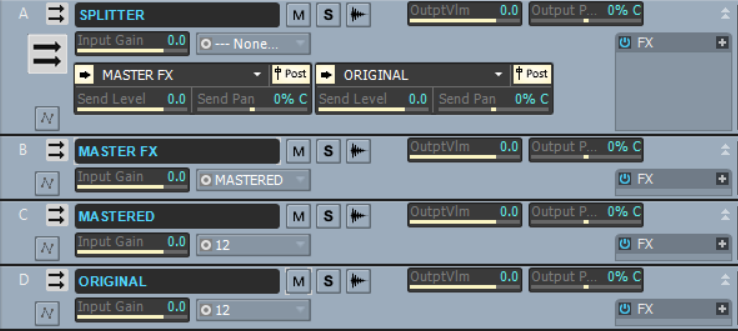
The only drawback to this configuration is that Cakewalk will warn us upon opening the project, that SPLITTER is identified as a “Silent Bus”. I prefer the symmetry of the two Sends, rather than using SPLITTER’s own Output, so I pay the price of dismissing this warning dialog. (Feel free to adapt as necessary.)
The next step is obvious: we add some FX plug-ins to the MASTER FX FX Bin. My tools of choice are from MeldaProduction:
You probably have your own favorites. I’ll use these to apply a tilt to the frequency spectrum, taming the shrillness and up-ing the bass; and also some tasteful multi-band compression.
Speaking of LUFS… My Loudness Meter plugin of choice is – you guessed it – also from MeldaProduction: MLoudnessAnalyzer.
I put an instance of the Loudness meter in each of MASTERED and ORIGINAL, configured identically.
More detail: I configure the MASTERED instance for a “target” of -12 LUFS. I’ll use this as a reference as I mess around with the EQ and Multiband limiting, aiming to raise the overall level and apply a smidgeon of peak reduction (aiming for a still-conservative -12 LUFS). [0]
I set the ORIGINAL instance identically so that I can match loudness-levels between the two, using the loudness metering.
Before we start playback, we need to set Exclusive Solo on (optional, but handy) so as to easily listen to one track at a time, switching between them with the Solo button:

And, just as important: Mute the ORIGINAL bus. Don’t forget to do this!
For convenience, I like to use a control group to link the Mute buttons of the MASTERED and ORIGINAL busses, letting me switch between them with one click:
- Un-mute MASTERED
- Mute ORIGINAL
- Right-click on one of the Mute buttons and select Group > New…
- Select a color for Group 1 (say)
- Right-click on the other Mute button and select Group > Group 1
The final configuration looks like this:
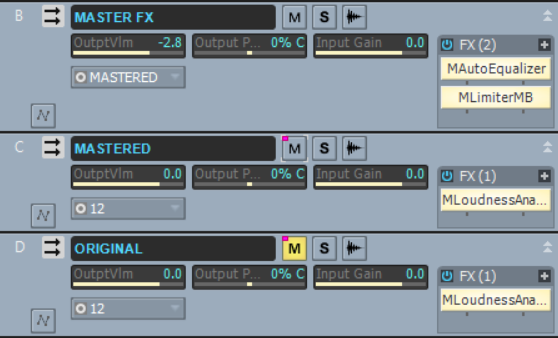
You may notice the little colored dot on the Mute buttons, indicating they work together as a group.
Now I can take some time to fine-tune the mastering effect chain as described above. When I’m more-or-less happy with the results, I open both Loudness meters and watch the playback. I can see – as expected – that the MASTERED path is adding about +3 db of raw volume boost. Which is fine – but I also want to know if I’ve actually made the sound worse than the original. For that, I need to use my ears, and to remove the “louder-equals-better” bias, I need to reduce the level of the Mastered signal, so that the Loudness meters show the same values.
We do this using the OutptVlm control on the MASTER FX bus, reducing the volume to match. (See above, it’s temporarily set to -2.8 for the comparison review). [1]
Now I can start playback, and switch easily between the two signal paths by clicking on either of the two buses Mute buttons (they’ll swap in one click).
Yup – my version sounds better than the original.
Now, in order to export each track with the mastered fx in play, we need to ensure that we:
- Switch to the MASTERED output;
- Put the MASTER FX Output Volume control back to 0db;
- Solo each track
- Select the clip (to get the right timeline range) and Export to WAV or FLAC or whatever.
Happy Mastering!
[0] I’ve re-calibrated, I don’t think -12 is conservative. But it’s an okay choice in this case, I stand by that.
[1] Alternatively, we could instead increase the OutptVlm on the ORIGINAL bus to match the MASTERED level. This has some advantages in that we don’t need to make any changes before the final Export. On the other hand, it is usually a good rule of thumb to “cut, not boost” to avoid unexpected overloading, so I’ll let the instructions stand as-is.
Great article! Awesome content.I Loved this post and I’m definitely pinning it to share!