I can not remember when I acquired the Roland A-880 MIDI Patch Bay. It certainly wasn’t the first piece of kit I ever bought – that honor goes to a second-hand Roland Jupiter 6 back in 1988. It had some DIN ports – In and Out – on the back for something called MIDI. It was soon followed by an Akai sampling keyboard and synthesizer rack module, which worked very well together when connected with MIDI cables. Also, you could send notes from the Jupiter to the Akai devices over MIDI, so long as you set the rack to listen on MIDI Channel 1 or 2. Shortly after that, we found a Roland MIDI Interface (MPU-401?) for our PC, and started recording MIDI sequences into a copy of Passport Software’s Master Tracks Pro.
Recap: MIDI in a nutshell
So far, so good. We had PC software that allowed us to perform patch librarian tasks using MIDI (called System Exclusive or SYSEX) on many of the devices but it requires bi-directional data transfer between the sound module and the computer, and signals in a single MIDI cable only go one way: You need two cables connecting the In and Out ports. From the computer OUT to the module IN; and also from the module OUT to the computer IN. The computer requests data; the module sends it; the computer sends more data.
MIDI messages are assigned a “channel” between 1 and 16. So if you connect a MIDI cable between two devices, a device listening on channel 1 won’t respond to any messages assigned to channels 2-16. More information here.
This allows more than one device in a MIDI chain. In fact, later keyboards and modules included a third port, a MIDI THRU that would re-transmit incoming MIDI signals to the next device in a chain, allowing layering and multi-timbral setups. Some manufacturers combined the THRU and OUT connectors.
I realize as I write this that it all sounds archaic these days, when we have digital bi-directional comms over a single USB connector, let alone Ethernet and WiFi. But back in the 1990’s, it was like magic, and no-one complained that they needed two cables for this type of two-way communication.
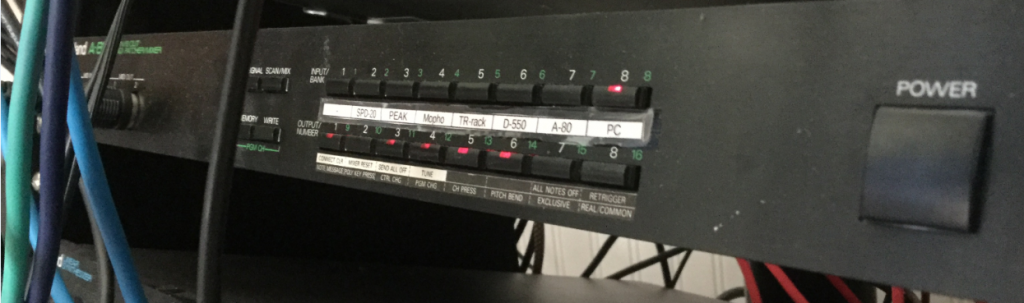
The problem is that the more devices you have, the more un-plugging and re-plugging of MIDI cables is required to manage all the equipment. Some sort of automated patch bay becomes almost required. Enter the Roland A-880 MIDI Patch Bay.

The A-880 is basically a box with 8 inputs; 8 outputs; and it will connect these together any way you like. You can use it ad-hoc by selecting an input (from the top row of eight buttons) and then selecting which of the eight outputs (from the bottom row of buttons) the MIDI messages are echoed on. If you find yourself using the same set of connections over and over, you can save it in one of the 64 possible memory locations for easy recall.
The Studio Equipment
For the purposes of this article I’m using the following devices:
- Windows 10 computer running the Cakewalk by Bandlab DAW
- MIDISport 2×2 USB MIDI interface (ports A and B)
- Roland A-80 Keyboard controller
- Roland SPD-20 Drum Pad controller
- Novation PEAK synthesizer desktop module
- Korg M1 Synthesizer keyboard
- Korg TR-Rack synthesizer rack module
- Roland D-550 synthesizer rack module
All these devices have MIDI In and Out ports for sending and receiving MIDI messages such as notes, clock, and system-exclusive (data dumps and patch edits). I’ve already decided which MIDI channels each device is going to use.
Aside: Cakewalk and MIDI Echo
Cakewalk – and presumably other DAWs – has the ability to mimic the behavior of a THRU port, and echoing the incoming MIDI data from input to output. It records the performance into the active track, but also optionally echoes the notes through the computer’s MIDI output port. This lets me play the Roland A-80 whilst hearing the sound from, say, the Roland D-550.
More on this in the Cakewalk Manual: Controlling MIDI playback – MIDI Echo
Use Case 1 – Playback of a previously recorded MIDI project from the DAW
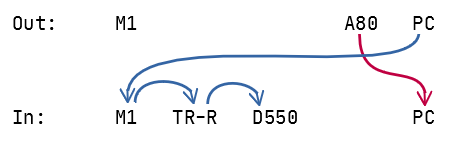
It’s an old project from back before we had the ability to record Audio tracks in our computer. It has three tracks and I need to send the MIDI out to the Korg M1; the Roland D-550; and the third track was drums and there’s a nice standard kit on the TR-Rack that will do nicely. So I need to connect the MIDI OUT from the computer to the MIDI In on those three modules:
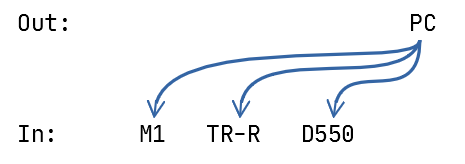
Unfortunately, that arrangement can’t be done as-is because the MIDI cables are point-to-point: one Out port has to go to one In port. Instead, we have to daisy-chain them using the MIDI THRU ports on each unit:
That works – providing you have the THRU ports available.
One down-side of this is latency, in that if your chain has too many hops, then the instrument at the end of the chain can take a noticeable time to respond after you press a note. Also, there’s a potential for signal degradation. If you limit yourself to 2-3 devices in a chain, it’s not a problem, and it works.
Use Case 2 – Recording a performance into a new MIDI track
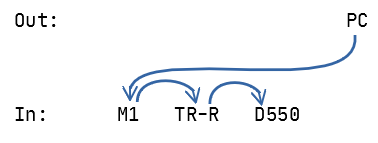
Now I want to record a MIDI performance on the M1 keyboard into a new track in the project in the computer software. So I need to connect the M1 Out to the computer’s In:
Hang on, the M1 keyboard is great for some types of playing styles, but after some practice runs, I think I really want to use the weighted, 88-keys of my Roland A-80. Just a sec, I need to re-connect:
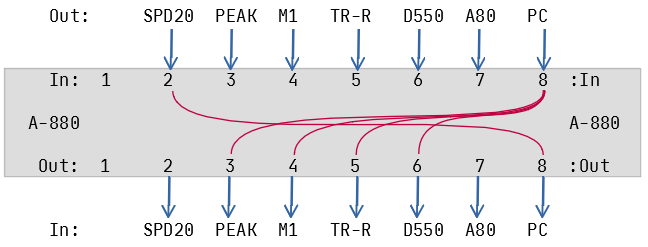
Okay, enough! I’m sure you get the idea. Let’s move all these connections into the Roland A-880. One advantage is that now, we can feed multiple In ports from a single Out port, reducing the latency and signal degradation (which in practice isn’t a problem, but hey, it’s all good):

Making virtual connections between the ports is easy once you know how: Press a button on the top row, followed by one or more buttons on the bottom row. Then press Scan/Mix or Signal to complete the configuration. So to set it up as shown above:
- Press In-8
- Press Out-4, Out-5, Out-6
- Press In-7
- Press Out-8
Now I can send my performance on the A-80 to the Cakewalk DAW running on my computer; and in turn, Cakewalk sends the MIDI notes from the existing tracks out to my sound modules.
If I decide I’d like to record the next track on the Korg M1, I can merely switch from the A-80 by:
- Press In-4
- Press Out-8 (this “disconnects” the previous connection from In-7)
Now the M1 is the “controller”.
Connecting the rest of the gear
Now we go into the closet and pull out ALL the MIDI cables, and connect all the devices:

Ports 1 and 2 are accessible from the front panel of the A-880, so I tend to reserve these for “temporary” connections (although, my SPD-20 drum pad controller has been out of the closet and connected up for about a year now). Port 1 is handy when I want to integrate my iPad into the studio, or back up patches on the Line6 POD.
Now, it is so easy to lay down a new drum track using the SPD-20 as the controller:
Other features
MIDI Clock is a “pulse” or timing reference transmitted along with other data that can be used to synchronize devices. The A-880 will respect the MIDI Clock on the port nominated as “Control In”. You can set which port (1-8) is the “control” by holding down the corresponding input button during power-on. I use Port 8 as the Control In because the PC/DAW is my timing master.
Use Case 3 – D-550 Editor/Librarian operation
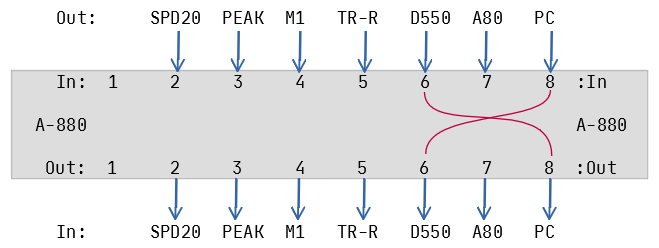
I can use SoundQuest‘s MIDI Quest software to download, edit, and upload patches to the Roland D-550, and this requires that we connect both In and Out to the computer:
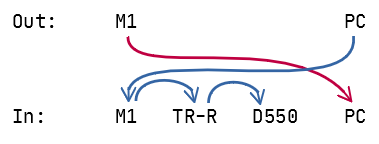
This works well – I can request a dump from inside MIDI Quest, and edit the patches, but what if I want to try out a few riffs from my handy keyboard controller? I want to be able to both edit the D-550 patches from the Computer (PC on Port 8) and also play notes on, say, the Korg M1 keyboard (Port 4), and have the D-550 respond.
Normally, MIDI does not allow multiple IN ports to direct to a common OUT port.
This is where the A-880’s Mixing function comes in: Any additional input port can be mixed with the control port. By design, Port 8 is my control port and also used by the DAW/PC. So we can add the M1 keyboard into the configuration using these steps:
- Hold down the Scan/Mix button;
- Press In-4 (the Korg M1);
- Press Out-6 (the Roland D-550);
- Release the Scan/Mix button.
That might seem odd but when you see the configuration graphically, hopefully it will make sense:
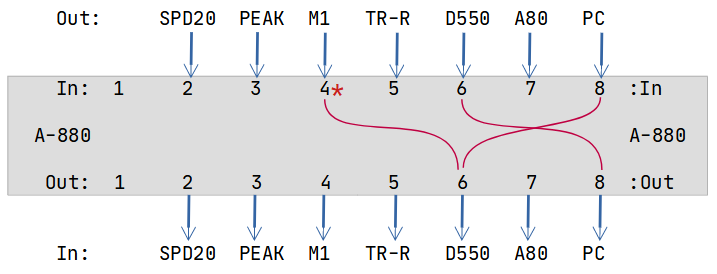
You can tell that Port 4 is “mixed” because the LED will flash during the scan cycle.
Memory Management
We have 64 memory locations available in 8 banks of 8 patches. I can’t imagine needing all of them. I divide mine into two categories: Bank 1 is “Controller select”, and Bank 8 is “SysEx Operation”. To make it easy to remember, I use the patch number to indicate the “subject” of the configuration:
- 1:2 SPD-20 is controller (on port 2)
- 1:4 Korg M1 is controller (on port 4)
- 1:7 Roland A-80 is controller (on port 7)
- 8:2 SysEx/Dump for SPD-20 (on port 2)
- 8:4 SysEx/Dump for Korg M1 (on port 4)
- etc
You can change programs on the A-880 by sending it patch change messages on the Control In port, using the Control MIDI Channel. You set this channel by pressing Memory + Write , then one of the 16 input/output buttons. For example, to set a control channel of 12:
- Press MEMORY + WRITE (don’t hold)
- Press OUTPUT 4
- Press SCAN/MIX or SIGNAL to complete.
Final thoughts
The A-880 has remained the heart of my studio since arriving back in the early 1990’s. Keyboards come and go (a moment of silence for the Jupiter 6, alas) but the A-880 remains at the hub, probably the most reliable piece of gear I’ve ever owned.
Other useful links


Recent Comments