Following on from a previous post, I wasn’t happy with the touch response on the Korg M1 since upgrading the keybed felt. The Yamaha FS keybed supports “aftertouch” or “channel pressure” which means that you can alter a sound by pressing down after the initial depression of the key. Nice for, say, opening the filter or adding vibrato, or some other musical change in the sound.
After the felt upgrade, the “feel” was great, but the response to additional pressure on the keys didn’t seem smooth or playable.
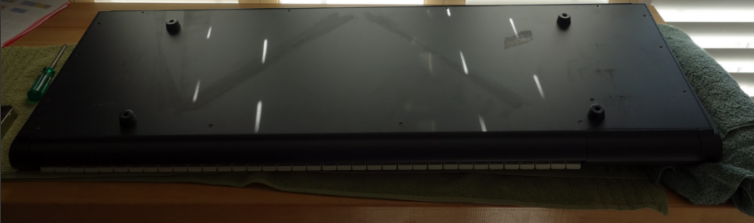
Fortunately, the Korg M1 has two tiny variable resistors you can tweak to fine-tune the pressure response. The down side? They are inside the chassis and you can’t get at them without turning the unit upside down, and removing the bottom panel. At which point, playing the instrument to check the results of the adjustment is problematic.
Remove all the screws except the ones holding the rubber feet
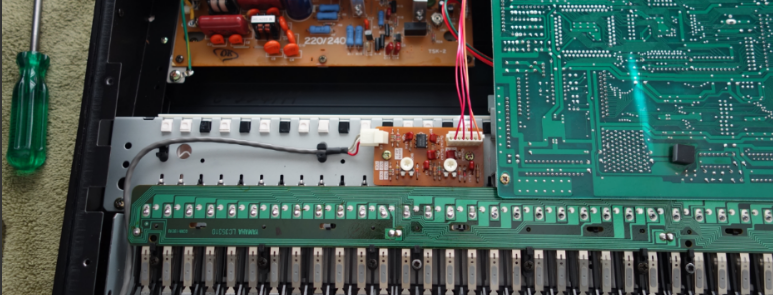
After removing the bottom plate and taking a look, the pressure adjustment controls are very easy to spot:
Right in the middle of the photo
Each control sets a different aspect of pressure sensitivity:
The one on the right sets the level required to start sending “channel pressure” signals.
The one of the left sets the level required to reach “maximum”.
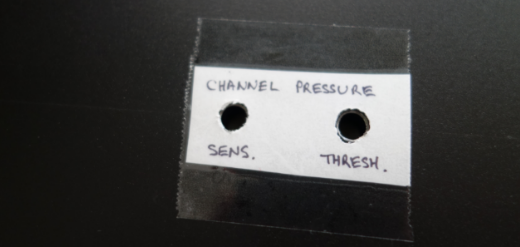
Obviously these levels are very subjective and need to be tuned to match your playing expectations, along with how firm the newly installed felt is. And over time, these may change – the felt will break down and become softer; and your technique as a performer may also change.
I decided I’d quite like to make it easier to access these adjustment controls with the keyboard assembled and set up for performance, so I measured the location and drilled a couple of holes in the under plate.
The location of the centers of the holes are 176 mm down from the top edge of the back plate, and 198mm and 226mm in from the left edge, respectively.
6mm holes
With the back plate screwed back into position, and the keyboard restored in the upright position in the stand, I plugged it in and temporarily edited the default I08 “Pan Flute” patch so that the AFTERTOUCH Pitch=+12, for calibration purposes. This means that “maximum pressure” should raise the tone by one octave.
I then used a Philips head screwdriver to reach under the chassis and adjust the levels to their mid-point. Pressing a key and listening to the onset of the change in pitch, and how heavy I needed to push in order to raise the pitch, allowed me to adjust each of the two levels to optimize the response of the keyboard to pressure.
I’m not a hoarder – at least, I try not to be – but there are some items of equipment I’m not using and probably don’t need to keep. They are either in storage, or mounted in a rack, taking up space but providing passive heat sinking.
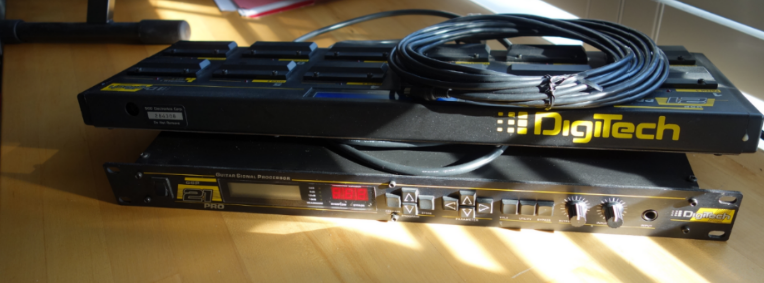
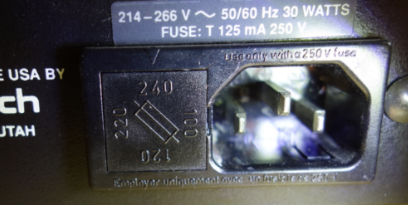
One of these items is my venerable Digitech GSP21-Pro. This is a very capable guitar effect processor and I think it could go to someone who would actually use it rather than just leave it sitting around. I brought this over from New Zealand, so it required a 240V mains supply. About 50% of my gear has been running on a grunty 120-240 mains transformer, so I’ve never bothered to take a close look at the power supply on this unit. However, if I am to pass this on to someone else, it will really need to run on a 120V supply.
Given my recent success with my Korg EX-8000 , I figured I’d open it up and see what was needed to convert the power supply. It turns out that it couldn’t be simpler:
The internal transformer supports 100-240 volts via a simple fuse plug
The easily switched voltage plus the standard appliance socket means that it was trivial to switch it over to 120V. Embarrassing! I could have done this years ago and not needed to run it on the big transformer.
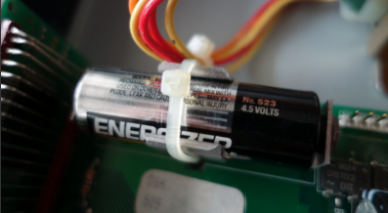
However, I did have a problem: The GSP21 had forgotten all of the custom programs I’d set up over the years, and when turned on, goes to patch 01 instead of the last used setting. Typically this behavior is due to the internal memory backup battery being dead. If I was to sell or gift the unit to someone else, I wanted to be confident that their own patches would be retained in memory while the unit was switched off.
The internals are easily accessed by removing a series of screws from the chassis. The backup battery is identified quickly, tucked away neatly at one side of the PCB. I expected a coin-style CR-2032 but it’s quite different:
Energizer No. 523 4.5 Volts
That battery lasted at least 20 years before giving up. Impressive.
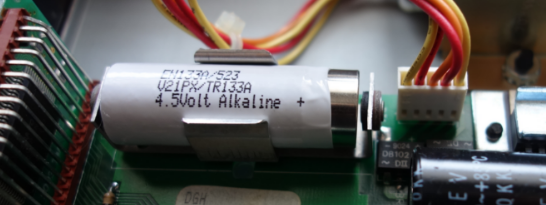
After some research I found that it is actually very difficult to find a No.523 battery of this type. One possible replacement is A21/A133 4.5 Volt Alkaline Battery which can be found at BatteryMart.com under the item code BAT-A21PX.
Mind the gap…
It is almost a perfect drop-in replacement except for a 1mm gap. I tried bending the battery socket arms inward to eliminate the gap but it wasn’t really possible without potentially stressing the PCB. It’s not really designed to be bent – it’s quite strong spring-steel.
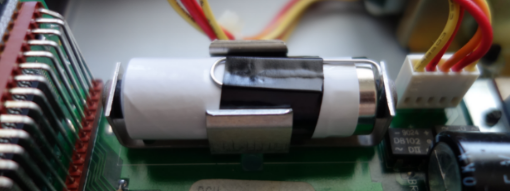
My solution was to use a paper clip. Really low-tech but seems to work well:
Simple but effective
It closed the circuit and the battery is firmly held in place. Turning on the unit for the first time showed “restoring factory patches….” for a second, before making patch 01 available. The second time I powered it up, the patches were available immediately, and it remembered which patch I had selected prior to turning the unit off. Success!
I cleaned the exterior of the unit, and offered it on NextDoor.com along with cables, the footpedal unit, and a ragged photocopy of the user manual (which is all I had). And now it is in someone else’s hands, hopefully to give many more years of effective use. I highly recommend the UltraVerb reverb algorithm; it’s very good.
How does your synth know what note to play, when you press a key? If it has a built-in keyboard, then the glib answer is, “whatever key I’m pressing!”. If your synth is a module in a rack, or your keyboard is responding to signals sent to it over the MIDI cable from your sequencer, it gets a little more interesting.
MIDI Note Numbers
MIDI signals are digital, so everything is represented by numbers. For example, if I want an instrument to play a sound, I need to send it a specific type of message: a “Note On” message. In addition to a number identifying the message as a “Note On”, it will include two additional numbers representing:
which note to play
how strongly the note was played (known as note “velocity“)
Because the numbers are 7-bit digital, there are 128 possible values. For example, the note number will be between 0 and 127, representing the lowest and highest possible notes respectively. The velocity will also be between 0 and 127, where 0 is the lightest possible touch, and 127 represents the most force you could use.
Your synthesizer uses these numbers to decide how to respond: which note (pitch) to play, and how to set the volume or tone for the requested velocity. For your typical instrument using a standard Western 12-tone scale, note number 60 will result in a tone of 261.63 Hz, or “Middle C”. The synth module will continue to play that note until it receives a follow-up “Note Off” message for the same note number.
A message here, a message there, and pretty soon you’re playing yourself a tune. MIDI messages get complicated quickly, and there are better places to go if you are curious about the details.
Introducing Note Names
Secure in the knowledge that our instruments – both physical and virtual – will respond with middle C if we sent them a MIDI Note Number 60, we can move on to note names.
If you’re used to conventional Western musical notation, it makes sense to refer to notes using the alphabet notation of the scale, .e.g. C, D, E, F, G, etc, instead of those confusing and non-obvious numbers. With ten and a half octaves covered by our 128 possible note numbers, back in 1982 Roland documentation writers chose “C4” to represent Note 60, middle C, and to enumerate octaves from C to B (.e.g. ascending notes would be A4, B4, C5, D5, etc.)
And everything was cool… until Yamaha used “C3” to represent note 60 in their own MIDI documentation.
Since then, instrument and music software manufacturers tended to pick one of the two conventions and ignore any subsequent confusion on the part of the users.
For example, XLN’s Addictive Drums follows Yamaha’s convention, and in their documentation and note maps, they use “C3” to refer to note 60.
Voxengo SPAN, however, displays ~262 Hz as “C4”, following the Roland standard.
Three notes walk into a bar
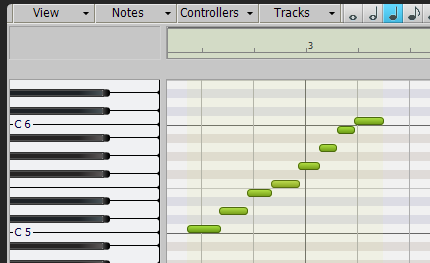
Just to be different, Cakewalk eschews both conventions, and shows note number 60 (middle C) as “C5” in their Piano Roll View.
“There is no industry standard for numbering octaves. By default, Cakewalk calls MIDI note 0 (the lowest possible note) C0.
Cakewalk Documentation
Here’s a scale from note 60 to 72:
Personally I think I know the reason for this: One side effect of middle C as C5 is that the lowest possible MIDI note 0 is then “C0”. Cakewalk started life as a character-based DOS sequencer, and if they’d used “C4” or “C3” for note 60, they’d have needed additional real-estate space for notating the lower octaves, e.g. “C-2”.
I don’t know for sure that this was the reasoning behind it, but it seems possible. Those were the days! I personally never used the DOS version of Cakewalk, but I used to develop character-mode applications in MS-DOS, and I feel their pain.
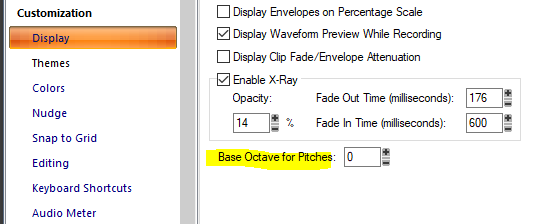
Fortunately, we’re not limited to Cakewalk’s default notation:
In the Preferences dialog, we can control the “base octave for pitches” offset to our needs.
The Yamaha FB-01, for example, shows MIDI note 0 as C-2 (C negative 2). To match Cakewalk to that standard, set Base Octave to –2.”
Cakewalk Documentation
Because I’m an avid user of XLN’s Addictive Drums virtual drum instrument, I set my Base Octave for Pitches” to -2.
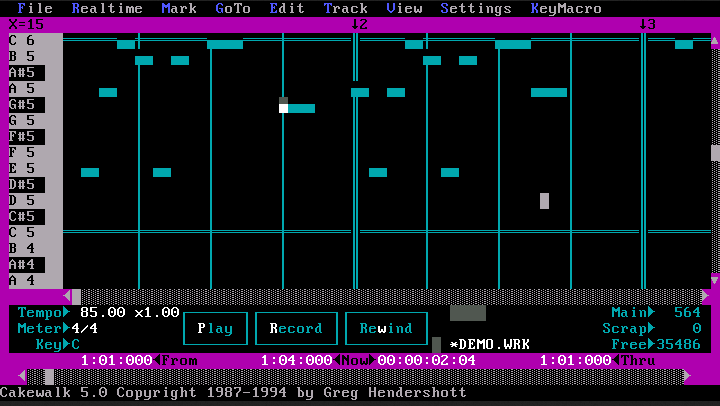
And all was good, until the other day I was developing some SFZ patch definitions and I noticed that the samples were being played back 12 notes below where I was defining them:
That worked as expected, responding when I pressed “Middle C” on my keyboard (i.e. sending MIDI Note 60 to the SFZ Player instance in my Cakewalk project.).
Bottom line: I could use the note numbers in my SFZ file definitions, but if I feel the need to use Note Names, I should remember that SFZ Player uses the Roland standard of C4=60.
What we’re About
Melodic progressive rock songs and instrumental interludes, a touch of 70’s influence but a product of the dystopian Now.
“Very smooth, hi-tech sounding delivery…” – Chris Jemmett, alt.music.yes
“This guy is awesome.” – Dazed, on the Carvin Forum.
“..on a rare occasion you just have to conclude that the prog world should be feasting upon the birth of a new and promising act. That’s exactly the case with this [first] album.”
– Theo Verstrael, DPRP.net
“I find this new album attractive, [..] slightly less appealing than the 2014 debut. But as that is often the case with great artists, let it not distract you from trying this fine album. Especially those that are interested in bands that play varied, cleverly made, well played and sung [..], this might just be your cup of tea.”
– Theo Verstrael, DPRP.net
Recent Comments