When I turned on the Korg M1 yesterday, the LCD window displayed “#24” which was followed by “Init Program – Low Battery”. Yes, the thing I’d been dreading for a number of years had finally happened: the internal patch backup battery had died, which meant that all the voice and combi patches had been lost from the synthesizer’s memory. And just when I need the “Melange” patch for my current project. Still, not bad for an instrument purchased in, what, 1989?
This is a scary thing for older synthesizers because not all of them are designed to have their internal batteries replaced. The Korg M1 is better off than most, in that the battery can be replaced, and it is of a common type: the ubiquitous 3 volt CR2032 Lithium “coin”.
First up, here’s what you can’t do: You can’t magically get the M1’s voice memory back. It has really gone. Even if you replace the battery, all the means is that the M1 will remember new patches that you program in. Even the “factory default” voice bank has been wiped. So if you don’t already have some kind of backup/restore method in place, there’s nothing you can do after replacing the battery to get your programs back. More on this subject below.
Replacing the internal battery
What you’ll need:
1 CR2032 3v Lithium replacement battery (about $5 from Radioshack – link)
1 medium Phillips head screwdriver
1. Clear off the kitchen table and cover it with a blanket or something to give a firm but gentle work space. You’ll need to work on the underside of the M1, so in order to protect the joystick from damage, build up a support on the right side of the table on which you can rest the top left edge of the synth. I used four DVD cases to make a roughly brick shaped support under the blanket.
2. Disconnect the M1 from power, MIDI, and audio, and eject any cards from the memory card slot. Carefully carry the synth over to the table and place it upside down with the front (keyboard) edge towards you. You should rest the right side on the support to protect the joystick underneath from pressure.

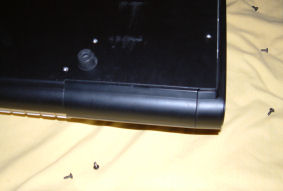
3. You need to remove the base plate from the synth. You do this by unscrewing it – basically every screw you can see except for the ones holding the rubber feet in position. You do not need to remove the rubber feet from the base plate! (There’s about 14 of these screws – I forgot to do an exact count.)
4. Slide the base plate towards you before lifting it off and putting it to one side. Now would be a good time to wipe dust off the inside surface of the base plate – on my instrument it had quite a coating of dust.
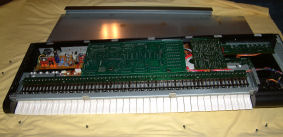
5. The battery socket is located on the underside (actually, the component side) of the large circuit board. You will need to unscrew this from the body of the synth in order to turn it over. On my instrument there were 5 short screws spaced around the periphery of the board, but there appeared to be holes for others, so check it over carefully.
6. You will also need to remove two longer screws from the interior of the circuit board. These attach the board to the memory card socket.
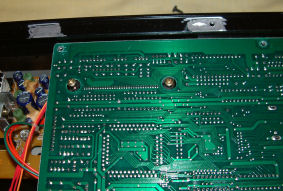
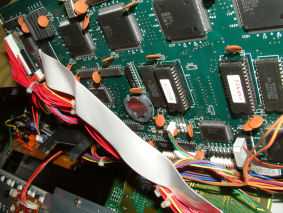
7. I found it impossible to flip the board over until I had detached the 4-wire connector on the left side, shown here. It’s a tricky type of connector if you haven’t encountered it before, so take care and gently pull up on the wires to detach it.
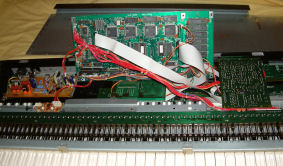
8. Now lift up the board, pivoting it on its back edge.
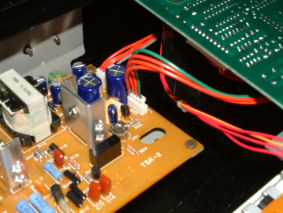
9. The battery socket is actually located behind the ribbon cable. There should be enough room for you to reach in with your fingers and remove the battery.
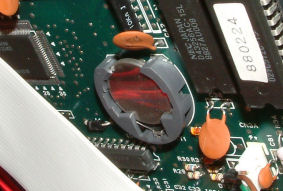
10. It will pop out quite easily if you push gently down on the top of the battery while simultaneously lifting up the edge with your fingernail. This is easier to do than to explain! Take note of which way up the battery was, and replace it with a new one.
11. After you have put the new battery in place, simply reverse the steps to re-assemble the instrument. Don’t forget to re-attach that 4-wire connector!
How to get your patch memory back
Once you have put the M1 back together and put it back on your keyboard stand, you may be dismayed to realize that all 100 or so voice programs say “Init Program” and sound the same (a nasty piano sample with a square VCA envelope). The instrument does not magically restore the “factory default” programs. You will have to get these from another source.
Just for once, I had “done the right thing” a couple of years ago, and backed up the M1’s program and combi memory banks using SoundQuest’s MidiQuest software SysEx librarian. Thankfully, I could restore all my custom patches – including “Melange”. (All I had to remember was to adjust the M1’s global settings and unprotect the memory, enable sysex, and put the instrument into “dump” mode. Yes this took a few minutes of panic to figure out why the restore wasn’t working.)
Things for you to try:
You can get the original factory sounds here:
http://www.vintagesynth.com/patches/m1patch.zip
Inside the ZIP file are several .SYX files. I think you can use MIDI-OX to load these. See: http://www.midiox.com/
There is a lot of good information here:
http://www.hitsquad.com/vocal/about2837.html
I hope this information helps someone else out there.
Thank you. Thank you. Thank you. Mine has been sat dormant for about 20 years. I’ve tried following YouTube videos, but they seemed to make it more complicated. Just changed the battery following your page, took about 30mins (15 mins extra because the battery housing was old and brittle, it snapped, so needed a bit of superglue..)
But yes! The lights are on. No sounds yet, but that’s a new problem.
Cheers pal.
Dom, Macclesfield U.K.
Yay, Dom! Glad I could help. Thanks for reading.
Ps you’d think they’d make a vital function like a battery change just a tiny bit easier… just saying.