Progressive Rock Artist seeks Audience

Category: Cakewalk SONAR (Page 2 of 3)

Diagnosing a randomly changing patch in a VST instrument

This is going to be a somewhat random post but I want to record this before I forget what I just found out.

I was playing around with Arturia’s CS80V when the patch I was playing suddenly changed: the release time increased. Also I could see the patch had changed because an asterisk appears in the patch name.

I reset the patch by selecting it in the browser, and continued playing. Suddenly, it happened again!

This time I watched the GUI of the synth to see if I could see it happen:

image

Sure enough, about a minute later the patch changed sounds and something caught my eye – a slider had changed positions:

image

Moving the slider back restored the original sound (although of course, the patch was still “changed” as far as the environment was concerned).

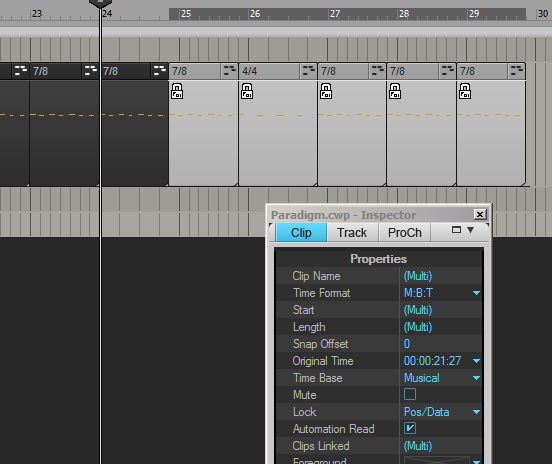
OK, how to diagnose this? I’ll cut a long story short and say eventually I set a track to record MIDI data from my controller, in case something funky was entering the MIDI event stream, and played a few notes.

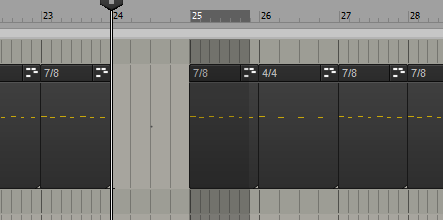
A short time later, I had this:

image

Those vertical lines are Continuous Controller (CC) events:

image

I was recording on Track 2 and that’s three events for Continuous Controller 83 that I can’t explain.

I need to find out why my Roland A80 master keyboard is emitting these controller events. Is this new behavior, or has it always happened?

Normally they are harmless, I guess, but the default MIDI Controller mapping for CS80v  has CC# 83 mapped to this VCA envelope release time slider:

image

So that explains the phantom finger on the slider. The ones in RED have been set to respond to a specific CC#.

It’s easy enough to fix – we can use the MIDI Mapping feature in Arturia’s software instruments to load an “empty” controller mapping:

image

Now the patch remains unchanged even when I play back the track containing the controller data.

Next up, find out why the A80 is emitting those random controller values…

Another Way to Skin an FX Send

Modern digital audio workstations offer a plethora of ways to solve your mixing and routing problems. Inspired somewhat by Craig Anderton’s latest column in Sound on Sound, I discovered a new way to apply reverb selectively to multiple tracks, in Cakewalk By BandLab using the Sonitus Reverb VST. Here’s my use case:

I have Lead and Backing vocal tracks, and I want to apply a long-tail reverb to portions of the verse and chorus phrases. (The main sustained notes provide a wash of reverb in the background, but keeping it clean and un-muddled by fricatives and fast syllables.)

In the past I have created a “VOX FX” Buss, put an instance of Sonitus Reverb on it, and directed it to feed the “VOX” main buss. Finally, I add a Send on each vocal track to feed the VOX FX, and use “Send Level” automation on each track:

image

This works well, and allows the automation curves to be adjusted per-track.

But what if you have more than two tracks, and per-track envelopes isn’t needed? Could there be a way to send audio to the reverb using a single automation curve? I experimented with using an Aux track, intending to add a send on each vocal track to the Aux track, then use the “Automated Send To FX Buss” trick described above.

However, I realized that I could simplify things by putting the reverb effect on the Aux track itself, and then automating the “VST Input Level” instead:

From the Edit Filter selector (displaying “Clips” by default) we can drill down into the Sonitus Reverb and select “Input” from the automation choices:

image

Now we can draw the automation envelope (only one is needed) to control the amount of audio from all tracks being processed by the reverb:

image

This gets the job done, and no need for a general purpose fx buss.

As I mentioned above, there are good reasons NOT to do it this way – but it is nice to have the option.

UPDATED 27 Sep 2019

It seems you can’t “freeze” an AUX track, so if you find yourself in the resource crunch and the FX bin on the Aux track is CPU-heavy, well, that’s another good reason not to use this technique.

Cakewalk is dead; Long Live SONAR

My Digital Audio Workstation (DAW) of choice is Cakewalk’s SONAR. In 2017, Cakewalk (formerly Twelve Tone Systems) were celebrating their 30th year in business. Over the years, the “Cakewalk” MIDI sequencer evolved to support digital audio and matured to became a very capable music production environment. Eventually the company took the name of its flagship sequencer, and the DAW continued under the “SONAR” name.

image

I first encountered Cakewalk Pro Audio in 1994 when my wife-to-be (long story) sent me a copy. I think it was version 5. It very quickly replaced Passport’s Master Tracks Pro * as my studio workhorse, especially after digital audio recording features were added. I’ve been a loyal, paid-up user ever since.

In 2008 the company was effectively acquired by Roland, which in 2013 subsequently sold their shares to Gibson.

In November 2017, Gibson effectively killed the company by stopping ongoing development and reducing the staff to the minimum required to keep the servers running.

We can guess that Gibson may have tried to find another owner for the company, and failed; or perhaps just decided that it was better to write it off as a loss for this financial year.

Either way, we’re not going to see any updates to the SONAR product in the foreseeable future, despite the fantasies being spun out by some on the user forum.

The company website still exists, and you can find links to “Buy SONAR” but they all eventually lead to the cease-of-business announcement and the statement that new purchases are no longer possible. Documentation and downloads of historical updates and resources are, for the moment, still available. You’d have to be an idiot to think that this will always be so, however.

So where does that leave folks like me?

  • Switch to another brand of DAW, immediately
  • Stay with SONAR for the time being

I think I’m totally in the second group. If I were to switch, it would be to PreSonus Studio One, because I already own it (I use it for the excellent Project page for mastering).

Negatives:

  • If you’re not happy with 2017.10, well, you’re out of luck waiting for changes.
  • A re-install will require access to online authentication servers (at least until a promised work-around is made available).
  • If you find an existing bug that doesn’t have a work-around, you’re out of luck getting it addressed.

Positives:

  • It’s not like SONAR is going to suddenly stop working;
  • No new features means no new bugs;
  • As far as we know, there aren’t any existing show-stopper bugs without workarounds;
  • Total mastery of the software is possible; current techniques won’t become obsolete;
  • We can finally create an up-to-date knowledge base of tips, tricks, and workarounds.

I don’t regret the time or money I’ve invested in Cakewalk SONAR up until this point. To throw up my hands and abandon it? That would be throwing away that investment. So for now, call me a happy SONAR user.

Onward, and create!

* Oh my goodness, they are still a Thing.

A work-around for Sonar’s timeline editing behavior: Slippy Clips

Update Dec 2017:

In a recent update to SONAR, Cakewalk added a feature called “Ripple Editing”. It doesn’t actually help with the problem described below, which still exists in the 2017.10 release of SONAR.

Original Post:

So I have this project – “Working the Paradigm Shift” – that is mixed 7/8 and 4/4 time signatures. Cakewalk SONAR is largely a great product but I feel that it does let us down in the area of time line editing. Here’s an example, and a work-around:

In this section of the project, I have a series of 7/8 bars followed by a 4/4 bar. Whilst practicing the keyboard solo, I realize that one of those 7/8 bars also needs to be 4/4 as well.

However, if I change Bar 24 from 7/8 to 4/4, all the subsequent clips change their musical position:

Notice the clips in bar 25,26,27 etc are now all offset. Clearly this is not what I want. I’m showing the click track here to make it very obvious what the problem is.

I don’t know why this should happen. After all, the clips use the default time base of “Musical”; they are not locked to absolute time or anything tricky like that.

OK, so let’s UNDO the time signature change, and try locking the clips first:

Nope, that still didn’t work. In fact, even though the clips are “locked” to “Musical” time base, they still slip into the previous bar.

I don’t think the clips should need to be locked at all; but even if they do, the SONAR documentation seems to indicate that the clips should not be changing their musical M:B:T position, if they are locked:

If the clip is set to the Musical time base, the clip’s M:B:T position stays constant, and its Absolute position shifts. If the clip is set to the Absolute time base, the position does not move, but its M:B:T position shifts

So… this could be a bug, or perhaps I am missing something. I’ll raise that with Cakewalk Support, but for now, here’s the work-around:

Work-around:

1. Ensure that Bar 25 is set to 7/8, over-riding the default/previous bar time signature.

2. At Bar 24, insert 1 measure in the time line: 

Inserting a measure like this does not corrupt the subsequent clips’ M:B:T position. This is expected and known behavior.

3. Change the time signature of the new Bar 24 to 4/4:

Observe:

  • The original bar 24 (now bar 25) is inheriting the 4/4 time signature from new bar 24;
  • The subsequent clips have changed their M:B:T position, as we would expect, given what we observed earlier.

4. Change the time signature of Bar 25 to 6/8:

This should cause the later clips to re-align with the bars, because 7/8 + 7/8  =  4/4 + 6/8:

Observe:

The “7/8” clip in bar 25 is wrong, but a) we don’t care about it, and b) all the other subsequent clips are correctly aligned.

Now we can remove the “extra” 7/8 bar 25 from the time-line. This actually involves a known work-around for another issue, which is that you can’t delete a bar from the time-line unless there is even data in the section you want to delete. Fortunately for us, we have a clip we don’t need:

5. Re-size the “7/8” clip so that it is nicely situation within the bar boundary.

6. Ensure Snap-To-Beat (whole note is advisable) is enabled

7. Press Ctrl-A to select ALL TRACKS

8. Select the entirety of Bar 25, and select Edit > Delete Special from the menu.

9. Select all options, especially “Delete Hole” and “Shift by Whole Measures”:

10. Click OK.

Bar 25 should now be removed, and now we have a Bar 24 in 4/4 and the rest of the project continues as it did before we started editing.

IN MY OPINION, THIS IS TOO DAMN COMPLICATED and should be addressed in a future version of SONAR. (Updated – see above)

Telling V-Vocal what default parameter values to use

V-Vocal is a monophonic audio editing plugin developed using Roland technology, integrated into the SONAR product. It was packaged with Cakewalk SONAR from about version 5 or 6. The last version that included it was SONAR X2.

V-Vocal has been compared unfavorably to other “vocal editor” software such as the better known Melodyne or Antares Autotune, but it is actually a very capable tool when used judiciously.

V-Vocal still works in SONAR X3, although due to a change in company ownership, it is no longer part of the SONAR installation. However, if you have previous versions of SONAR installed, V-Vocal will be available. In fact, in my opinion, ironically V-Vocal works better in X3 than in any previous version of SONAR.

However, some quirks remain, and one of them is the default values used for several of the editing parameters. I’m always having to remember to adjust the FORMANT parameter in particular, every time the V-Vocal window is launched.

These default values can be changed, though, through some careful editing of an arcane .INI file. All credit for this hack goes to Tom Parker for this post on the SONAR user forum in December 2006.

I’m going to copy the instructions here for quick access, and in case the post is removed from the forum or lost in the cloud:

1. First, make a backup copy of the file C:\Program Files\Cakewalk\Shared Dxi\Vvocal\Skin\VVocal.INI

2. Then edit the original VVocal.INI file

3. Starting at line 130 you’ll see a section “Display 8 ( Formant Control )”.
   There are 3 values (on 2 lines) that need to be changed.
   Recommended: Change them all from 100 to 0:

   a) Ctrl181 3rd value (Value if you double click in the “PITCH FOLLOW” graphic dial center)
   b) Ctrl181 17th value (Initial value for the graphic dial)
   c) Ctrl183 17th value (The critical Initial value; this will be displayed in the box below the dial)

4. Save the changes, and re-start SONAR.

« Older posts Newer posts »

© 2024 The Prodigal Sounds

Theme by Anders NorenUp ↑