There’s more than one way to skin a cat, and other folks have talked about this before. The more, the merrier. Here’s how I constructed a project in Cakewalk to re-master a commercial CD.
The Problem
I have a commercial CD release from 1986 that sounds horrible for several reasons: it was the Age of Digital Reverb and there’s too much of it. Also: it was the Age of Digital Recording, and CDs were new, and when Treble wasn’t something you required analog psycho-trickery to extract from magnetic tape. It’s a very shrill mix. I am fond of the actual music, though.
It was “remastered” back in 2001 when the Loudness Wars were in full swing, and the results were… over-compressed and also shrill. What to do? I still have the original CD release from 1986, fortunately.
The Plan
Because this is a “re-master” and not a “master”, I’m going to treat all tracks the same way, using a common FX stack. I also want to be able easily to switch back and forth between “effected” and “un-effected” versions, for comparison purposes.
When evaluating quality changes of audio, it is important to match effective loudness between the two. This is because our ears think “louder” = “better”. And that’s a problem, because one of the things I will be doing is raising the overall level of the music. The original CD from 1986 is mastered at a fairly low average level.
So, the plan is to temporarily reduce the volume of the mastering effect chain during the tweaking so that the measured loudness is the same. This will require obtaining a loudness measurement from both signal paths.
The Process
I open a new empty project, and import the audio tracks from the CD. Cakewalk will create a separate audio track for each of the CD tracks.
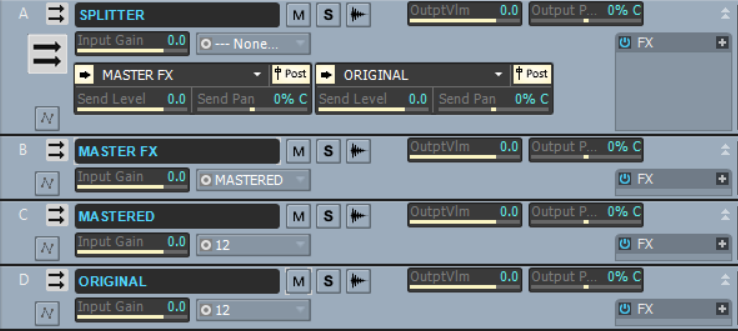
Next, I create four stereo busses. The first is named SPLITTER, and I need to set all of the imported audio tracks to direct their output to this bus:
Press Ctrl-A to select all tracks. Then hold down the Ctrl key, and set the Output of one of the tracks to SPLITTER. All highlight tracks will set their Output the same way. (The Ctrl- key creates a “quick group” documented here.)
The other three buses are named MASTER FX, MASTERED, and ORIGINAL.
On the SPLITTER bus, I create two Sends: One to MASTER FX, and the other to ORIGINAL. (Both sends’ levels are left at the default of 0 db.) I set the Output of SPLITTER to “None”.
I set the Output of MASTER FX to the MASTERED bus.
Now I have two duplicate signal paths. Both MASTERED and ORIGINAL continue to direct their Output to the default, a hardware output (called “12” on my system).
The only drawback to this configuration is that Cakewalk will warn us upon opening the project, that SPLITTER is identified as a “Silent Bus”. I prefer the symmetry of the two Sends, rather than using SPLITTER’s own Output, so I pay the price of dismissing this warning dialog. (Feel free to adapt as necessary.)
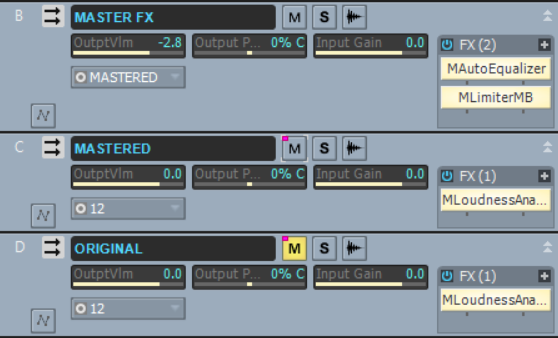
The next step is obvious: we add some FX plug-ins to the MASTER FX FX Bin. My tools of choice are from MeldaProduction:
You probably have your own favorites. I’ll use these to apply a tilt to the frequency spectrum, taming the shrillness and up-ing the bass; and also some tasteful multi-band compression.
Speaking of LUFS… My Loudness Meter plugin of choice is – you guessed it – also from MeldaProduction: MLoudnessAnalyzer.
I put an instance of the Loudness meter in each of MASTERED and ORIGINAL, configured identically.
More detail: I configure the MASTERED instance for a “target” of -12 LUFS. I’ll use this as a reference as I mess around with the EQ and Multiband limiting, aiming to raise the overall level and apply a smidgeon of peak reduction (aiming for a still-conservative -12 LUFS). [0] I set the ORIGINAL instance identically so that I can match loudness-levels between the two, using the loudness metering.
Before we start playback, we need to set Exclusive Solo on (optional, but handy) so as to easily listen to one track at a time, switching between them with the Solo button:
And, just as important: Mute the ORIGINAL bus. Don’t forget to do this!
For convenience, I like to use a control group to link the Mute buttons of the MASTERED and ORIGINAL busses, letting me switch between them with one click:
Un-mute MASTERED
Mute ORIGINAL
Right-click on one of the Mute buttons and select Group > New…
Select a color for Group 1 (say)
Right-click on the other Mute button and select Group > Group 1
The final configuration looks like this:
You may notice the little colored dot on the Mute buttons, indicating they work together as a group.
Now I can take some time to fine-tune the mastering effect chain as described above. When I’m more-or-less happy with the results, I open both Loudness meters and watch the playback. I can see – as expected – that the MASTERED path is adding about +3 db of raw volume boost. Which is fine – but I also want to know if I’ve actually made the sound worse than the original. For that, I need to use my ears, and to remove the “louder-equals-better” bias, I need to reduce the level of the Mastered signal, so that the Loudness meters show the same values.
We do this using the OutptVlm control on the MASTER FX bus, reducing the volume to match. (See above, it’s temporarily set to -2.8 for the comparison review). [1]
Now I can start playback, and switch easily between the two signal paths by clicking on either of the two buses Mute buttons (they’ll swap in one click).
Yup – my version sounds better than the original.
Now, in order to export each track with the mastered fx in play, we need to ensure that we:
Switch to the MASTERED output;
Put the MASTER FX Output Volume control back to 0db;
Solo each track
Select the clip (to get the right timeline range) and Export to WAV or FLAC or whatever.
Happy Mastering!
[0] I’ve re-calibrated, I don’t think -12 is conservative. But it’s an okay choice in this case, I stand by that.
[1] Alternatively, we could instead increase the OutptVlm on the ORIGINAL bus to match the MASTERED level. This has some advantages in that we don’t need to make any changes before the final Export. On the other hand, it is usually a good rule of thumb to “cut, not boost” to avoid unexpected overloading, so I’ll let the instructions stand as-is.
Drum Maps go back a long way. I’m certain that the feature was added to Cakewalk very early on back in the MIDI-only sequencer days before it became “Cakewalk Pro Audio”, back in 1995. This long-established feature hasn’t seen much attention from the developers in recent decades because it is stable and does the job. But what job is that, exactly? And why are new users often confused about them?
Where people get confused
At first glance, Drum Maps appear to be the way to set up Cakewalk’s Piano Roll View (PRV) so that, when you edit a MIDI track, you can see the names of each instrument or kit piece (“Tom1”, “Tom2”, “Snare”, “Wood Block”, etc.) in your drum instrument, whether it be a dedicated drum brain, SFZ sample library, or a “drum kit” patch in your rack synthesizer.
And to be fair, yes, that is true: Drum Maps are used to display kit piece names in the PRV (more on that later). Also, Cakewalk provides many pre-baked drum map presets for common percussion modules, which definitely reinforces this impression.
Fig.1 And many, many, more! Keep reading for more about “presets”
But drum mapping is much more powerful than just “show names for drum kit pieces in the PRV”, and Cakewalk doesn’t try to hide it. That’s probably where a lot of the confusion comes from. This tutorial/article aims at explaining Drum Maps, hopefully to reduce that confusion.
Thank you for subscribing to Map Facts!
A drum map is a virtual MIDI instrument that we define inside our Cakewalk project. It might help to think of them more generically as a “MIDI Map”. A map provides a way to translate incoming MIDI notes to alternative destinations. For any specific input note number, we can:
change the output MIDI note number;
change the output MIDI channel;
change the output port to any existing port in the project: Hardware or VSTi;
assign a name text;
apply a velocity offset (make it louder or softer by an amount);
apply velocity scaling (make it louder or softer by a percentage)
We don’t have to create a mapping for every one of the 128 possible notes – just the ones we are interested in. (Keep reading to learn about what happens to un-mapped notes.)
Once we have created our mapping, it becomes available as a possible MIDI output port for any MIDI track in our project.
Example use cases:
a 1:1 map that does nothing except reduce the velocity values by 50%;
a map that forces each note to the nearest note in the Pentatonic scale;
a map that assigns notes generated by your favorite drum controller (e.g. Roland SPD30, or Alesis kit, etc.) to trigger your favorite percussion VST instrument;
a map that splits the controller keyboard across two or more different instruments, e.g. Bass in the lower notes, Strings in the higher notes, samples on the top octave.
a map that combines several output ports into a single virtual instrument (e.g. Toms from AD2, snare from SI-Drums, etc.)
many others, I’m sure!
Key take-away: Because mapping takes note events from any single MIDI In portt and translates them to one or more MIDI Out Ports as defined in a project, the drum maps belong to the project and do not exist as separate files.
The Drum Map Manager
It’s an older code, sir, but it checks out.
Admiral Piett
The Drum Map Manager is located under Edit > Preferences > MIDI > Drum Map Manager, for historical reasons. It is only available with a current open project. This is definitely a source of confusion because you’d think the Preferences dialog is normally for general settings that apply across all projects. And yet, you can look under Edit > Preferences > MIDI with no project open, and you won’t find it.
The user interface is a little primitive – remember, this venerable code base dates back to the early ’90’s – but it is functional, given everything it has to do.
It shows all maps currently defined in the project (there can be more than one!), and allows you to edit the assignment settings for each note contained in each map. By default, a brand new empty project will have no drum maps, and the manager will be empty.
Please bear with me, as we work through creating a map from first principles.
Creating a new empty drum map, and editing it
As way of preparing for this tutorial, I’ve just created a new project, and added a couple of percussion VST instruments: Cakewalk’s SessionDrummer, and OrganicDrumLoop‘s OCK.
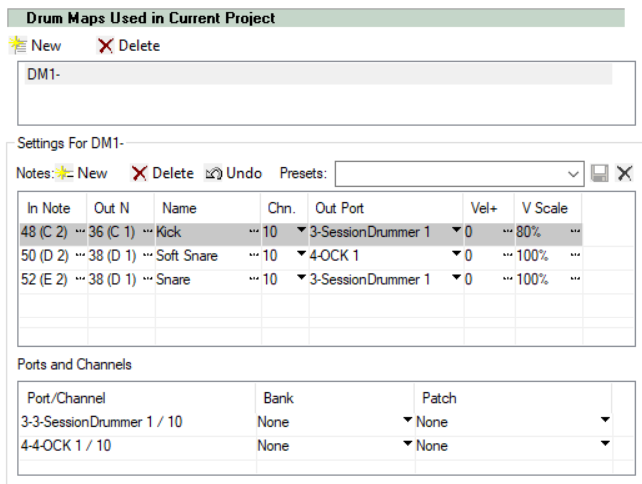
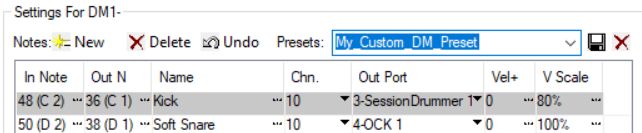
Now we bring up the Drum Map Manager. Clicking on the “New” button will create a map called “DM1-“, with no entries in it.
ASIDE: It would be nice to be able to give the map a more helpful name, wouldn’t it? Unfortunately, we can’t just simply assign one at this point. We’re stuck with “DM1-“. More on this later.
We start creating mappings for each MIDI note number by adding a new row to the map with the “New” button:
Fig 2. Creating a drum map from scratch
In this example, I want to build a virtual percussion instrument using sounds from both SessionDrummer and OCK. I’ve created three mappings, so that C2, D2, and E2 will trigger a kick and two snares respectively, with the “Soft Snare” coming from the OCK instead of SessionDrummer.
At this point the map exists as a definition in the project, and we can start using it.
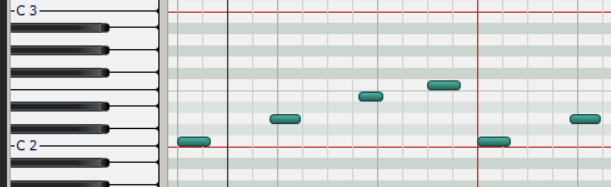
I’ve created a MIDI track (Track 3) containing a clip with note events for C2,D,E, and F2 and we can see them in the PRV:
Fig 3. Note events in the Note Pane: C2, D2, E2, etc…
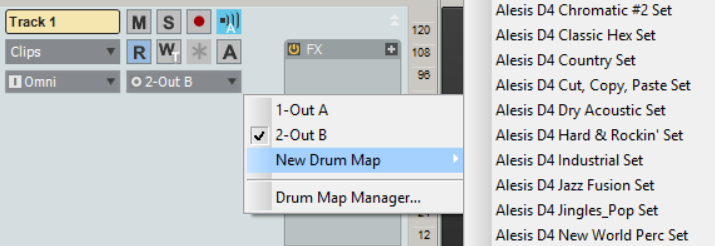
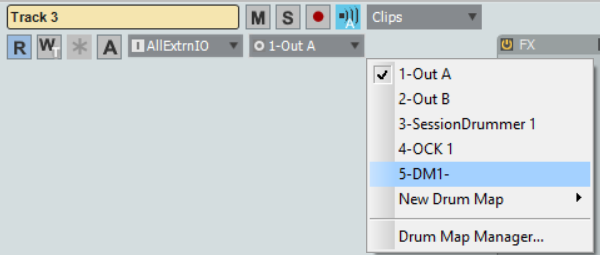
That’s with the Track 3 pointing at the default output port, which on my system is “1-Out A” – my USB MIDI interface (Midisport 2×2). Now let’s change this to be the new Drum Map, “DM1-“, which shows up in the list of available Out ports for the track, along with the two VSTi’s:
Fig 4. Assigning the track’s out port to the new Drum Map
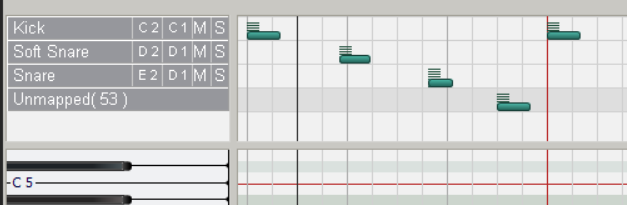
Now, having made that assignment, when we open or refresh the PRV, and select Track 3, we see the Drum Grid pane has become visible above the Note pane:
Fig 5. Mapped track shows in the Drum Grid
(Actually it was always there, just empty and minimized out of sight above the Note pane.)
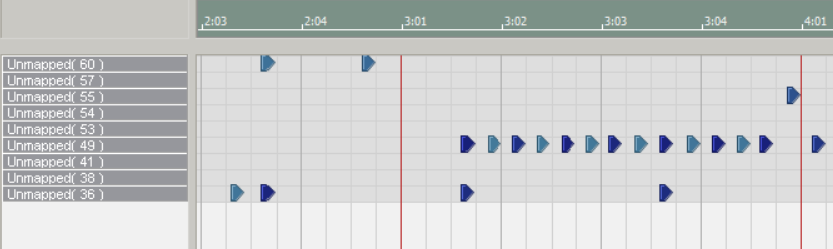
All the notes in Track 3 are now shown in the Drum Grid, and not the Note Pane. I deliberately included an un-mapped note (F2) so that we could see what would happen. Cakewalk includes the un-mapped notes at the bottom of the Grid Pane, clearly marked as “unmapped”. They won’t trigger any sounds because they haven’t been assigned to any Output. We are free to delete the notes; left them as inaudible visual cues; or add them to the map, as appropriate.
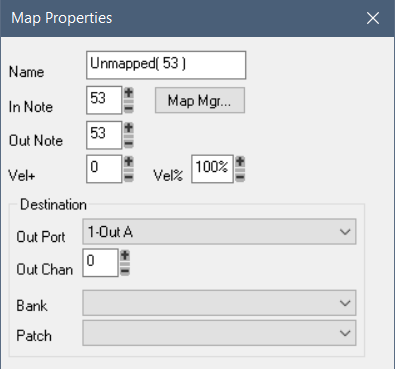
Double-clicking on the unmapped note row will bring up a property dialog that allows us to enter the necessary mapping information for that note:
Observations on PRV Editing with Drum Maps:
Notes in Tracks assigned to Drum Maps only display in the Drum Grid Pane.
Although multiple MIDI tracks can be edited at the same time in the PRV, Notes in Tracks using a Drum Map are only shown when the Track is the selected Track. (I’ve posted about this on the Cakewalk forum.)
Only one Track can be displayed in the Drum Grid Pane at any one time.
Correction: Only one Drum Map can be displayed in the Drum Grid Pane at any one time, but it will include note events from all Tracks assigned to that map.
Because of these side-effects, it can be frustrating working with multiple MIDI tracks where some are Mapped and other are not; or tracks directed to two or more drum maps.
Did someone mention presets?
Although setting up a drum map from scratch can be tedious, there are short-cuts.
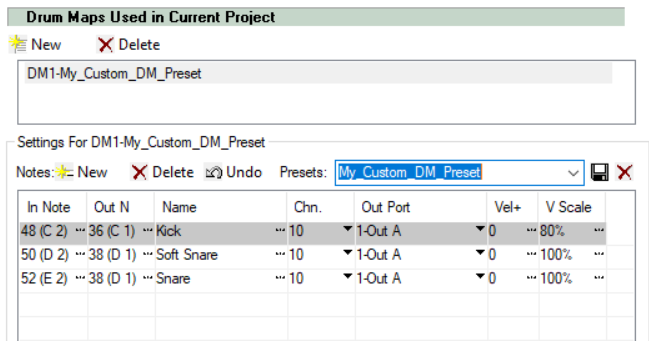
You can save an existing drum map in a project as a “preset” so that you can quickly restore it. Let’s do that now: open the Map Manager and type in a name for the preset, and then press the Save button:
Fig 6. Saving a map as a new preset
Two things happen:
the Drum Map in the project is renamed;
A .map preset file is created on disk.
The first thing is a bit of misdirection on Cakewalk’s part. There is no link between the drum map in the project and the preset file created on disk, yet now the drum map in the project has a name that is the same as the preset (in my case it is now “DM1-My_Custom_DM_Preset”).
If you later create a preset from a different drum map, with the same name, you will overwrite the existing preset file. However, the original drum map is not altered or changed in any way (nor would you want it to be!).
And it would seem that the only way to give the drum map in the project a meaningful name is to create a saved preset, with the desired name!
By default, these preset files (.map extension) are stored in the following directory, as per Edit > Preferences > File Locations:
%APPDATA%/Cakewalk/Cakewalk Core/Drum Maps
TIP: Out-of-the-box, Cakewalk provides a metric tonne of drum map presets available to use as a template when creating a new drum map. In order to retain your sanity, I recommend that you copy the specific files you actually use to a different directory, and change the folder location to match. Then you’ll see a much reduced list to choose from.
Okay, let’s create a new project and make use of this preset that we just created!
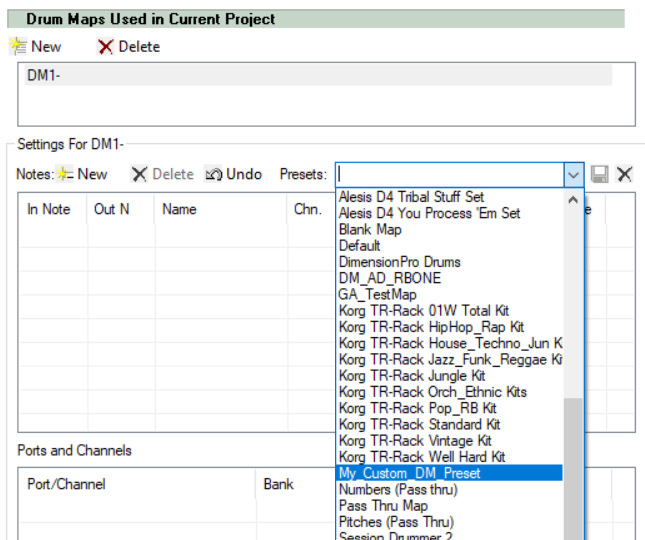
There’s two ways to do this. First, you can go into the Drum Map Manager, create a new empty drum map (“DM1-“), and then drop down the list of presets and select the entry:
Fig 7. Initializing a new drum map from a preset
Alternatively, use the Output selector on the Track (See Fig.4) and select “New Drum Map” and pick one from the list (which, according to my advice above, you have reduced to a manageable size, right?)
Having done this, you should notice something immediately:
Fig 8. The out ports aren’t set as we expect
The mappings have been initialized from the preset, but the Out ports are not set. They’ve reverted to the default. Why? It’s a new empty project! We don’t have any VSTs loaded yet; and in fact, we might even have a different default MIDI i/o hardware configuration (i.e. I could have removed the USB MIDI interface and switched to the MIDI I/O on my Focusrite 6i6). So it makes sense that the Out Ports are not included in the preset. Right? Wrong:
Or maybe there’s something else going on
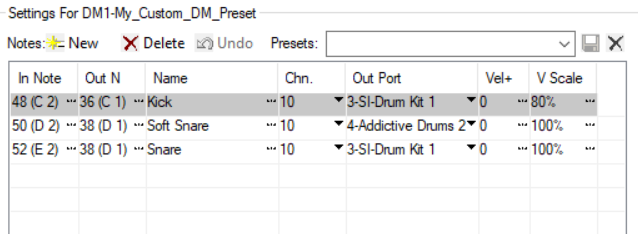
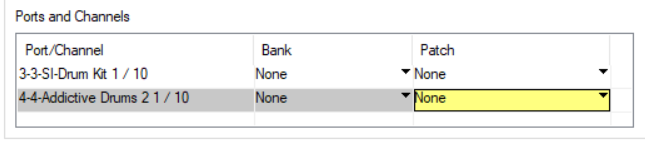
Let’s try something different: Once again, create a new empty project, and this time, add an instance of Cakewalk’s Studio Instruments “SI Drum Kit” and then an instance of Addictive Drums.
Now repeat the process: add a MIDI track; and assign the output to a New Drum Map, using the same preset we used above:
Fig 9. Ports are restored in enumerated order
Interesting! The Out Ports are being retained and retrieved from the preset, kinda, except they are assigned using an enumerated value (or index number), matching the order the VSTs were loaded into the project. (That’s the 3, 4.)
So now we have the Kick and Snare going to the SI Drum Kit, and the “soft snare” going to Addictive Drums. So clearly there’s some clean-up we’re going to need to do, in addition to loading the correct presets in each of the associated VSTs (or, indeed, external percussion synth modules if that is what you’re using).
Warning: This bears repeating: When you remove a VST from a project, its virtual MIDI IN port is also removed, and the index of any remaining VSTs in the project may be changed, depending on the order in which they were loaded in the project. Drum Maps assign their MIDI out port assignments by index rather than by name. This means that a drum map may end up with its out port assignments changing underneath it, after that VST is removed, even if the VST was unrelated to those used by the drum map.
How to quickly change the out port on all rows in a Drum Map:
Hold down Ctrl+Shift keys while changing one of the rows – you’ll see all rows assigned to the same Out Port change to the new value. Nice!
Exercise for the Student: Did you look further down the Drum Map Manager? Perhaps patches are also saved with the drum map preset, if we wanted them to? Might be worth exploring, if that is something you’re interested in:
Fig 10. Can a patch be restored with the preset? Experiment!
How to quickly create a Drum Map from an existing MIDI track
There is a handy way to create a new drum map for an existing track, such that it only contains mappings for the note events in the track:
Select the source track with MIDI note data in it
Assign the Output to New Drum Map > Blank Map
In the PRV/Grid pane, you’ll see:
Fig 11. An alternative way to create a drum map from scratch
You can now enter the mapping properties for each unmapped row.
A final tip
You may notice in Fig 5. above that each mapped row can be MUTE or SOLO independently. One interesting use case presents itself: Imagine a drum kit map, and now select a kit piece to use for a click track (say, “Sticks” or similar). Now map an additional MIDI note to trigger that sound. You can use this additional note as a click or reference beat, and then MUTE it when you don’t need it, leaving all the normal “performance” notes untouched.
Finally, for real
I hope that helps clear up some of the intricacies and subtleties about MIDI Maps – I mean, Drum Maps – in Cakewalk.
Consider an audio track, in which we want to change the volume of the audio for a short period of time during playback. Instead of moving the Track Fader manually with our mouse, we can set up an automation envelope on our track to do this for us.
Creating an automation envelope
Click on the Edit Filter menu and select Automation > Volume from the drop-down list:
Fig 1. Creating an automation envelope for Track Volume
Now we can add nodes to the envelope and arrange them so that the volume is adjusted the way we want. In this example, we’re going to lower the second half of the clip by 6 db:
Fig 2. Click-drag to select a region in the lower part of the clip, then drag down from above
You’ll notice that the Track Volume control changes to show an envelope symbol, indicating that the value is controlled by an envelope, and will change its value over the timeline:
Fig 3. The Track Volume envelope controls the value depending on timeline position
So far, so good. You may notice that if you try to change the Volume value during playback, it will snap back to the value dictated by the envelope. This is expected behavior.
Fig 4. Meter value shows -6 to -12 during playback, controlled by the envelope’s -6 db change.
The default volume of the track is -6 db (as shown by the meter) but as the envelope curve takes effect, it applies a change from 0 to -6 and the output is now -12 db.
By default, this is how Cakewalk displays Track parameters controlled by automation envelopes. This is “Envelope Mode”.
Introducing Offset Mode
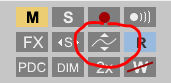
Alternatively, we can switch to “Offset Mode” by using the switch in the Control Bar Mix Module:
The Envelope/Offset mode switch
In Envelope Mode, volume and pan faders follow the project’s automation and do not respond to changes you make in real-time.
In Offset Mode, you “offset” the current automation in a track using a parameter’s controls.
Switching to Offset Mode changes the Volume control “envelope” symbol to a plus sign, but other than that, there is no change:
Fig 5. Playback in Offset Mode
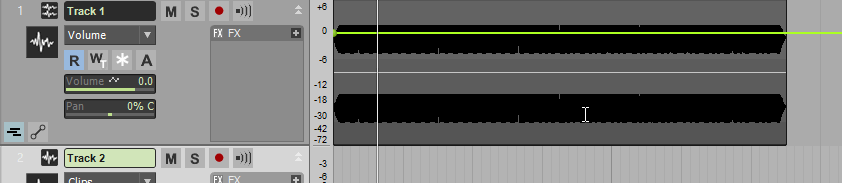
Now, say we want to adjust the overall level of the track, but retain the envelope shape. We can just make the change. For example, in Fig 6. we have looped playback over the clip, and I change the volume “offset” from 0 to -6, which lowers the envelope values by -6 over the whole timeline.
Fig 6. Lowering the overall volume by 6 db in Offset Mode (during a looped section)
After we apply the manual adjustment, you can see from the audio meter that the output volume at the start of the clip is now at -12db. During playback, the envelope then applies the -6 reduction and the output has been lowered and is now -18 db during that segment of the timeline.
Tip: Switch back to Envelope Mode to avoid accidental changes
Because it is less easy to make accidental adjustments in Envelope Mode, it is a good idea to switch back to it, and only use Offset Mode when we need it. Back in Envelope Mode, the track now looks like this during playback:
Fig 7. Back in Envelope mode, after making a -6db offset adjustment
Of course, using our ears and looking at the Track Meters, we can tell that the track audio is now playing back -6db quieter, which is what we intended.
Warning: Be aware of the invisible offset value
On the down-side, both the level of the envelope and the Volume control value are indicating that the level is being adjusted from 0 to -6db. But that isn’t strictly correct: there is an invisible additional offset of -6db, that we applied in Offset Mode, but now isn’t visually displayed (except in the audio meter).
So you should be aware of this possible source of confusion, and, when in doubt, you can temporarily switch from Envelope to Offset mode to check for any manually-applied offsets.
Bonus Tip: easy gradual envelope changes
A quick way to get a gradual change in the envelope instead of the instant change shown above, try this: Place two nodes by clicking on the envelope; then select a wider region and Ctrl-Click-Drag down from above:
Ctrl-Drag a selection around existing nodes for a gradual slope
Finally, you may wish to return the Track display to the view shown in Fig 1., in which case, just set the Edit Filter back to “Clips” (see Fig.1).
Although I’ve used Volume as an example in this post, everything I’ve said also applies to Pan and other values controlled by automation. Have fun with automating parameters with envelopes in Cakewalk By Bandlab.
How does your synth know what note to play, when you press a key? If it has a built-in keyboard, then the glib answer is, “whatever key I’m pressing!”. If your synth is a module in a rack, or your keyboard is responding to signals sent to it over the MIDI cable from your sequencer, it gets a little more interesting.
MIDI Note Numbers
MIDI signals are digital, so everything is represented by numbers. For example, if I want an instrument to play a sound, I need to send it a specific type of message: a “Note On” message. In addition to a number identifying the message as a “Note On”, it will include two additional numbers representing:
which note to play
how strongly the note was played (known as note “velocity“)
Because the numbers are 7-bit digital, there are 128 possible values. For example, the note number will be between 0 and 127, representing the lowest and highest possible notes respectively. The velocity will also be between 0 and 127, where 0 is the lightest possible touch, and 127 represents the most force you could use.
Your synthesizer uses these numbers to decide how to respond: which note (pitch) to play, and how to set the volume or tone for the requested velocity. For your typical instrument using a standard Western 12-tone scale, note number 60 will result in a tone of 261.63 Hz, or “Middle C”. The synth module will continue to play that note until it receives a follow-up “Note Off” message for the same note number.
A message here, a message there, and pretty soon you’re playing yourself a tune. MIDI messages get complicated quickly, and there are better places to go if you are curious about the details.
Introducing Note Names
Secure in the knowledge that our instruments – both physical and virtual – will respond with middle C if we sent them a MIDI Note Number 60, we can move on to note names.
If you’re used to conventional Western musical notation, it makes sense to refer to notes using the alphabet notation of the scale, .e.g. C, D, E, F, G, etc, instead of those confusing and non-obvious numbers. With ten and a half octaves covered by our 128 possible note numbers, back in 1982 Roland documentation writers chose “C4” to represent Note 60, middle C, and to enumerate octaves from C to B (.e.g. ascending notes would be A4, B4, C5, D5, etc.)
And everything was cool… until Yamaha used “C3” to represent note 60 in their own MIDI documentation.
Since then, instrument and music software manufacturers tended to pick one of the two conventions and ignore any subsequent confusion on the part of the users.
For example, XLN’s Addictive Drums follows Yamaha’s convention, and in their documentation and note maps, they use “C3” to refer to note 60.
Voxengo SPAN, however, displays ~262 Hz as “C4”, following the Roland standard.
Three notes walk into a bar
Just to be different, Cakewalk eschews both conventions, and shows note number 60 (middle C) as “C5” in their Piano Roll View.
“There is no industry standard for numbering octaves. By default, Cakewalk calls MIDI note 0 (the lowest possible note) C0.
Cakewalk Documentation
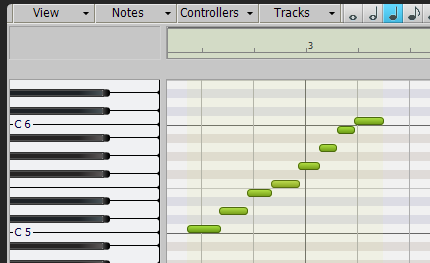
Here’s a scale from note 60 to 72:
Personally I think I know the reason for this: One side effect of middle C as C5 is that the lowest possible MIDI note 0 is then “C0”. Cakewalk started life as a character-based DOS sequencer, and if they’d used “C4” or “C3” for note 60, they’d have needed additional real-estate space for notating the lower octaves, e.g. “C-2”.
I don’t know for sure that this was the reasoning behind it, but it seems possible. Those were the days! I personally never used the DOS version of Cakewalk, but I used to develop character-mode applications in MS-DOS, and I feel their pain.
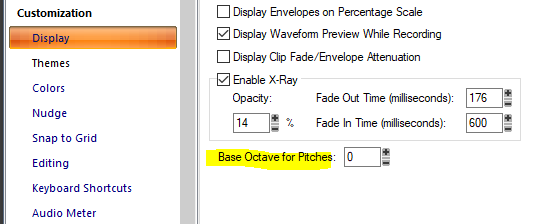
Fortunately, we’re not limited to Cakewalk’s default notation:
In the Preferences dialog, we can control the “base octave for pitches” offset to our needs.
The Yamaha FB-01, for example, shows MIDI note 0 as C-2 (C negative 2). To match Cakewalk to that standard, set Base Octave to –2.”
Cakewalk Documentation
Because I’m an avid user of XLN’s Addictive Drums virtual drum instrument, I set my Base Octave for Pitches” to -2.
And all was good, until the other day I was developing some SFZ patch definitions and I noticed that the samples were being played back 12 notes below where I was defining them:
That worked as expected, responding when I pressed “Middle C” on my keyboard (i.e. sending MIDI Note 60 to the SFZ Player instance in my Cakewalk project.).
Bottom line: I could use the note numbers in my SFZ file definitions, but if I feel the need to use Note Names, I should remember that SFZ Player uses the Roland standard of C4=60.
Since then, Cakewalk’s SONAR has been reborn as Cakewalk By Bandlab and includes many updates and new features, including “Ripple Editing”. This makes timeline editing much more convenient, and therefore I think it is time to revisit this case study.
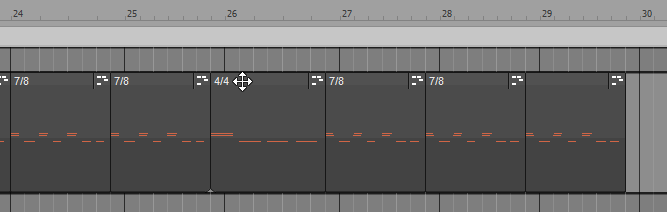
So I have this project that contains a mixture of 7/8 and 4/4 bars. For example, in this section I have a series of 7/8 bars followed by a 4/4 at bar 26.
Whilst practicing the keyboard solo, I realized that one of those 7/8 bars needed to be 4/4 also. However, if I change bar 24 from 7/8 to 4/4 by inserting a meter change at bar 24, this happens:
All the measures following bar 24 are no longer aligned on the beat. In fact, the meter of all bars following 24 have changed from 7/8 to 4/4, until bar 26 and 27 which have explicit meter declarations of 4/4 and 7/8 respectively, in the timeline.
This suggests that we also need an explicit declaration of 7/8 meter on bar 25 so that only bar 24 is affected by our initial meter change:
Of course we still have our clips offset from the underlying measures… The easiest way of correcting this is to enable “Ripple Editing” for all tracks and slide the clips into alignment.
First, to enable Ripple Editing we use the control in the top right of the track view to toggle it from “Off” to “All”:
Then we can simply drag the clip at bar 25 into alignment:
The Ripple Edit setting automatically includes all other clips in the timeline (on ALL tracks) along with the one we’re relocating. Handy! The Snap To Grid feature is very helpful to ensure that the clips move exactly 1/8 note to align to the start of the measure.
Before we do anything else, however, we should restore the Ripple Editing setting from “All” to “Off”, because if you forget that it is enabled while moving clips around, you can very easily mess up your project.
These kinds of edits are much easier with Ripple Editing! Thanks to the Cakewalk Developers for implementing it.
I’m writing this post mostly to remind myself how it’s done.
Overview: I’ve got a nice setup in Guitar Rig, including a virtual volume pedal, and I really want to be able to control it using a MIDI controller foot pedal.
Step 1 – Add an audio track for our guitar, to capture the guitar performance. You’ll also want to select the appropriate input channel on your audio interface.
Step 2 – Put an instance of Guitar Rig in the FX bin, and select our super-awesome patch:
Step 3 – Using the VST2 drop-down menu in the plugin header, select “Enable MIDI Input”:
Step 4 – Add a MIDI track to capture the MIDI controller data.
Step 5 – Assign the appropriate input channel for the MIDI track.
In my case, MIDI control data will be generated from my Roland A-80 controller keyboard with various pedals connected to it, connected to the Midisport 2×2 In A, so I assign the input channel thusly:
Step 6 – Assign the output channel of the MIDI track to the Guitar Rig Plugin. This is possible because we enabled MIDI input in Step 3 above – we get an option to select the plugin as the destination for the MIDI data in the output channel list:
Step 7 – Define a controller inside the Guitar Rig plugin
Go to the Options > Controller tab in Guitar Rig, and click on “Add Controller”.
At this point, a “New Control” module appears in the Controller list in Guitar Rig.
Step 8 – Click the “Learn” button and wiggle the controller’s foot pedal:
Notes:
Obviously the controller must be turned on!
Assuming the foot pedal has been assigned to CC#4 (which is typical), you should see the controller number appear against the control definition in Guitar Rig.
For diagnostic purposes, it helps to have the meters in Cakewalk displaying incoming MIDI messages.
Step 9 – Assign the controller to the Volume Pedal
In the controller list, click on the Menu button and select Volume Pedal > Pedal
At this point, moving the expression pedal should be reflected in Guitar Rig’s UI as moving the volume pedal level:
If we now arm both tracks for recording, we can record the guitar audio and the MIDI controller data at the same time, capturing the performance.
Melodic progressive rock songs and instrumental interludes, a touch of 70’s influence but a product of the dystopian Now.
“Very smooth, hi-tech sounding delivery…” – Chris Jemmett, alt.music.yes
“This guy is awesome.” – Dazed, on the Carvin Forum.
“..on a rare occasion you just have to conclude that the prog world should be feasting upon the birth of a new and promising act. That’s exactly the case with this [first] album.”
– Theo Verstrael, DPRP.net
“I find this new album attractive, [..] slightly less appealing than the 2014 debut. But as that is often the case with great artists, let it not distract you from trying this fine album. Especially those that are interested in bands that play varied, cleverly made, well played and sung [..], this might just be your cup of tea.”
– Theo Verstrael, DPRP.net


Recent Comments